前端工程化
EditorConfig
EditorConfig是编辑器级别的,通过在项目中添加配置文件.editorconfig,EditrConfig插件读取配置文件,并根据配置文件来设置编辑的设置
root = true #表示是最顶层的配置文件,设为 true 时,停止向上查找

[*]
charset = utf-8 # 编码字符集
indent_style = space #设置缩进为 tab 或 space 。如果为tab,输入tab变现为为indent_size个空格,实际上是添加制表符;如果为space,会把tab替换为indent_size个空格
indent_size = 2 #设置缩进所占列数
end_of_line = lf #设置换行符,值为lf、cr和crlf
insert_final_newline = true #设为 true 表示使文件以一个空白行结尾
trim_trailing_whitespace = true #设为 true 表示会去除行尾的空白字符

[*.md]
insert_final_newline = false
trim_trailing_whitespace = false注意:
vscode需要安装插件,才会应用配置文件的规则

ESlint
通过使用ESlint对代码质量进行检查(ESLint也有部分配置,是针对于代码风格的)
整体认识
ESLint包
代码质量检查的工具,需要通过npm下载到项目中,通过命令触发代码检查、修复
ESLint插件
依赖于ESlint包(先在项目中安装ESlint包)才能实现其功能。
Eslint包才具有对代码进行检查的功能,而Eslint插件仅仅是和编译器结合起来,将检查出来的问题在编辑器中做出提示(见下图)等等功能。

我们能够通过编译器对ESlint插件进行设置,调整触发ESLint检查的时机(可以设置保存自动触发)
ESLint配置文件
推荐为下面格式
text
eslint.config.ts eslint.config.js
### 前世今生

ESLint之前有JSLint和JSHint,之所以ESLint能大火是因为 ES6 的出现。ES6 发布后,因为新增了很多语法,JSHint 短期内无法提供支持,而从上面的原理分析,我们就能知道 ESLint 只需要有合适的解析器就能够进行 lint 检查。当时 babel 为 ESLint 提供了支持,开发了 babel-eslint,让ESLint 成为最快支持 ES6 语法的 lint 工具

### 细节学习

* ESLint包npm install -d eslint
安装依赖之后,命令行调用下面的命令即可对指定的文件、目录、匹配项进行ESLint检查和修复
与Prettier一样,通常我们不会选择手动调用,而是集成到 Git Hooks 中,使其成为自动化流程中的一部分。
```shell
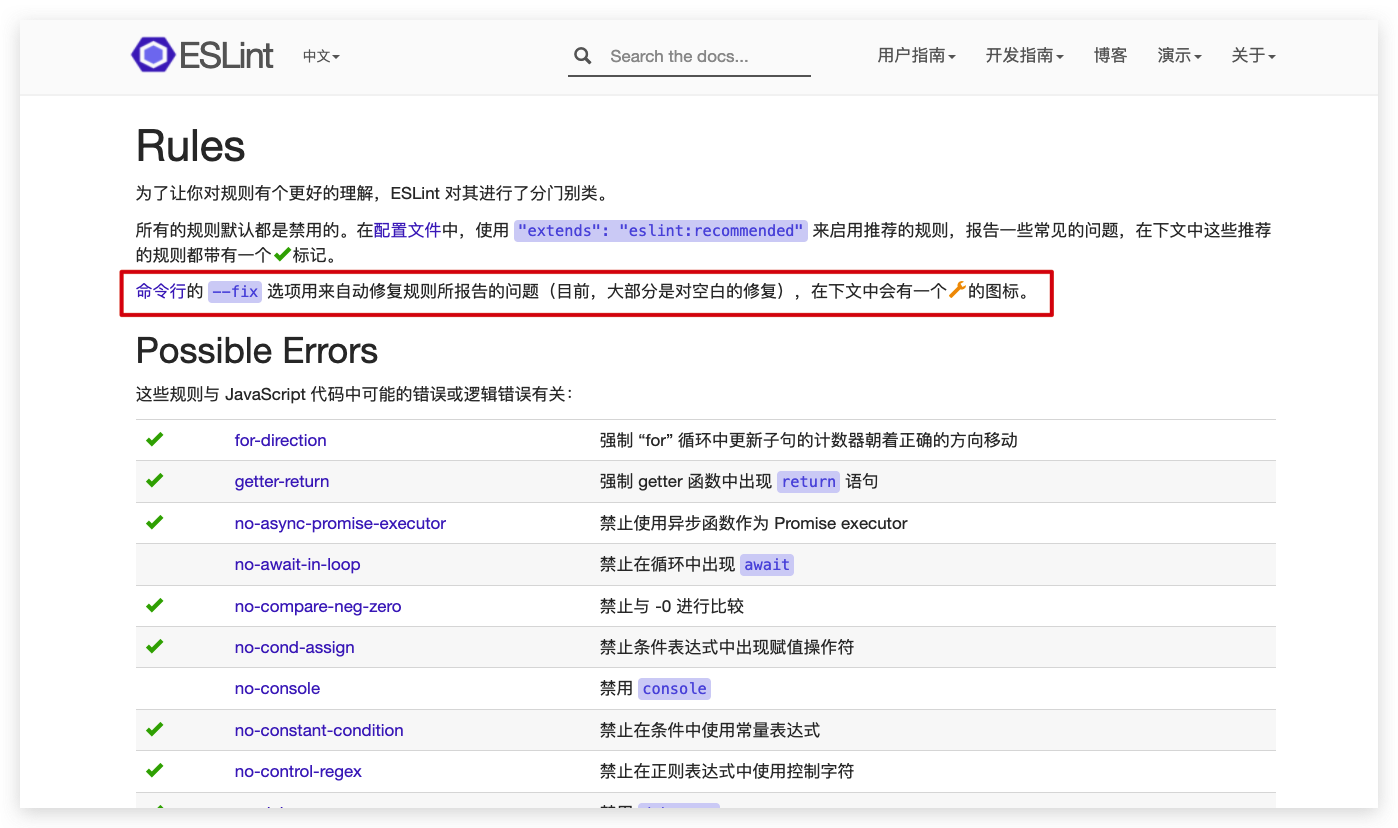
# --fix修复
eslint --fix注意:并非所有的ESLint规则,都可以使用--fix修复,请查阅ESLint规则大全
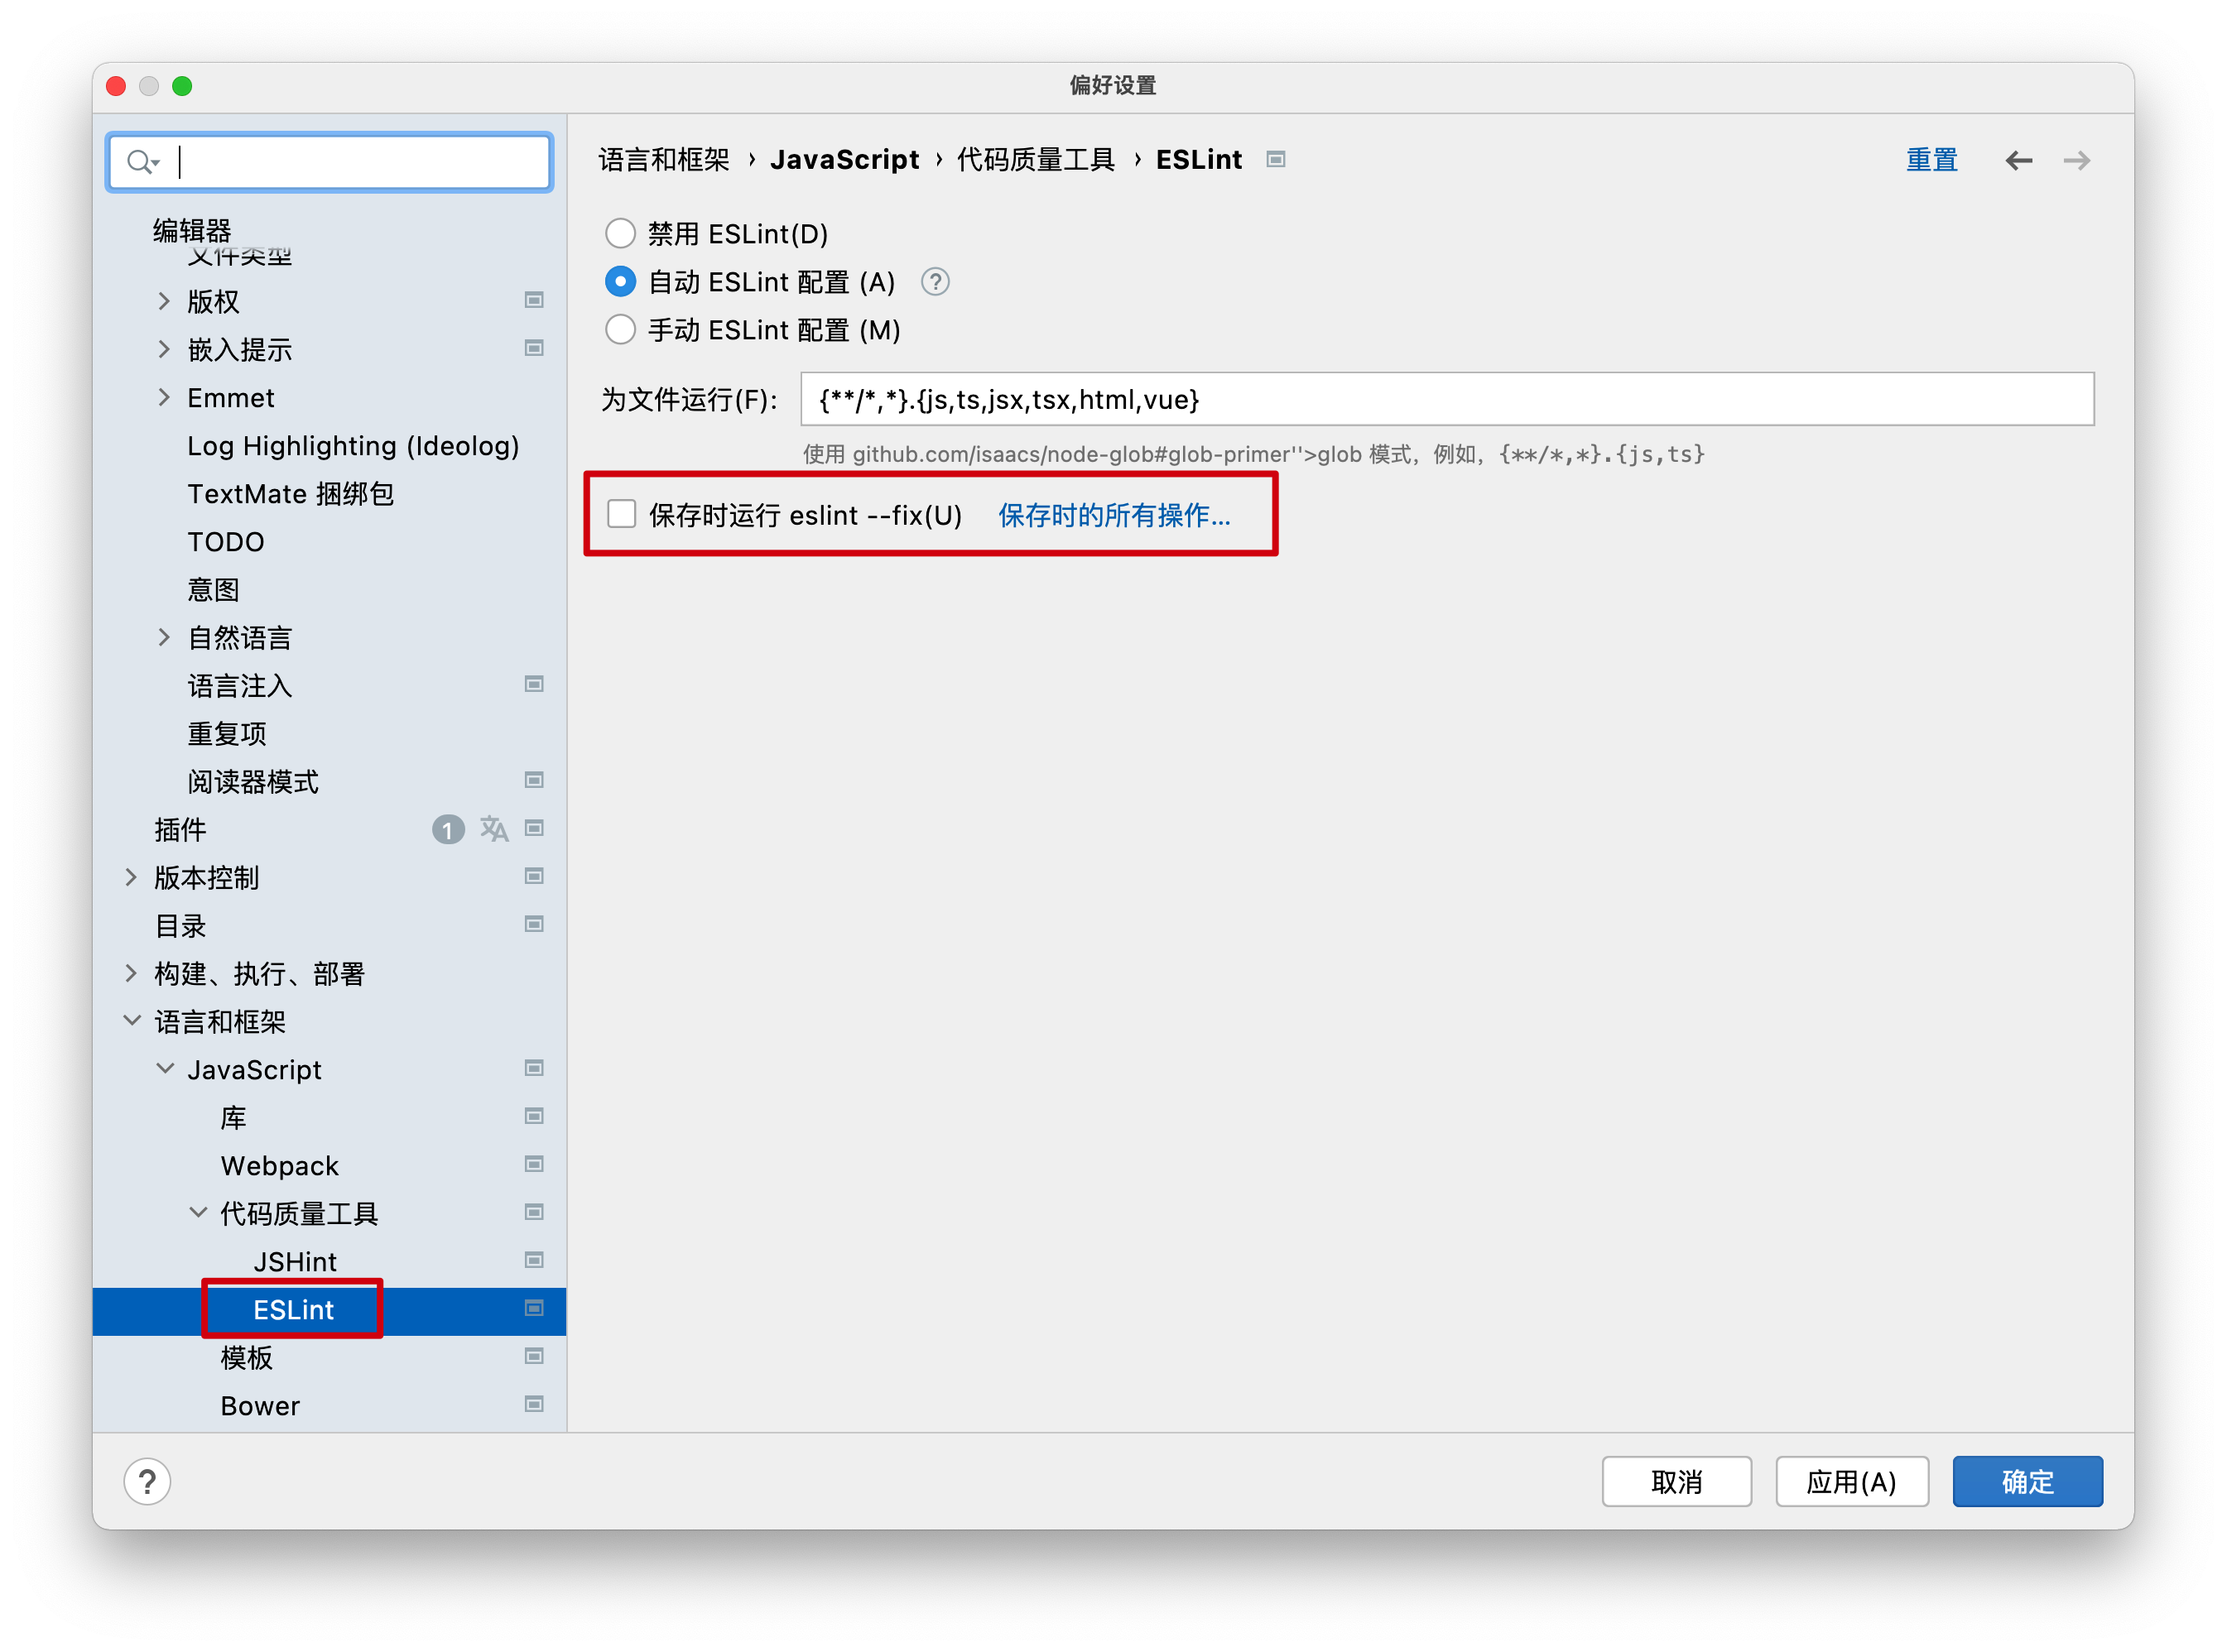
ESLint插件
WebStrom中内置了ESLint插件不必自动安装,但是必须要先安装ESLint包,才能起作用
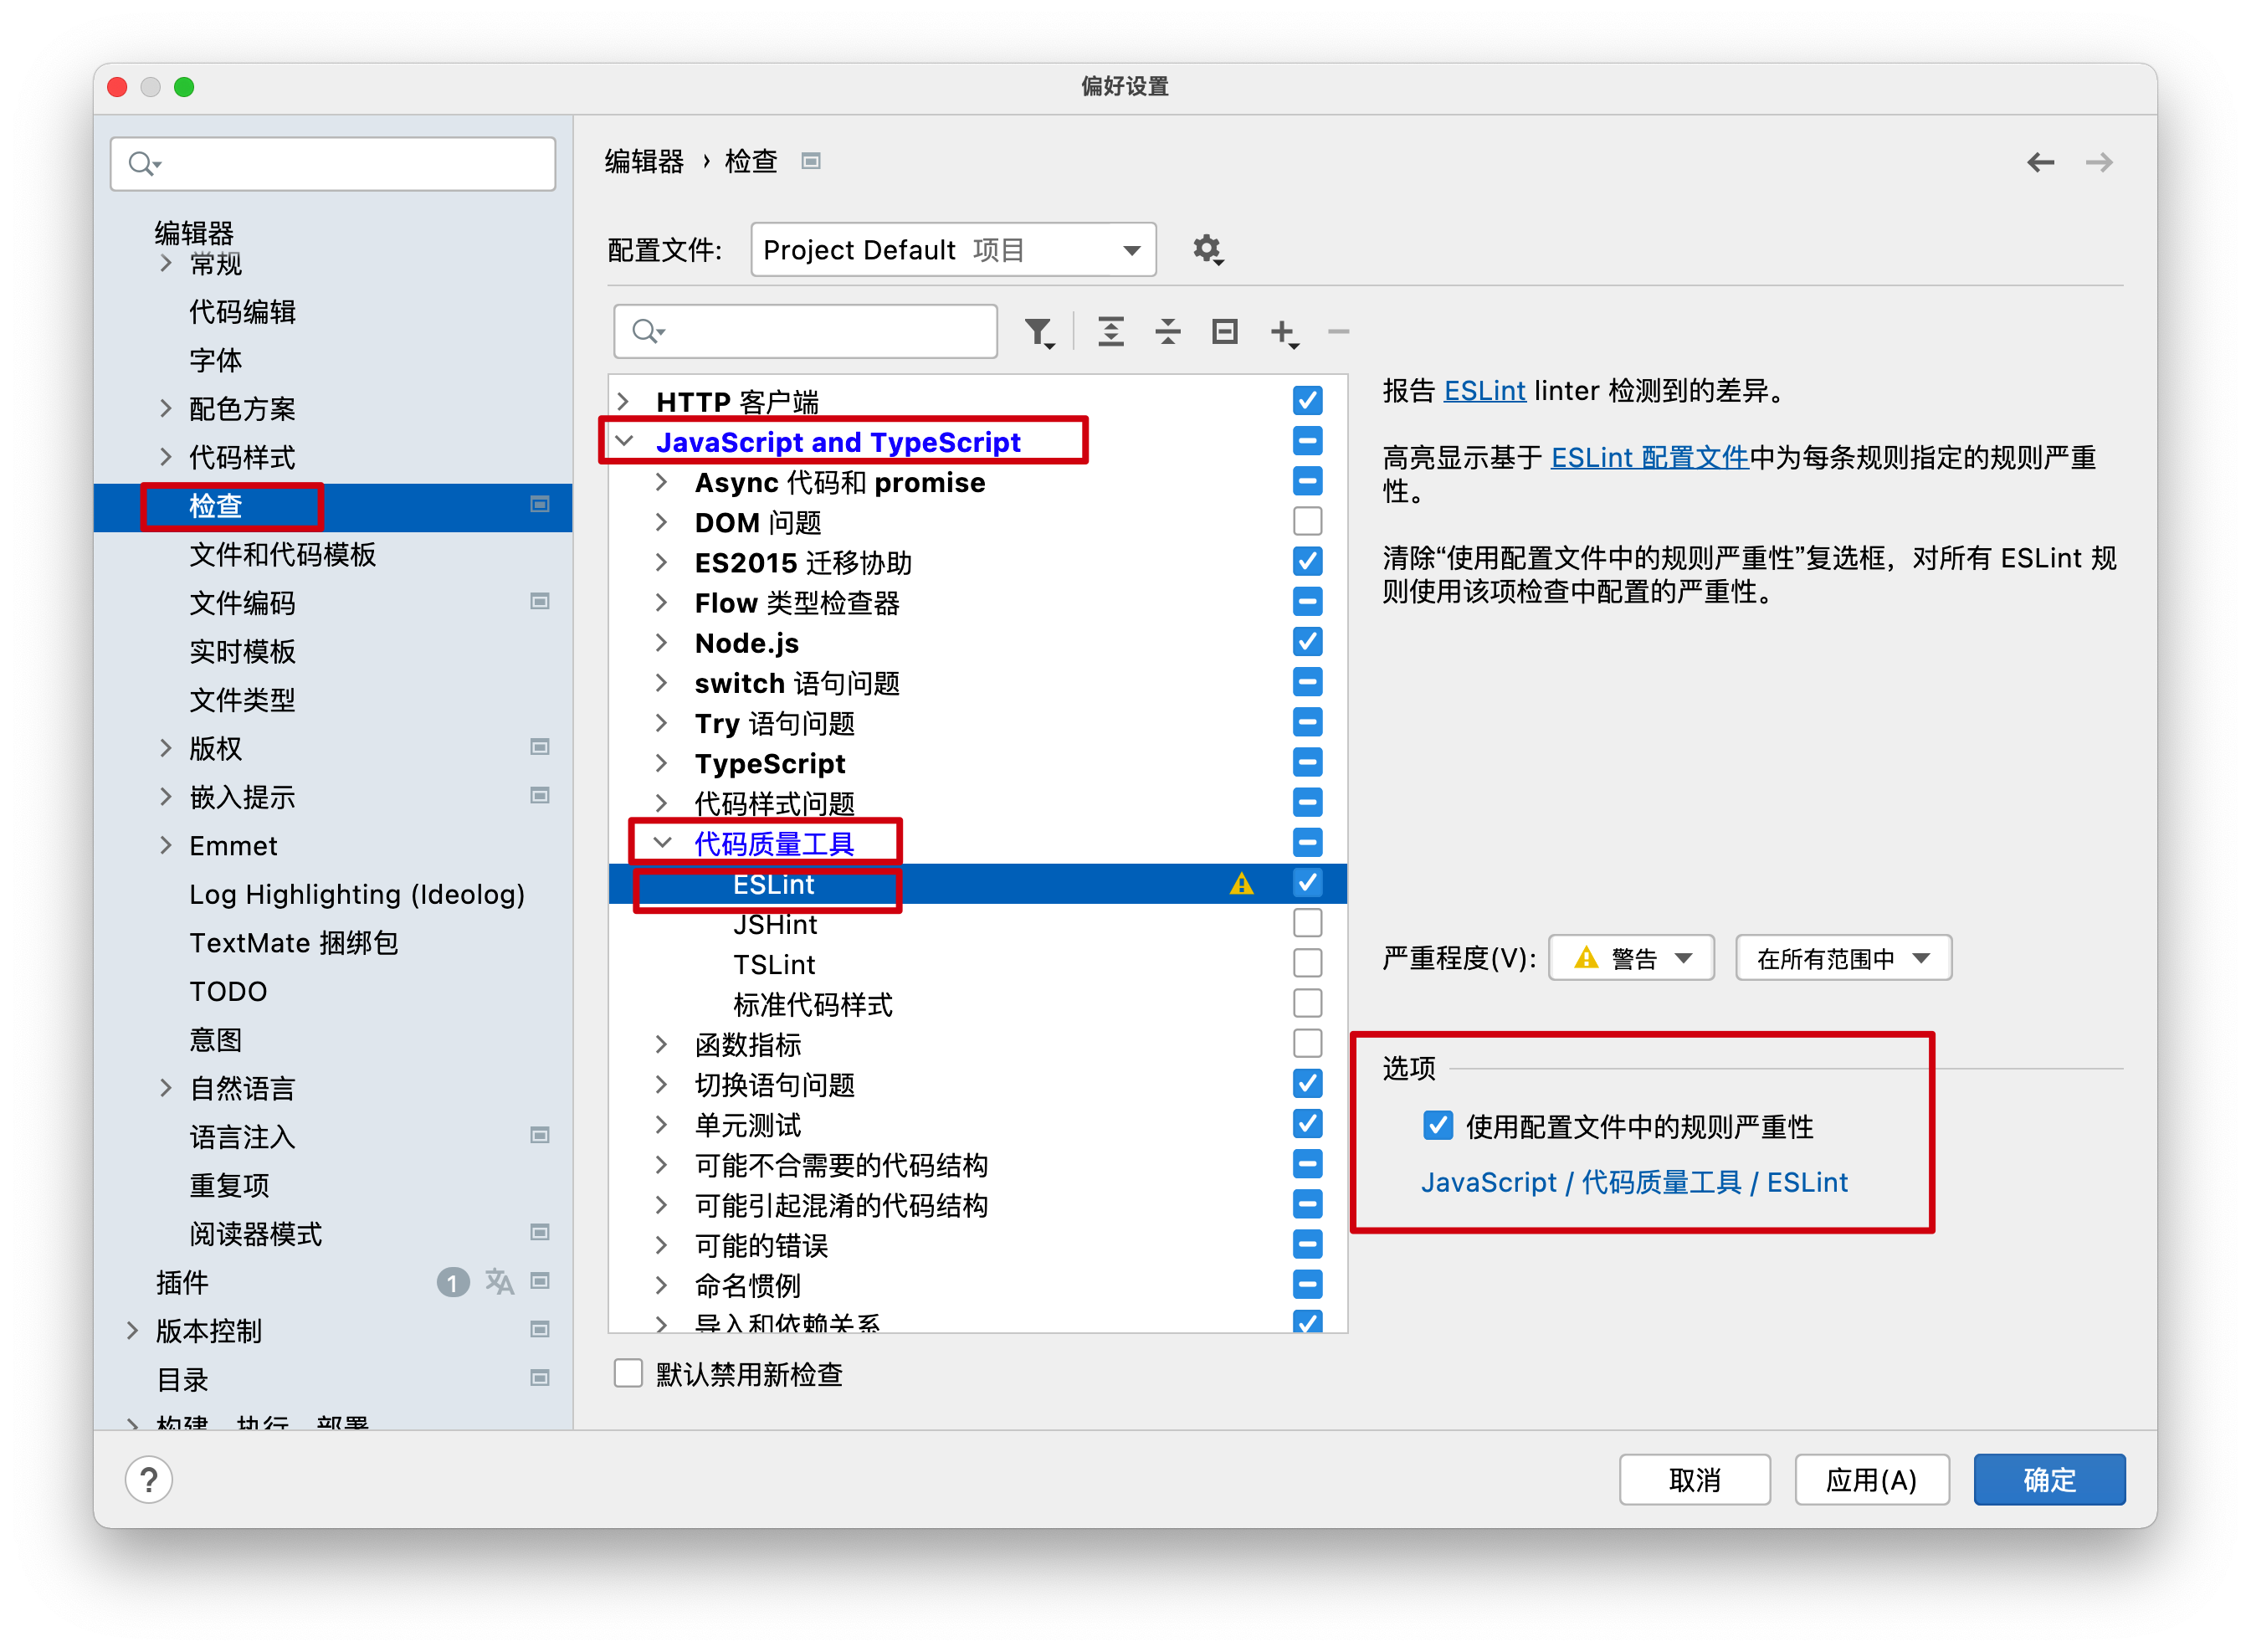
另一个重要的设置,这里可以设置WebStrom按照ESLint配置文件进行检查(默认也是这样),如果违反ESLint规则就是在代码中,用波浪线标识出来
ESLint 的底层要素是 语法树(AST) 和 规则(Rules)。ESLint 的内部工作步骤可以概括为:
ESLint 通过解析器(parser,ESLint默认使用的解析器是espress)将源代码解析成语法树(AST)
深度遍历 AST,遍历到节点和路径时触发特定的钩子
Rule 在钩子上挂载检测逻辑;执行检测逻辑时发现当前语法不符合规范,直接向 ESLint 上报错误信息。
自定义ESLint配置
重点是 plugin 引入插件,files指定文件类型,然后 rules 是罗列该插件的规则
// --------------
// 1、eslint9.x  extends选项已废弃

// 2、
// languageOptions: {  // 这个选项下的配置和具体的解析器相关。
//     parser: parserVue,  // 同级都是vue 解析器配置
//     sourceType: 'module',
//     parserOptions: {
//        ecmaFeatures: {
//           jsx: true
//        },
//        extraFileExtensions: ['.vue'],
//        parser:parserTS // 同级都是ts解析器的配置
//     }
// },

// 3、插件对象 key ,就是规则的前缀,这个 key 不一定是插件包名,可以是任意的。关闭规则: eslint-disable-next-line ts/no-unused-vars
//    但是发现 @eslint/js 官方提供的插件,规则就是 no-debugger 这种没有前缀

// 4、(插件x、插件x内的规则)需要在一个配置对象内,不能跨对象
// plugins: {
//     ts: pluginTS,
//     vue: pluginVue,
//
// },
// rules: {
//   'ts/no-unused-vars':['warn', {argsIgnorePattern: '^_'}],
//   'vue/component-name-in-template-casing': ['error', 'PascalCase'],
// }

// --------------
import type { Linter } from 'eslint'

// eslint 自带的 js 规则 https://www.npmjs.com/package/@eslint/js
import js from '@eslint/js'

// eslint 风格化相关的规则收集到里面
import stylisticPlugin from '@stylistic/eslint-plugin'

// @typescript-eslint/eslint-plugin
// ts插件。经过调试发现这个插件导出configs['flat/recommended']也是个数组,没法直接取出来 rules
import pluginTS from '@typescript-eslint/eslint-plugin'

// @typescript-eslint/parser ts解析器(直接解析 ts、与vue-eslint-parser嵌套使用解析vue 中的ts)
// 1、配置项 https://typescript-eslint.io/packages/parser/#configuration
import parserTS from '@typescript-eslint/parser'

// 鼠标右键调试看下引入的插件的结构。 plugin.configs 如果只有rules直接放到 rules 字段,如果还有其他直接展开

import unocssConfig from '@unocss/eslint-config/flat'

// eslint-plugin-vue 文档:https://eslint.vuejs.org/
// 1、提供 vue-<template>的一些规则
import pluginVue from 'eslint-plugin-vue'
// globals全局变量配置
import globals from 'globals'

// export default resConfig;

// import { Better } from '@baidu/better-core'
// import { Linter } from '@baidu/better-plugin-linter'
//
// const better = new Better().register(
//   new Linter({
//     vue: true,
//     typescript: true,
//     unocss: true,
//     stylistic: true,
//     include: ['test-file/**/*'],
//   }),
// )
// const config = await better.apply('linter')
//
// export default config

// vue-eslint-parser 文档:https://www.npmjs.com/package/vue-eslint-parser
// 1、解析 vue 文件的 <template> 标签
// 2、默认跳过 <script>标签,可以指定 languageOptions.parser 为 ts 解析器(@typescript-eslint/parser提供)
import parserVue from 'vue-eslint-parser'

const indent = 2
const stylistic = true

const tsRules = (pluginTS.configs['flat/strict'] as Linter.Config[]).reduce((pre, cur) => {
  if (cur.rules) {
    for (const key in cur.rules) {
      const replacedKey = key.replace('@typescript-eslint/', 'ts/')
      pre[replacedKey] = cur.rules[key]
    }
  }

  return pre
}, {} as Record<string, any>)

function renameRule(options: {
  rules: Record<string, any>[]
  origin: string
  target: string
}) {
  const { rules, origin, target } = options
  return rules.reduce((resultRules, rule) => {
    for (const key in rule) {
      const replacedKey = key.replace(origin, target)
      resultRules[replacedKey] = rule[key]
    }
    return resultRules
  }, {} as Record<string, any>)
}

function composeRulesFromConfigs(configs: Linter.Config[]) {
  return configs.reduce((pre, cur) => {
    if (cur.rules) {
      for (const key in cur.rules) {
        const replacedKey = key.replace('@typescript-eslint/', 'ts/')
        pre[replacedKey] = cur.rules[key]
      }
    }

    return pre
  }, {} as Record<string, any>)
}

const vueconfig = {
  name: 'my/vue',
  files: ['src/**/*.vue'],
  plugins: {
    vue: pluginVue,
    ts: pluginTS,
  },
  languageOptions: {
    parser: parserVue,
    sourceType: 'module',
    parserOptions: {
      ecmaFeatures: {
        jsx: true,
      },
      extraFileExtensions: ['.vue'],
      parser: parserTS,
      sourceType: 'module',
    },
  },
  processor: pluginVue.processors['.vue'],
  rules: {
    ...composeRulesFromConfigs(pluginVue.configs['flat/recommended']),
    'no-debugger': 'error',
    'vue/block-order': [
      'error',
      {
        order: ['template', 'script', 'style'],
      },
    ],
    'vue/component-name-in-template-casing': ['error', 'PascalCase'],
    'vue/component-options-name-casing': ['error', 'PascalCase'],
    'vue/custom-event-name-casing': ['error', 'camelCase'],
    'vue/define-macros-order': [
      'error',
      {
        order: ['defineOptions', 'defineProps', 'defineEmits', 'defineSlots'],
      },
    ],
    'vue/dot-location': ['error', 'property'],
    'vue/dot-notation': ['error', { allowKeywords: true }],
    'vue/eqeqeq': ['error', 'smart'],
    'vue/html-indent': ['error', indent],
    'vue/html-quotes': ['error', 'double'],
    'vue/max-attributes-per-line': 'off',
    'vue/multi-word-component-names': 'off',
    'vue/no-dupe-keys': 'off',
    'vue/no-empty-pattern': 'error',
    'vue/no-irregular-whitespace': 'error',
    'vue/no-loss-of-precision': 'error',
    'vue/no-restricted-syntax': [
      'error',
      'DebuggerStatement',
      'LabeledStatement',
      'WithStatement',
    ],
    'vue/no-restricted-v-bind': ['error', '/^v-/'],
    'vue/no-setup-props-reactivity-loss': 'off',
    'vue/no-sparse-arrays': 'error',
    'vue/no-unused-refs': 'error',
    'vue/no-useless-v-bind': 'error',
    'vue/no-v-html': 'off',
    'vue/object-shorthand': [
      'error',
      'always',
      {
        avoidQuotes: true,
        ignoreConstructors: false,
      },
    ],
    'vue/prefer-separate-static-class': 'error',
    'vue/prefer-template': 'error',
    'vue/prop-name-casing': ['error', 'camelCase'],
    'vue/require-default-prop': 'off',
    'vue/require-prop-types': 'off',
    'vue/space-infix-ops': 'error',
    'vue/space-unary-ops': ['error', { nonwords: false, words: true }],

    ...(stylistic
      ? {
          'vue/array-bracket-spacing': ['error', 'never'],
          'vue/arrow-spacing': ['error', { after: true, before: true }],
          'vue/block-spacing': ['error', 'always'],
          'vue/block-tag-newline': [
            'error',
            {
              multiline: 'always',
              singleline: 'always',
            },
          ],
          'vue/brace-style': [
            'error',
            'stroustrup',
            { allowSingleLine: true },
          ],
          'vue/comma-dangle': ['error', 'always-multiline'],
          'vue/comma-spacing': ['error', { after: true, before: false }],
          'vue/comma-style': ['error', 'last'],
          'vue/html-comment-content-spacing': [
            'error',
            'always',
            {
              exceptions: ['-'],
            },
          ],
          'vue/key-spacing': [
            'error',
            { afterColon: true, beforeColon: false },
          ],
          'vue/keyword-spacing': ['error', { after: true, before: true }],
          'vue/object-curly-newline': 'off',
          'vue/object-curly-spacing': ['error', 'always'],
          'vue/object-property-newline': [
            'error',
            { allowMultiplePropertiesPerLine: true },
          ],
          'vue/operator-linebreak': ['error', 'before'],
          'vue/padding-line-between-blocks': ['error', 'always'],
          'vue/quote-props': ['error', 'consistent-as-needed'],
          'vue/space-in-parens': ['error', 'never'],
          'vue/template-curly-spacing': 'error',
        }
      : {}),
  },
}

const stylisticRules = renameRule({

  rules: [stylisticPlugin.configs.recommended.rules!],
  origin: '@stylistic/',
  target: 'stylistic/',
})

export default [

  {
    name: 'my/global',
    languageOptions: {
      ecmaVersion: 2022,
      globals: {
        ...globals.browser,
        ...globals.es2021,
        ...globals.node,
        document: 'readonly',
        navigator: 'readonly',
        window: 'readonly',
      },
      parserOptions: {
        ecmaFeatures: {
          jsx: true,
        },
        ecmaVersion: 2022,
        sourceType: 'module',
      },
      sourceType: 'module',
    },
    linterOptions: {
      reportUnusedDisableDirectives: true,
    },

  },
  {
    name: 'my/ts',
    files: ['**/*.?([cm])tsx', '**/*.ts', '**/*.vue'],
    plugins: {
      ts: pluginTS,
    },
    languageOptions: {
      parser: parserTS,
      sourceType: 'module',
    },
    rules: {
      'no-debugger': 'error',
      ...composeRulesFromConfigs(pluginTS.configs['flat/strict'] as Linter.Config[]),
    },
  },
  {
    name: 'my/js',
    files: ['**/*.?([cm])jsx', 'src/**/*.js'],
    plugins: {
      js,
    },
    rules: {
      ...js.configs.recommended.rules,
    },
  },
  {
    name: 'my/unocss',
    ...unocssConfig,
  },
  // ...(pluginTS.configs['flat/recommended'] as Linter.Config[]),
  vueconfig,
  // ...pluginVue.configs['flat/recommended'],
  {
    name: 'my/stylistic',
    // ...stylisticPlugin.configs.recommended,
    plugins: {
      stylistic: stylisticPlugin,
    },
    rules: {
      ...stylisticRules,
      'stylistic/semi': ['error', 'always'],
      'stylistic/indent': ['error', 4],
    },
  },

]工作流自动化集成
Git Hooks
Git预先定义了一些事件钩子,如commit-msg、pre-commit等,当我们执行对应的Git操作时会触发它们,然后项目根目录下的.git/hooks 目录中对应的脚本就会执行,如图所示:
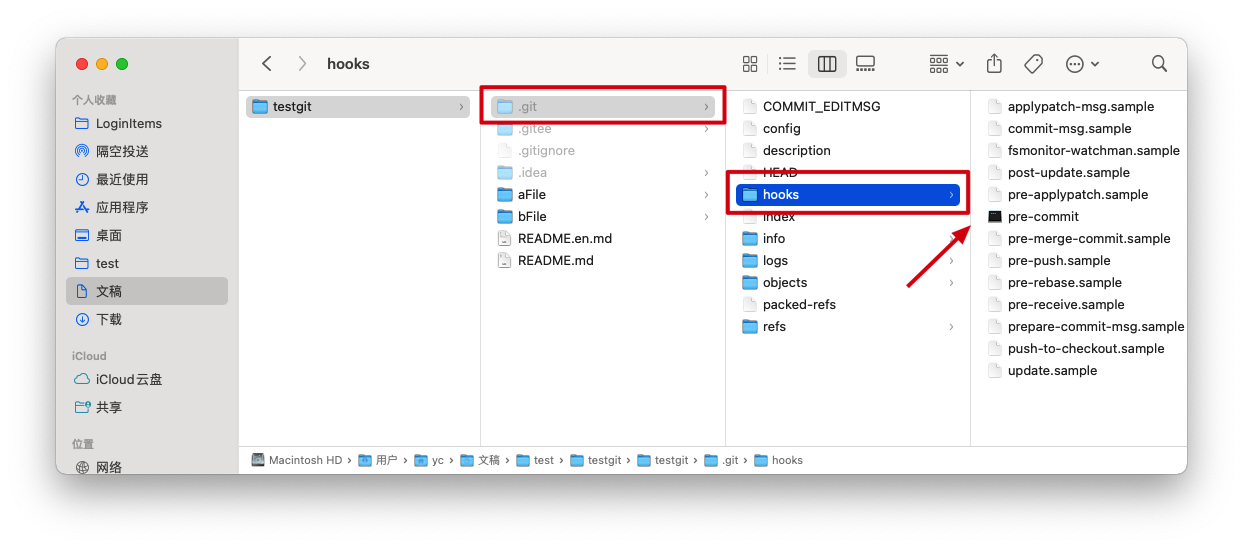
默认情况下,这里shell脚本都是.sample结尾的,所以我们执行对应的Git操作时,并不会触发对应的脚本执行。我们可以将.sample结尾去掉,就会触发执行,其中的shell脚本了。同时,我们可以编写shell脚本,就能让Git触发勾子事件时,按照我们要求去执行任务了
但前端工程师大多对linux/windows shell并不擅长, 因此我们通过编写git hooks脚本来优化前端工作流的这条道路十分艰难。但是,Nodejs的出现改变了这一切,它让JS拥有了控制“操作系统”的能力,你只需要安装npm包husky,它会帮我们自动生成.git/hooks目录下的shell script,我们便可以很轻松的使用更熟悉的JS处理git hooks任务,而无需关注shell脚本的实现细节
图中,pre-commit文件之所以,没有.sample结尾,就是我安装了husky包,然后在package中配置触发的任务后,husky自动帮我生成脚本放入其中,并去掉.sample
husky旧版本
安装husky
npm install -D husky@3.1.0package.json中配置husky
"scripts": {
    "test": "node test.js"
},
"husky": {
    "hooks": {
      // 可以执行一个js文件,将控制权转移给我们更熟悉的nodejs
      "pre-commit": "node test.js",
      // 也可以调用其他脚本或者执行一段原生shell命令
      "commit-msg": "npm run test && echo succeed"

    }
}常用下面的方式集成钩子
"husky": {
    "hooks": {
      "commit-msg": "commitlint -E HUSKY_GIT_PARAMS",
      "pre-commit": "lint-staged"
    }
},husky新版本
新版本引入破坏性变动,使用方式和旧版本有较大出入
新版不在使用默认的.git/hooks目录存储脚本,而是指定了项目内的文件夹为脚本目录
安装husky
npm install -D huskypackage.json中添加
prepare脚本会在npm install(不带参数)之后自动执行
当我们执行npm install安装完项目依赖后会执行 husky install命令,该命令会在当前目录创建.husky/目录并指定该目录为git hooks所在的目录。【默认git hooks目录在.git/hooks下,这个目录是不会被提交到仓库的】
如果不添加为prepare脚本,即使.husky文件夹被提交到git仓库,其他人在clone项目后,本地的git不会将Git钩子的目录指定为项目中的.husky目录

//手动在package.json中添加
{
  "scripts": {
    "prepare": "husky install"
  }
}

//使用npm命令添加
npm set-script prepare "husky install"添加git hooks
husky add:第一个参数是在.husky目录下新建的文件名,第二个参数是文件中的写入的脚本
在.husky目录下新建pre-commit脚本,
npx husky add .husky/pre-commit "npx lint-staged"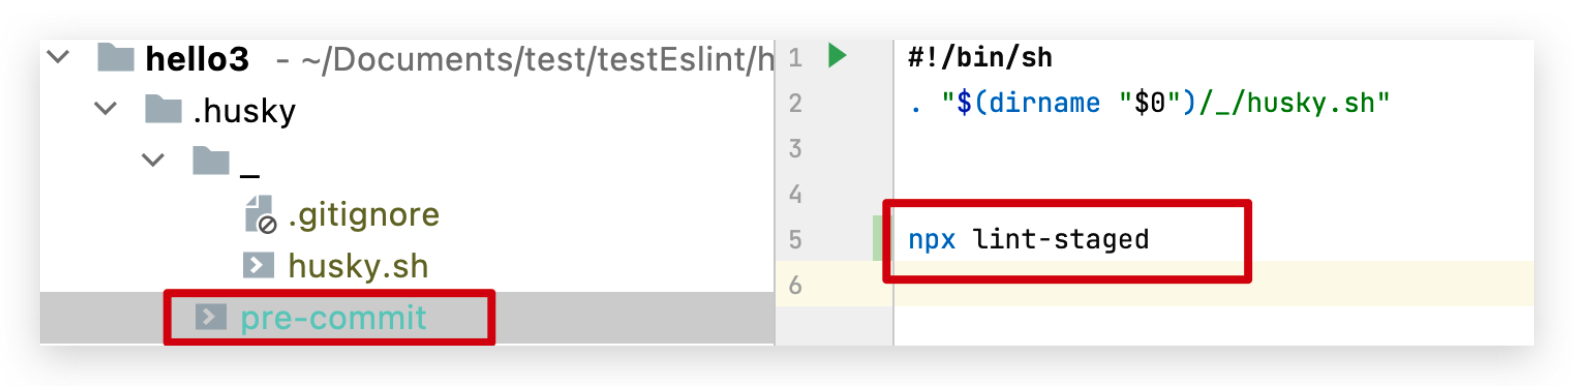
在.husky目录下新建commit-msg脚本
npx husky add .husky/commit-msg "npx --no-install commitlint --edit $1"
#--no-install 参数表示强制npx使用项目中node_modules目录中的commitlint包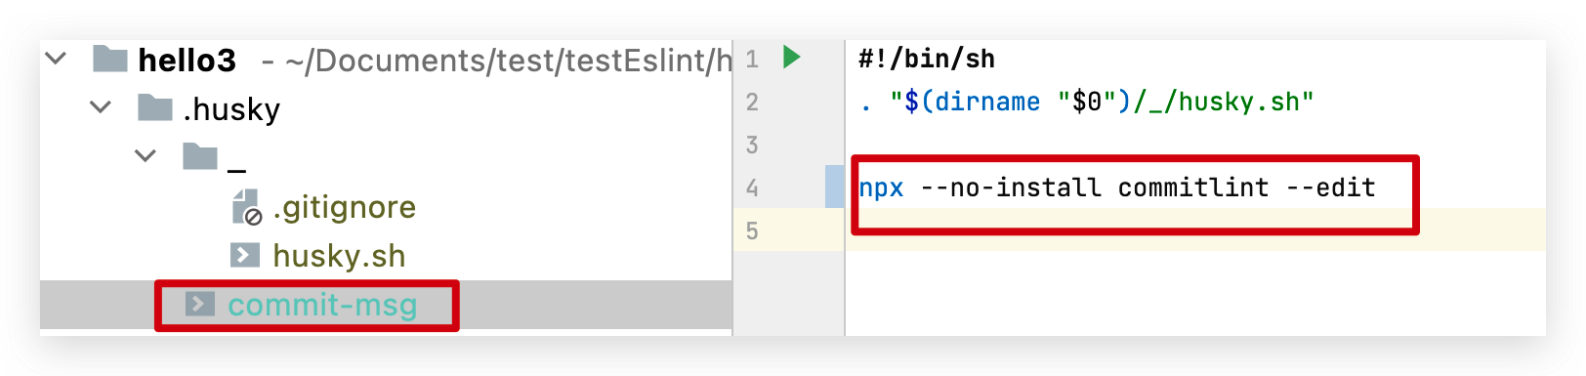
这里提到的,在脚本中添加的几个命令,会在后面提到
lint-staged
Git Hooks可以让我们在提交流程中触发自定义操作,完成各种工作的自动化集成。
通常情况下,我们只需要对自己的本次提交变更的代码,进行各种校验或修复
lint-staged就能完成这样的任务,可以让我们的操作只针对于暂存区的代码
安装
npm install -D lint-staged配置
基本格式
"lint-staged": {
    "文件格式": [
      "命令1",
      "命令2",
      "...其他命令"
    ]
}例子:对暂存区中的js、jsx、vue文件,使用eslint修复命令。因为eslint修复后,代码可能会出现变化,这些可能出现的变化放自动放入到暂存区
"lint-staged": {
    "*.{js,jsx,vue}": [
      "eslint --fix --ext .js app/",
    ]
}集成commitlint
规范化提交,更便于在仓库中查找某次提交
可以直接用规范化的commit message生成change log
安装
@commitlint/cli 是commitlint提供的命令行工具,安装后会将cli脚本放置在./node_modules/.bin/目录下
@commitlint/config-conventional是社区中一些共享的配置,我们可以扩展这些配置,也可以不安装这个包自定义配置
shellnpm install -D @commitlint/cli npm install -D @commitlint/config-conventional
提交规范
commit message 由
header(必须) 、body(可选)、footer(可选)text<type>[scope]: <subject> [body] [footer]header
text<type>[scope]: <subject>type:表示提交的类型,
@commitlint/config-conventional中包含的可选值有textfeat: 新功能 fix: bug 修复 docs: 仅修改文档 style: 修改格式(空格,格式化,省略分号等),对代码运行没有影响 refactor: 重构(既不是修 bug ,也不是加功能) build: 构建流程、外部依赖变更,比如升级 npm 包、修改 webpack 配置等 perf: 性能优化 test: 测试相关 chore: 对构建过程或辅助工具和库(如文档生成)的更改 ci: ci 相关的更改 revert: 当前提交是为了撤销之前的某次提交,应该用 revert 开头,后面加上被撤销的提交的 header,在 body 中应该注明:This reverts commit <hash>. ,hash 指的就是将要被撤销的 commit SHA // 例如 revert: feat(user): add user type This reverts commit ca16a365467e17915f0273392f4a13331b17617d.scope:表示本次提交代码的影响的范围
subject:表示对本次提交代码的简短描述
body
body 部分是对本地 commit 的详细描述,可以分成多行
footer
基本用在这两种情况:
不兼容的改动( Breaking Changes ),通常用 BREAKING CHANGE: 开头,后面跟一个空格或两个换行符。剩余的部分就是用来说明这个变动的信息和迁移方法等。
shellrefactor: BREAKING CHANGE:某某发生了更改 按照下面的例子迁移代码: Before: scope: { myAttr: 'attribute', myBind: 'bind', myExpression: 'expression' } After: scope: { myAttr: '@', myBind: '@', myExpression: '&' } 某某发生了更改关闭 Issue(Closes #Issue号)
shellfix: 修复用户登陆注册 Closes #2314, #3421
初始化@commitlint/cli的配置文件
项目根目录下,创建
commitlint.config.js文件,也可以是.commitlintrc.js官网给出的配置文件完整的格式
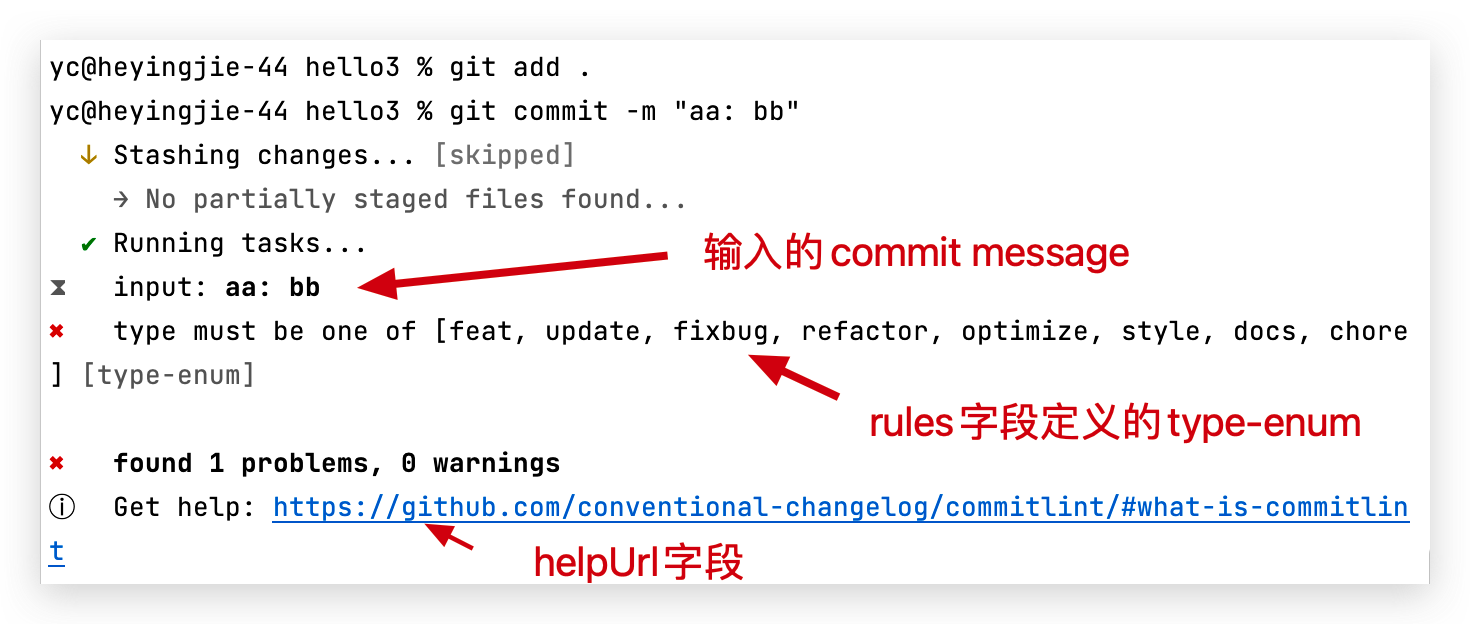
jsmodule.exports = { /* * Resolve and load @commitlint/config-conventional from node_modules. * Referenced packages must be installed */ extends: ['@commitlint/config-conventional'], /* * Resolve and load conventional-changelog-atom from node_modules. * Referenced packages must be installed */ parserPreset: 'conventional-changelog-atom', /* * Resolve and load @commitlint/format from node_modules. * Referenced package must be installed */ formatter: '@commitlint/format', /* * Any rules defined here will override rules from @commitlint/config-conventional */ rules: { 'type-enum': [2, 'always', ['foo']], }, /* * Functions that return true if commitlint should ignore the given message. */ ignores: [(commit) => commit === ''], /* * Whether commitlint uses the default ignore rules. */ defaultIgnores: true, /* * Custom URL to show upon failure */ helpUrl: 'https://github.com/conventional-changelog/commitlint/#what-is-commitlint', /* * Custom prompt configs */ prompt: { messages: {}, questions: { type: { description: 'please input type:', }, }, }, };通常我们使用第一步安装的第三方配置就可以了
js/*使用第一步安装的第三方配置*/ module.exports = { extends: ['@commitlint/config-conventional'], }如果想要自定义一些配置
jsmodule.exports = { extends: ['@commitlint/config-conventional'], /*可以在下面,继续写其他字段的配置,这些配置会覆盖@commitlint/config-conventional中对应的配置*/ }比如Rules,按照官网的Rules字段配置,这里我们讲下配置的格式
text'规则名':[Level,Applicable,Value] //规则名:从官网查到所有的规则名的第一部分都是commit message的不同部分,例如:header-* 、scope-* 、type-*,表示规则作用的部分 //Level : 错误提示等级,0是关闭提示,1是警告提示,2是错误提示 //Applicable : always启用规则,never关闭规则 //Value : 有些规则需要传递参数,在这里传递,比如 'header-max-length': [2, 'always', 72] 表示 header最长72例子:覆盖
@commitlint/config-conventional中的rules字段js/** * feature:新功能 * update:更新某功能 * fixbug:修补某功能的bug * refactor:重构某个功能 * optimize: 优化构建工具或运行时性能 * style:仅样式改动 * docs:仅文档新增/改动 * chore:构建过程或辅助工具的变动 */ module.exports = { extends: ['@commitlint/config-conventional'], /*自定义配置,会覆盖@commitlint/config-conventional中的配置*/ rules: { 'header-max-length': [2, 'never', 72], // header 最长72 'body-leading-blank': [2, 'always'], // body换行 //type的枚举字段,提交时的type值,只能是这里的值,@commitlint/config-conventional中的可选值全部被覆盖了 'type-enum': [2, 'always', ['feature', 'update', 'fixbug', 'refactor', 'optimize', 'style', 'docs', 'chore']], } }添加到Git钩子中
旧版husky
json//package.json文件中 "husky": { "hooks": { "commit-msg": "commitlint -E HUSKY_GIT_PARAMS" } }新版husky(参照上面Git Hooks章节的使用)
shellnpx husky add .husky/commit-msg "npx --no-install commitlint --edit $1" #--no-install 参数表示强制npx使用项目中node_modules目录中的commitlint包lint-staged
这里仅仅是校验commit message,不是暂存区代码,所以不必使用lint-staged
提交
编写commit message的辅助工具
commitzen是一款工具,可以通过在终端选择的方式,帮助我们编写合格的commit message
shellnpm install -D commitizen让commitzen其支持 Angular 的 Commit message 格式
shellcommitizen init cz-conventional-changelog --save-exact查看package.json,就会多出一句
json"config": { "commitizen": { "path": "./node_modules/cz-conventional-changelog" } }以后,凡是用到
git commit命令,一律改为使用git cz。这时,就会出现选项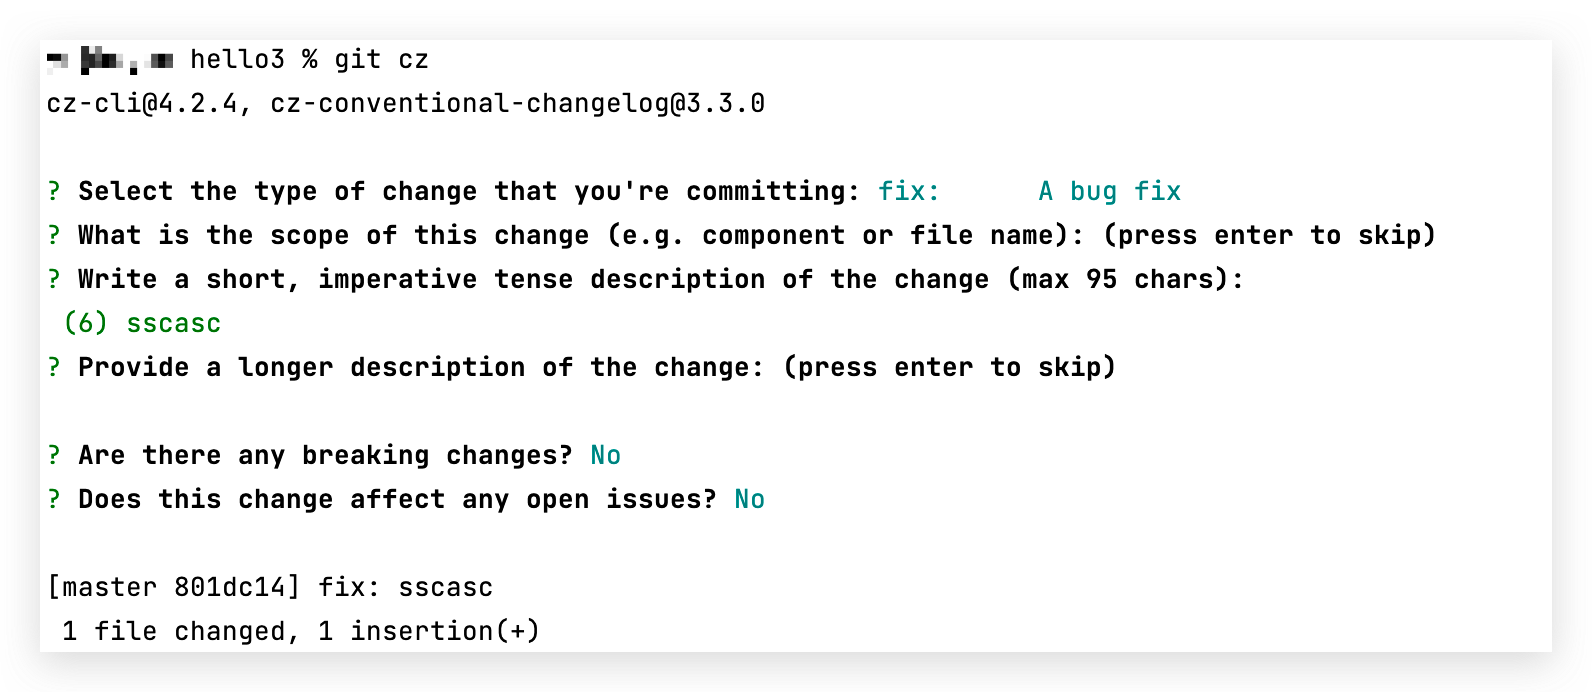
集成Changelog
如果你的所有 Commit 都符合 Angular 格式,那么发布新版本时, Change log 就可以用脚本自动生成
生成的文档包括以下三个部分。
- New features
- Bug fixes
- Breaking changes.
每个部分都会罗列相关的 commit ,并且有指向这些 commit 的链接。当然,生成的文档允许手动修改,所以发布前,你还可以添加其他内容
npm install -D conventional-changelog-cli生成CHANGELOG.md文件
conventional-changelog -p angular -i CHANGELOG.md -w #命令不会覆盖以前的 Change log,只会在CHANGELOG.md的头部加上自从上次发布以来的变动

conventional-changelog -p angular -i CHANGELOG.md -w -r 0 #生成所有的 Change log,要改为运行下面的命令文件的格式大概是下面这个样子

集成到package.json的脚本中
scripts: {
   "changelog": "conventional-changelog -p angular -i CHANGELOG.md -s -r 0 && git add CHANGELOG.md"
}集成Prettier
一般情况下,我们并不会把Prettier集成到自动化流程中
因为,如果我们对项目中其他人的页面进行修改,在提交时自动触发Prettier格式化,可能会将页面中其他人的代码格式化,这样在提交记录上来看,其他人的代码,变成了自己提交的代码
安装
shellnpm install -D prettier根目录下新建配置文件
prettierrcjson{ "printWidth": 80, "tabWidth": 2, "useTabs": false, "semi": true, "singleQuote": false, "bracketSpacing": true, "bracketSameLine": true, "endOfLine": "lf" }package.json中配置
这里仅仅是暂存区的文件需要进行Prettier格式化,所以使用了lint-staged
json{ "scripts": { "prettier": "prettier --write" }, "lint-staged": { "*.{js,vue}": [ "npm run prettier", "git add" ] } }添加Git Hooks
shellnpx husky add .husky/pre-commit "npx lint-staged"
Git官网介绍了,所有的Git勾子的详细信息
流程:
- Git Hooks在Git提交的某个阶段触发的勾子
- 勾子中使用lint-staged,使得格式化工具只作用于暂存区代码
自动化,只会用到提交工作流钩子,提交工作流包含 4 个钩子:
st=>start: git commit -m "提交文本"
op1=>operation: pre-commit
op2=>operation: prepare-commit-msg
op3=>operation: commit-msg
op4=>operation: post-commit
e=>end: 提交完成
st->op1->op2->op3->op4
op4->epre-commit钩子在键入提交信息前运行,在这个阶段加入 代码检查 流程,会代码prepare-commit-msg钩子在启动提交信息编辑器之前,默认信息被创建之后运行。它对一般的提交来说并没有什么用;然而对那些会自动产生默认信息的提交,如提交信息模板、合并提交、压缩提交和修订提交等非常实用。 你可以结合提交模板来使用它,动态地插入信息「可在这个阶段加载commitizen之类的辅助填写工具」commit-msg钩子在即将提交前运行,勾子接收一个参数,即存有当前提交信息的临时文件的路径,可在这个阶段借助commitlint进行提交信息规范性检查;post-commit钩子在整个提交过程完成后运行,它不接收任何参数,在这个阶段一般做一些通知操作。
使用 Git 钩子最直观的方式是操作 .git/hooks 下的示例文件,将对应钩子文件的 .sample 后缀名移除即可启用。然而这种操作方式存在弊端:
- 需要操作项目范围外的 .git 目录(有系统级别、全局级别的.git配置文件)
- 无法同步 .git/hooks 到远程仓库(.git是本地的git配置文件,不会被提交)
可以将Git勾子的目录设置在项目的根目录下
# 指定 Git hooksPath 为根目录下的 .githooks 目录(原来是 .git/hooks 下的文件 )
git config core.hooksPath .githooks安装husky
npm install -d husky安装lint-staged
npm install -d lint-staged在package.json
//在hooks中可以定有Git勾子
"husky": {
    "hooks": {
      "pre-commit": "lint-staged",
      "commit-msg": ""
    }
},

//针对暂存区进行操作
"lint-staged": {
  	//指定 什么类型的文件:["执行命令1","执行的命令2"]
  	//一般把命令放在script字段里,这里直接调用其中的命令
  	//最后以一个命令是git add ,将前面命令做的代码变更重新加到暂存区
    "**/*.{js,vue}":[
      "npm run lint",
      "npm run prettier",
      "git add"
    ]
},

//
"scripts": {
    "dev": "xxxxx",
    "build": "xxxxx",
  	//eslint修复 --fix是自动修复
    "lint-fix": "eslint --fix --ext .js app/",
  	//eslint --ext指定文件类型和目录(支持glob方式)
    "lint": "eslint --ext .js app/",

  	//prettier
  	"prettier":"prettier --write",

  	//
    "changelog": "conventional-changelog -p angular -i CHANGELOG.md -s"
},待补充
commit message限制和change log限制Commit message 和 Change log 编写指南
bashnpm install -g commitizen npm install -g conventional-changelogcommitLint
styleLint
其他配置文件
.gitignore
#mac系统下,记录文件夹位置的文件
.DS_Store

#依赖安装目录
node_modules

#打包路径
/dist

# local env files
.env.local
.env.*.local

# 日志文件
npm-debug.log*
yarn-debug.log*
yarn-error.log*
pnpm-debug.log*

# 编辑器配置文件
.idea
.vscode
*.suo
*.ntvs*
*.njsproj
*.sln
*.sw?总结
EditorConfig 作用于预览和输入阶段,Prettier 在保存和提交阶段重新组织代码,Prettier 会成为代码形态的最终决定者