Vite
什么是构建工具
浏览器他只认识html, css, js
企业级项目里都可能会具备哪些功能
- typescript: 如果遇到ts文件我们需要使用tsc将typescript代码转换为js代码
- React/Vue: 安装react-compiler / vue-complier, 将我们写的jsx文件或者.vue文件转换为render函数
- less/sass/postcss/component-style: 我们又需要安装less-loader, sass-loader等一系列编译工具
- 语法降级: babel ---> 将es的新语法转换旧版浏览器可以接受的语法
- 体积优化: uglifyjs ---> 将我们的代码进行压缩变成体积更小性能更高的文件
- 等等
我们需要将这些文件,打包成浏览器认识的JS、CSS、Html
这些操作异常繁琐,所以就有了构建工具,用来自动化处理这些操作。除了自动化集成其他工具外,承担了哪些其他工作?
构建工具需要承担了哪些工作
模块化开发支持
例如,
Html文件中,使用type指定引入ES Module模块html<html lang="en"> <head> <meta charset="UTF-8"> <title>Title</title> </head> <script type="module"> import xxx from 'xxx' </script> <body> </body> </html>from后只支持指定模块的路径,才能在这个路径下找到
如果,直接使用yarn安装模块
shellyarn init -y yarn add xxx浏览器不知道要去node_modules下寻找该模块,而构建工具,可提供模块化支持(想想Vue-cli创建的项目中,依赖都安装在node_modules下,但是依然可以编译后,在浏览器运行,就是这个道理)
补充问题:为什么浏览器中的ESM不能像commonjs(服务端使用)那样,支持自动去node_modules下寻找安装的依赖?
js因为浏览器与服务端不同,html、css、js、安装的依赖+依赖的依赖都会被浏览器通过网络下载 依赖关系往往是十分复杂的,一个依赖包可能依赖了几百个其他的依赖,这会严重降低前端的性能打包工具如何解决?
自动化集成其他工具(不是构建工具做的, 构建工具将这些语法对应的处理工具集成进来自动化处理)
- 处理代码兼容类的工具: 比如babel语法降级,less、sass、ts 语法转换
- 提高项目性能类的工具:压缩文件, 代码分割
优化开发体验
开发服务器(dev-server)
比如,vue-cli 解决跨域的问题。实际上,编写的
*.vue、ts、less等文件不能直接运行,构建工具自动化处理这些文件后,启动了一个本地服务器,返回的处理后的内容,就可以成功在浏览器上运行了构建工具会自动监听文件的变化, 当文件变化以后自动调用对应的集成工具进行重新打包, 然后再浏览器重新运行(热更新)
构建工具让我们不用每次都关心我们的代码在浏览器如何运行,只需要给构建工具提供一个配置文件(没有配置文件,也会有默认的规则),在启动项目时执行下构建工具,然后就可以专注于开发,而其他工作自动完成
主流的构建工具有哪些
- webpack
- vite
- parcel
- esbuild
- rollup
- grunt
- gulp
Webpack与Vite的区别
webpack需要最依赖分析,将ESM和CommonJS做统一的转换后,在启动服务器,开发者才能看到页面,速度要慢很多
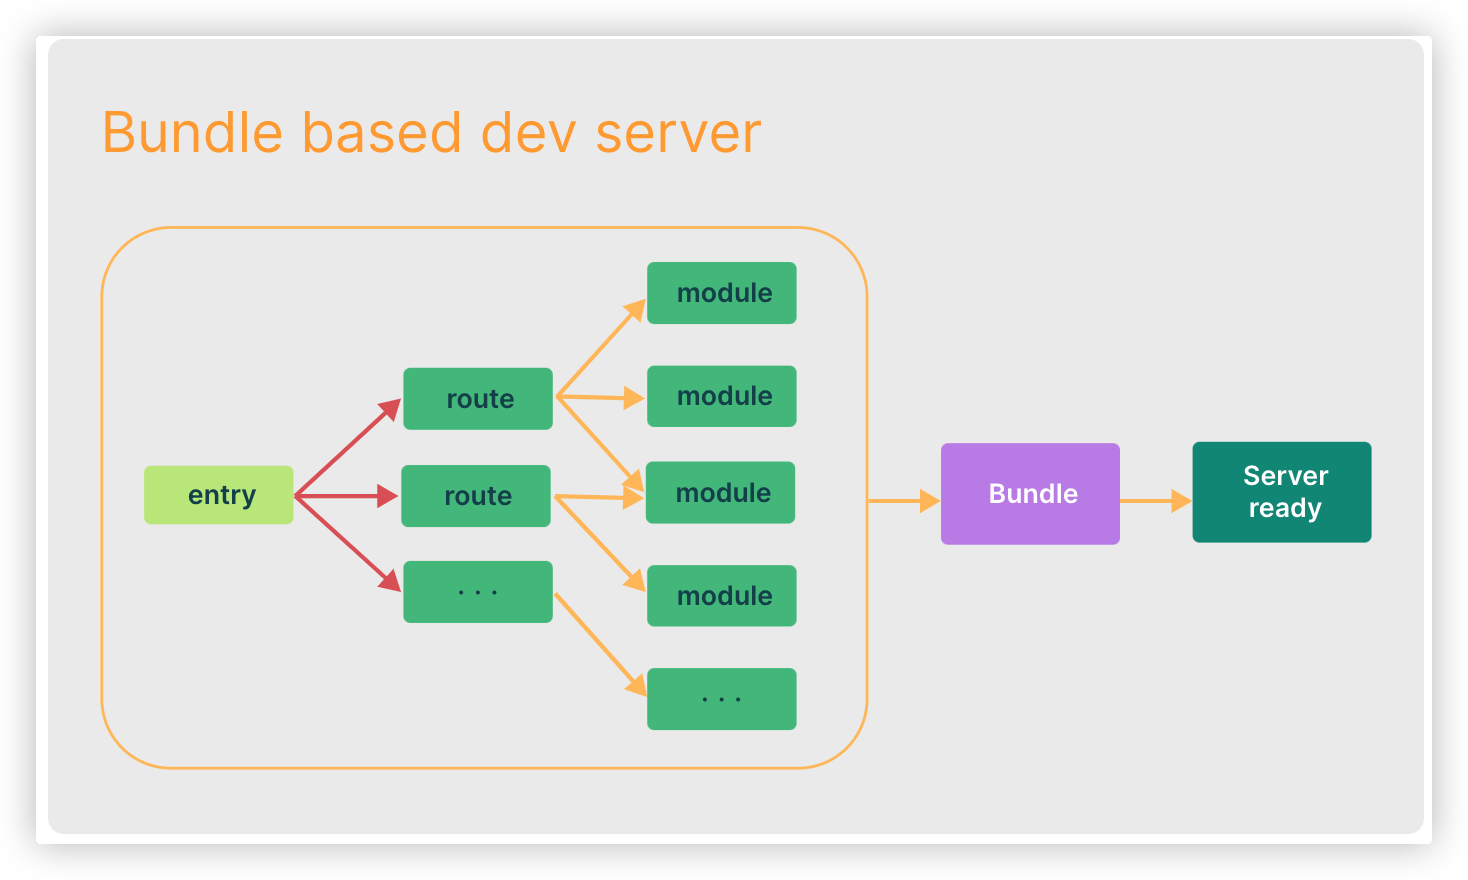
Vite:
- 利用了目前浏览器广泛支持ESM的特点,不再做统一转换,而是直接将ESM模块提供给浏览器处理
- 采用了基于路由拆分的代码模块,不再需要加载模块
- 虽然依赖也通常会存在多种模块化格式(例如 ESM 或者 CommonJS),但是Vite使用更快的esbuild(基于Go多线程开发的打包器,比用JavaScript 编写的打包器 预构建依赖快 10-100 倍。)

侧重点:
- webpack倾向于关注兼容性
- vite是基于ESM的,更关注浏览器端的开发
vite的简单例子
vite库是一个构建工具库
yarn add vite -D # 开发依赖vite脚手架,用来创建一个完整的项目(其中包含vite依赖库)
yarn create vite简单的小例子
解决前面不使用构建工具,浏览器找不会自动到node_modules下找依赖的问题
初始化项目
shellyarn init -y安装依赖(以loadsh为例子)
shellyarn add loadsh -D示例文件
方式一:注意,直接在
script标签内使用node_modules中的包不行html<html lang="en"> <head> <meta charset="UTF-8"> <title>Title</title> </head> <script type="module"> import _ from 'loadsh' console.log('loadsh',_) </script> <body>方式二:使用路径引入的文件中,如果使用了node_modules中的包也不行
html<html lang="en"> <head> <meta charset="UTF-8"> <title>Title</title> </head> <script src="./count.js" type="module"> </script> <body> </body> </html>js//count.js import _ from 'loadsh' console.log('loadsh',_)两种方式都会报错,提示使用路径引入

本例中,使用第二种方式
安装vite构建工具
shellyarn add vite -D启动
这里一点知识,使用包管理器安装的依赖,都会在
node_modules/.bin创建快捷方式,想调用必须使用下面的方式shellyarn vite一般情况下,会在package.json中加脚本,使用yarn dev即可运行
json"scripts": { "dev": "vite" }运行后,会运行dev-server。终端出现提示,运行的地址
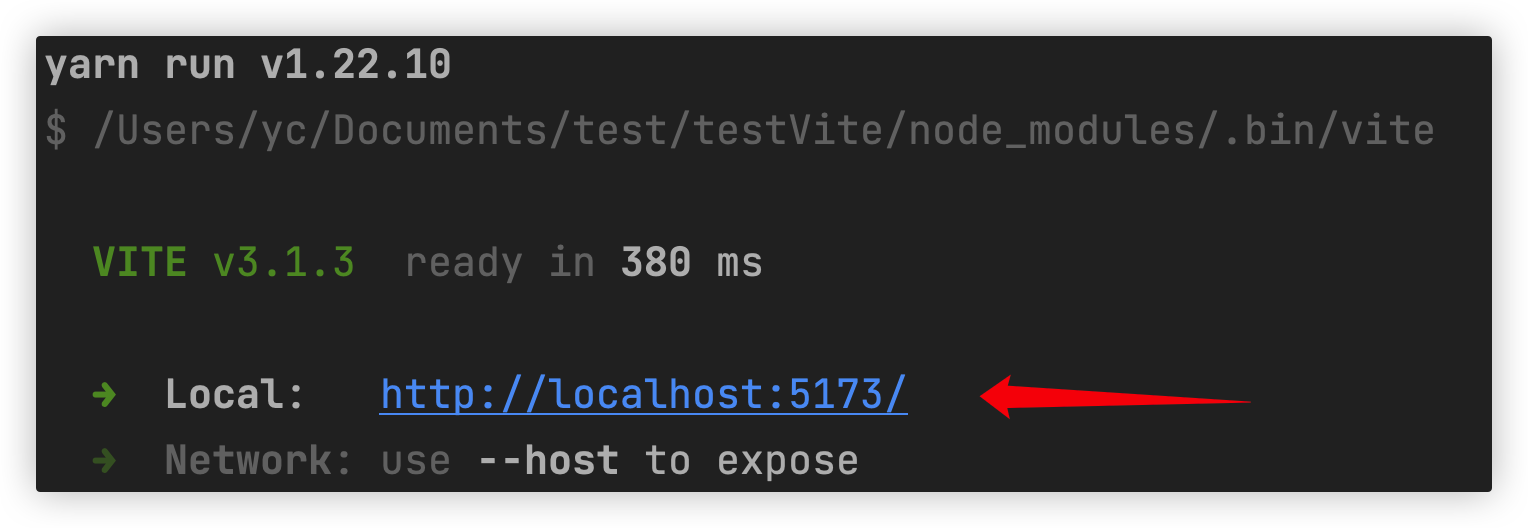
打开就不会有报错了

依赖预构建
预构建:
vite启动时,就会预构建了项目依赖
浏览器向devServer请求html页面,浏览器会向import from的路径发起请求(
./count.js对应的请求地址就是 当其页面地址+./count.js),devServer对应的文件如果这个包是不是ESM,则会使用esbuild将该包转化为ESM
这个包本身可能依赖很多其他的模块(浏览器下载大量的依赖,会消耗很多时间)。vite将依赖集成为一个js文件
接着上一章节的例子讲解。项目成功启动并打印成功,说明vite解决了找不到loadsh包的问题。下面两个图解释了,vite预构建做了啥?
浏览器加载的count.js文件
会发现引入的loadsh库,实际加载的是/node_modules/.vite/deps/loadsh.js,即依赖预构建缓存的位置

项目下的node_modules目录

重新预构建的时机
Vite 将预构建的依赖项缓存到 node_modules/.vite 中。它会基于以下几个来源来决定是否需要重新运行预构建步骤:
- 包管理器的锁文件内容,例如
package-lock.json,yarn.lock,pnpm-lock.yaml,或者bun.lockb; - 补丁文件夹的修改时间;
vite.config.js中的相关字段;NODE_ENV的值。
上述其中一项发生更改时,就会重新运行预构建
如果想要强制 Vite 重新构建依赖项,可以在启动开发服务器时指定 --force 选项,或手动删除 node_modules/.vite 缓存目录
Vite配置文件格式
注意:修改Vite的配置文件不需要重启,就会生效
基础格式
vite是开箱即用的,即有一套默认的配置规则
如果,我们需要自定义配置,需要在项目下使用配置文件vite.config.js
配置文件内容写成下面的形式,在webstorm中是有配置项提示的,但是在vscode中没有提示
export default {
  //vite的配置项
}需要编译器提示,就要使用下面的写法
方式一:(推荐的方式)
jsimport {defineConfig} from 'vite' export default defineConfig({ //vite的配置项 })方式二:
js/**@type import('vite').UserConfig*/ const viteConfig={ //vite的配置项 } export default viteConfig
生产测试环境
主配置文件(vite.config.js),在此文件引入不同环境下的配置文件
通过启动vite的开发服务器使用不同的启动命令,command参数也会不同
defineConfig(({command})=>{
console.log('defineConfig --> ',command)
})yarn vite devcommand参数值为serve
yarn vite buildcommand参数值为build
添加到package.json中,使用yarn xxx即可运行
"scripts": {
"dev": "vite dev",
"build": "vite build"
},vite.base.config
生产、测试共同的vite配置
import {defineConfig} from 'vite'
export default defineConfig({
  //vite的配置项
})vite.prod.config
生产环境的配置
import {defineConfig} from 'vite'
export default defineConfig({
    //vite的配置项
})vite.dev.config
测试环境的配置
import {defineConfig} from 'vite'
export default defineConfig({
    //vite的配置项
})vite.config.js
主配置文件,最终导出vite配置的文件
代码运行时会首先执行主配置文件,所有导出的defineConfig函数中的打印会输出到终端后,项目启动
import {defineConfig} from 'vite'
import viteBaseConfig from "./vite.base.config";
import viteProdConfig from "./vite.prod.config";
import viteDevConfig from "./vite.dev.config";

//策略模式
const envResolver={
    'build':()=>{
        console.log('生产环境')
        return {...viteBaseConfig,...viteProdConfig}
    },
    'serve':()=>{
        console.log('测试环境')
        return {...viteBaseConfig,...viteDevConfig}
    }

}

//最终的vite配置
export default defineConfig(({command})=>{
    console.log('defineConfig --> ',command) //启动vite时,会输出到终端
    return envResolver[command]()
})补充问题
启动vite的环境是Node环境,为啥其读取的配置文件vite.config.js中使用的是ESM规范的引入方式?
这是因为vite在读取这配置文件时,会先解析文件语法,如果发现ESM规范会直接替换变成Commonjs规范
Vite环境变量
vite启动的环境是Node环境,Node的环境变量是存储在process.env这个对象下
vite内置了dotenv这个第三方库
默认情况下,dotenv会自动读取项目下的.env文件, 并解析这个文件中的对应环境变量,并将其注入到process对象中
但是,如果直接注入,会与某些vite配置(例如,envDir用来配置当前环境变量文件的地址)产生冲突问题, 所以,vite需要手动配置读取哪个文件注入到process对象
所以,使用loadEnv函数,根据启动Vite的方式加载不同的环境变量文件
import {defineConfig, loadEnv} from 'vite'
import viteBaseConfig from "./vite.base.config";
import viteProdConfig from "./vite.prod.config";
import viteDevConfig from "./vite.dev.config";

//策略模式
const envResolver={
    'build':()=>{
        console.log('生产环境')
        return {...viteBaseConfig,...viteProdConfig}
    },
    'serve':()=>{
        console.log('测试环境')
        return {...viteBaseConfig,...viteDevConfig}
    }

}

export default defineConfig(({command,mode})=>{

    //这里的commands(启动的命令)是: build(yarn vite build打包)、serve(yarn vite dev)
    console.log('command --> ',command)

    //这里的mode是:production、development 、mode的参数
    //注意:
    //  mode 就是vite build --mode xxxx中的xxxx
    //  默认 yarn vite build 等价于 yarn vite build --mode=production
    //  默认 yarn vite dev 等价于 yarn vite dev --mode=development
    console.log('mode --> ',mode)

    //-------加载对应环境的环境变量----------
    // 内置函数loadEnv
    // 参数1:当前运行的模式。回去查找`.env.[参数1]`文件作为环境变量(即.env.production 、 .env.development)
    // 参数2:想要加载的.env文件所在的目录。因为我们的.env文件就在根目录,所以使用process.cwd()函数可以返回运行当前js文件时,所在的目录
    // 注意.env文件中的环境变量默认应该为VITE_xxxx格式,xxx将会被作为环境变量。
    // 在vite.base.config.js配置了envPrefix:'ENV_',则环境变量必须是ENV_
    // 在项目中,环境变量被放置在import.meta.env中
  	// vite.cofing文件中无法通过import.meta.env获取环境变量,但是loadEnv就是全部环境变量
    const env=loadEnv(mode,process.cwd())


    //-------安装对应环境的返回对应环境的配置文件---------
    //这个函数返回的对象,才是最终的vite配置。我们可以将配置写到
    //vite.base.config.js(共同的配置) 、vite.dev.config.js(开发的配置) 、vite.base.prod.js(生产的配置)
    return envResolver[command]()
})JS中获取环境变量
// 所有的环境变量
console.log("环境变量",import.meta.env)


// 设置 VITE_BASE_URL=http://127.0.0.1 ,获取该环境变量
console.log("环境变量",import.meta.VITE_BASE_URL)HTML中获取环境变量
<h1>Vite is running in %VITE_BASE_URL%</h1>内置的环境变量
import.meta.env.MODE: {string} 应用运行的模式。

import.meta.env.BASE_URL: {string} 部署应用时的基本 URL。他由base 配置项决定。

import.meta.env.PROD: {boolean} 应用是否运行在生产环境。

import.meta.env.DEV: {boolean} 应用是否运行在开发环境 (永远与 import.meta.env.PROD相反)。

import.meta.env.SSR: {boolean} 应用是否运行在 server 上为环境变量增加ts类型提示
interface ImportMetaEnv {
  readonly VITE_BASE_URL:string;
}Vite的路径别名配置
import {defineConfig} from 'vite'

const postcssPresetEnv=require('postcss-preset-env')

const path =require('path')

export default defineConfig({
  resolve:{
        alias:{
          	//配置别名
            "@":path.resolve(__dirname,'./src'),
            "@assets":path.resolve(__dirname,'./src/assets')
        }
	},
})Vite的DevServer原理
原理
执行yarn vite dev。Vite会启动一个服务器

当访问http://localhoost:5137路径时,就会发起一个HTTP请求,路由是/,就返回了index.html文件。所以,index.html是项目的入口
<html lang="en">
<head>
    <meta charset="UTF-8">
    <title>Title</title>
</head>
<!--html文件是入口,在其中会加载main.js-->
<script src="/main.js" type="module"></script>
<body>

</body>
</html>HTML文件中使用module方式加载一个/main.js文件,实际上会发起http://localhoost:5137/main.js的请求(根路径是主机根目录,相对路径是相对于主机目录的)
如果线上项目部署在http://www.abc.com:5137/test,这就需要设置vite的配置
import { defineConfig } from 'vite'
export default defineConfig({
  base:'/test', //再次强调,base选项与其他配置项都不同,base是以部署主机的根目录为相对位置的
})这样的话打包后的index.html为下面的
<html lang="en">
<head>
    <meta charset="UTF-8">
    <title>Title</title>
</head>
<!--html文件是入口,在其中会加载/test/main.js-->
<script src="/test/main.js" type="module"></script>
<body>

</body>
</html>注意一点,打包后的文件也要放在test下才能找到的到。我们需要再服务器个目录建一个test目录,再把dist目录下的内容复制过去
简单的办法,可以使用outDir配置自动在dist下生成一个test目录。部署时只需要把dist目录下的内容复制直接放到服务器根目录即可
import { defineConfig } from 'vite'
export default defineConfig({
  build:{
  	outDir:'dist/test' //默认为dist。这个路径是相对于vite.config.js所在位置的
  }
})打包后的结果
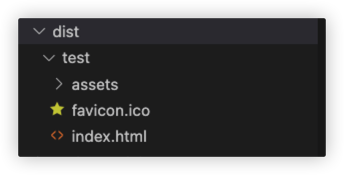
DevServer接到请求/main.js,服务器接到绝对路径请求,会以当前项目根目录为作为根。(注意/main.js并不会以机器的根目录作为根,而是项目根目录)
接下来分别讲下main.js不同部分的处理,js文件中的每一个import也都是一个http请求
//main.js中加载JS。发起/count.js的请求
import count from './count'
console.log('countNum --> ',count.countNum)//count.js
export default{
countNum:1
}
DevServer简单实现
实现了返回index.html、JS文件、支持别名@
https://gitee.com/hyj1270433876/example-learn/tree/master/vite-learn/dev-server
DevServer的配置
export default defineConfig({
    server:{
      	//当需要在手机浏览器上访问当前项目,需要将host的值设置为true或0.0.0.0。
        host:true
    }
}host设置为true,就多个一个内网地址

关于静态资源的引入
前提
import仅仅支持引入ES模块,例如:
export default{
	xxx:function(){

  }
}


export function(){
  //xxx
}require大多用在服务端,可以引入CommonJS模块,例如:
module.exports.xxx=function(){

}

module.exports={

}require还支持引入JSON格式的文件,并自动转换为JS对象
后续
所以无论是那种模块化方案,其最重要的是引入JS文件(require可以引入JSON)
Vite内置支持处理的静态资源类型
在前端开发中,我们常常再JS中直接引入css、less、sass、图片等等格式的静态文件
这其实是DevServer为我们做了资源的处理(使用了loader,加载器),才能在开发环境被加载都项目中
打包工具为我们做了资源的处理,才能打包出最后的文件
无需处理的静态资源
publicDir配置用来指定开放目录(默认值<root>/public,就是根目录下的public目录)
假设该目录下有个logo.png,代码中必须用/xxx引用,并不遵守实际路径,记住这个约定
import '/logo.png'打包后,这个目录下的文件不会被命名为[filename]-[hash].ext,直接放置在dist根目录(outDir配置,其默认值为dist)
Vite与Webpack
在Vite对静态资源的处理是开箱即用的,Vite 会根据文件的类型自动进行处理,使得开发过程中,DevServer能够正确加载和返回资源
在webpack中需要使用特定的加载器(loader)来加载静态资源
注意
后面看到import最直接引入了非JS文件,都是因为vite为我们提供了开箱即用的加载静态资源的能力
vue不是vite支持的静态文件,可以安装下面的插件,该插件把.vue文件编译为JS模块,就可以正常加载了
#为 Vite 构建工具提供对 Vue 单文件组件 (SFC) 的支持
yarn add @vitejs/plugin-vue -D在vite中配置插件
import { defineConfig } from 'vite';
import vue from '@vitejs/plugin-vue';

export default defineConfig({
  plugins: [
    vue()
  ]
});静态资源:CSS
Vite原生支持CSS,还支持Less、Sass等预处理器
引入CSS的原理
main.js中
import './index.css'在加载CSS时,浏览器会向DevServer发起/index.css的请求
DevServer会将CSS处理为JS,并在返回头中设置
Content-Type=application/javascript浏览器会将其作为JS执行,即创建Style标签,将样式复制到其中,接着入到Head标签中
/**index.css**/
body{
    width: 100vw;
    height: 100vh;
    background: red;
}index.css处理后的JS

效果:

CSS Module
造成的问题
如果有两个div使用了同名的Class样式。同样插入到Head标签中,靠后的Class会覆盖前面的样式。
例如:组件A、组件B
componentA/index.css
.box{
    width: 200px;
    height: 200px;
    background: blue;
}componentA/index.js
import './index.css'
let div=document.createElement('div')
document.body.appendChild(div)
div.className='box'componentB/index.css
.box{
    width: 200px;
    height: 200px;
    background: yellow;
}componentB/index.js
import './index.css'
let div=document.createElement('div')
document.body.appendChild(div)
div.className='box'main.js中加载两个组件
//加载CSS
import './components/componentA/index.js'
import './components/componentB/index.js'组件B中的box样式覆盖了组件A

改造为CSS Module
CSS Module是一种约定,即命名方式为 xxx.module.css的样式文件,就会默认开启
过程会自动创建一个映射对象
{box: '_box_1pwe8_1'}Key是原本的类名,Value是新的类名。
在网页的Head标签之间插入Style标签,样式代码复制到Style之间。样式的类名为Value改造:
两个组件的css文件名,改为 index.module.css
两个组件的JS文件引入CSS,cssModule的box属性,就是新命名的box类名
jsimport cssModule from './index.module.css' console.log('cssModule --> ',cssModule) //{box: '_box_1pwe8_1'} let div=document.createElement('div') document.body.appendChild(div) div.className=cssModule.box //使用box类原本的类名box,都被重命名为新的类名,这样就不会重复了

预处理器(less、scss)
less
Vite支持自动调用预处理器,由于其并没有内置预处理器,所以需要用户手动安装所需的预处理器。下面以less为例子:
安less依赖,用来编译Less文件
yarn add -D less创建less文件
index.module.less //开启CSS Module组件A,仅仅是引入名字改为index.module.less
import cssModule from './index.module.less'

let div=document.createElement('div')
document.body.appendChild(div)
div.className=cssModule.boxVite会自动将其插入网页
scss
注意还需要安装一个sass-loader
pnpm install sass sass-loader -Dpostcss
对CSS进行后处理,例如:
- 为有兼容性问题的CSS属性,增加前缀(--webkit)或者替换为低级语法
- 把px单位转换为vw单位
postcss插件列表:
新建一个项目
初始化:
yarn init安装:
yarn add postcss-cli postcss -D

# postcss-cli 脚手架,提供一些命令。参考:https://www.npmjs.com/package/postcss-cli
# postcss 处理器,用来实际去执行命令安装一个插件:
插件作用:语法降级(比如支持css变量)、自动补全(autoprefixer插件的功能,注意postcss-preset-env包含了该插件)
shellyarn add -D postcss-preset-env使用配置文件
js//postcss.config.js const postcssPresetEnv = require('postcss-preset-env'); module.exports={ plugins:[ postcssPresetEnv(/* pluginOptions */) ] }准备index.css
css:root{ --globalColor:red } div{ background-color: var(--globalColor); }处理
shellnpx postcss index.css --output result.css #将index.css 转换为 result.css转换后的result.css文件
css:root{ --globalColor:red } div{ background-color: red /*低级语法写前面,这样能保证高级语法失效时,低级语法能生效*/ ; background-color: var(--globalColor); }
注意:
原本postcss是有less、sass相关的预设插件的,只要安装这些插件就可以自动完成less、sass编译后,执行后学的插件功能。但是由于less、sass官方每次发布新特性,postcss插件都需要跟随发布新的版本,这导致了这些插件后续逐渐不再被维护
目前,如果想要处理less、sass都必须手动安装编译,postcss的目标仅仅是对编译后的css文件进行处理
所以,后来业界也称postcss为后处理器。(注意postcss其实是有能力替代less、sass作为处理样式文件唯一的工具的,只是目前的趋势是仅仅将其作为后处理器)
vite配置
vite中直接支持了postcss,不像less、sass需要手动安装编译器
postcss直接配置即可生效,如果配置postcss插件是需要下载插件的
yarn add -D postcss-preset-env//注意这里,vite.config.js实际读取的环境是commonJS,vite会自动将ESM转换为commonJS
import {defineConfig} from 'vite'
const postcssPresetEnv=require('postcss-preset-env')
export default defineConfig({
css:{
postcss:{
plugins:[
postcssPresetEnv()
]
}
}
})vite也支持自动读取postcss.config.js中的postcss配置,但是,vite.config.js的postcss字段的优先级最高
postcss-px-to-viewport 插件
将px转换为vw,可以对不同设备进行布局适配
import { defineConfig } from 'vite'
import postcssPxToViewport from 'postcss-px-to-viewport'
import { resolve } from 'path';

export default defineConfig({
    css: {
        postcss: {
            plugins: {
                // viewport 布局适配
                postcssPxToViewport({
                    viewportWidth: 375
                })
            }
        }
    }
})CSS In JS
CSS In JS方案: styled-components和emotion
对于 CSS In JS 方案,在构建侧我们需要考虑选择器命名问题、DCE(Dead Code Elimination 即无用代码删除)、代码压缩、生成 SourceMap、服务端渲染(SSR)等问题,而styled-components和emotion已经提供了对应的 babel 插件来解决这些问题,我们在 Vite 中要做的就是集成这些 babel 插件
import {defineConfig} from 'vite'
export default defineConfig(
  plugins: [
    react({
      babel: {
        // 加入 babel 插件
        // 以下插件包都需要提前安装
        // 当然,通过这个配置你也可以添加其它的 Babel 插件
        plugins: [
          // 适配 styled-component
          "babel-plugin-styled-components"
          // 适配 emotion
          "@emotion/babel-plugin"
        ]
      },
      // 注意: 对于 emotion,需要单独加上这个配置
      // 通过 `@emotion/react` 包编译 emotion 中的特殊 jsx 语法
      jsxImportSource: "@emotion/react"
    })
  ]
})CSS原子化框架
例如:Tailwind CSS、Windi CSS
下面以Windi CSS为例子,集成到Vite中
安装
pnpm i windicss vite-plugin-windicss -D配置
export default defineConfig({
  plugins: [
    windi()
  ]
})引入
main.js中
// 用来注入 Windi CSS 所需的样式
import "virtual:windi.css";CSS相关配置
vue.base.config.js配置文件
import {defineConfig} from 'vite'
export default defineConfig({
    css:{//css相关配置

        //modules字段会传给postcss
        modules:{
            //假设css文件类名为footer-content,
            //在js中引入css文件后 `import componentACss from xxx`
            //设置camelCaseOnly,在js中使用 componentACss.footerContent 访问到该样式
            localsConvention:"camelCaseOnly",

            //全局样式global(css会以原本的类名插入页面style标签)、局部样式local(默认值。即开启css module)
            scopeBehaviour:"local",

            //scopeBehaviour是local,这个配置css module的每个样式名
            //name文件名,local原本的css类名,hash:5前五位哈希值 (参考:https://github.com/webpack/loader-utils#interpolatename)
            // generateScopedName:"[name]_[local]_[hash:5]"
            // generateScopedName:(name,fileName,css)=>{
            //     //name 原本的css类名,fileName 样式文件绝对路径, css 当前那个样式
            //     return `${name}_111`
            // }

            //相当于给hash加盐
            hashPrefix:'hello',

            //指定哪些样式文件不使用css module
            globalModulePaths:['./components/componentA/index.module.less']
        },

        //key是预处理器名 ,value是该预处理器配置
        preprocessorOptions:{
          	scss:{
              //指定全局变量所在的文件
              additionalData:'@import "./src/styles/variable.scss";' //注意:';'一定要写,否则报错
            },
            less:{//这里的配置项其实就是less的命令行参数。参考:https://lesscss.org/usage/#less-options

                //等价于 lessc --math='always' xxx.less 。
                //less默认会括号中的进行数学运算 width:(100px/2)
                //配置为always。就会将 width:100px/2 编译成 width:50px
                math:"always",

                //在global.less定义变量 @mainColor:'red' ,在index.less中想要使用需要@import url('./global.less)引入后才能使用
                //我们可以定义全局的变量,直接使用,不必再引入
                globalVars:{
                    mainColor:"red"
                }
            }
        },

        //开启css的sourcemap功能
        devSourcemap:true
    }
})devSourcemap选项
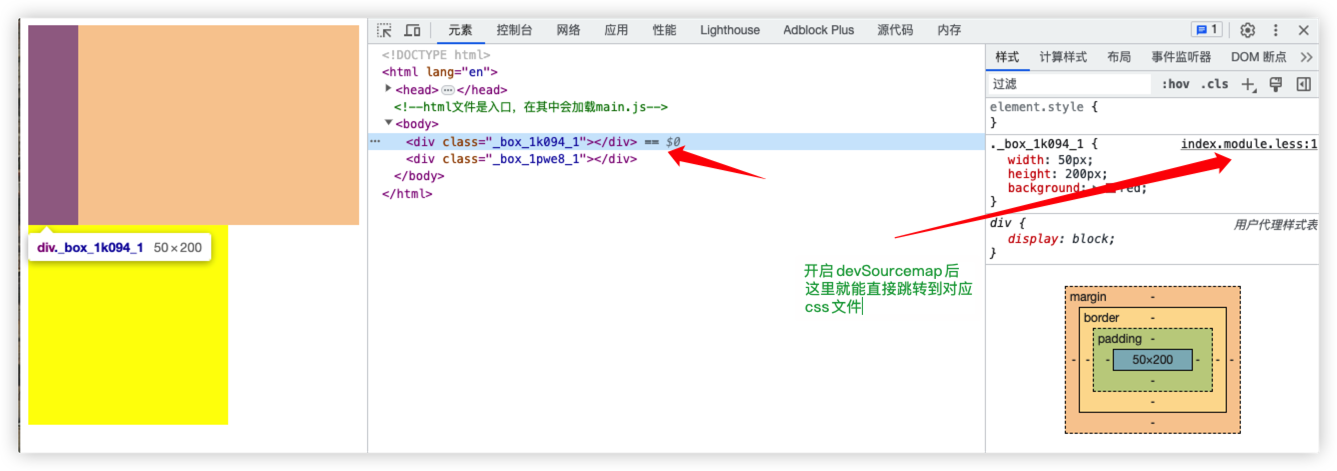
静态资源:SVG
img的src可以直接使用SVG
<img src="@/assets/images/loading.svg">也可以,使用插件vite-plugin-svg-icons来进行加载SVG(特点:预加载、高性能 )
# https://github.com/vbenjs/vite-plugin-svg-icons/blob/main/README.zh_CN.md
pnpm install vite-plugin-svg-icons -D配置插件
import path from 'path'

import { defineConfig } from 'vite'


import {createSvgIconsPlugin} from  'vite-plugin-svg-icons'

export default defineConfig({
  plugins: [
    createSvgIconsPlugin({
      // 指定svg图标放置的目录
      iconDirs: [path.resolve(process.cwd(), 'src/assets/icons')],
      // 加载的格式
      symbolId: 'icon-[dir]-[name]',
    })
  ]
})main.ts引入虚拟模块
import 'virtual:svg-icons-register'使用SVG
<!--   可以使用css定义宽高   -->
<svg style="width: 30px;height:30px">
  	<!--   #icon-xxx加载xxx.svg   -->
 		<!--   fill填充svg图标颜色   -->
		<use xlink:href="#icon-guard" fill="yellow"></use>
</svg>打包配置
yarn build #yarn vite build生成一个dist目录
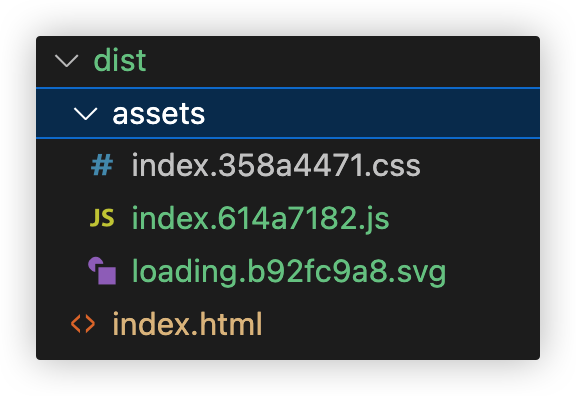
几个问题:
为什么assets下的静态资源会带hash值
浏览器有缓存机制,如果同一个文件名,浏览器第二次请求,会直接使用缓存。为了保证修改后重新打包,使用浏览器访问能立即生效,所以,每次文件有变动,打包后都会生成新的名字(hash值部分变化)
baseUrl:'/'默认vite配置为
/baseUrl:'/',可以看到打包后的index.html中所有的路径都是/开头的dist目录下的所有文件,放在主机路径下这里就能正常访问了
如果放在了下面的路径
http:/xxx.xxx.com/yyybaseUrl:'/yyy'
常用配置:
import {defineConfig} from 'vite'

const postcssPresetEnv=require('postcss-preset-env')

const path =require('path')

export default defineConfig({
			//打包构建相关配置(即,vite build执行打包时的配置)
      build:{//打包构建相关配置(vite build)

        minify:"false" //默认true,即将打包后的js压缩

        rollupOptions:{//配置rollup的构建策略。rollup文档:https://www.rollupjs.com/guide/big-list-of-options#%E6%A0%B8%E5%BF%83%E5%8A%9F%E8%83%BD-core-functionality
            output:{
                //rollup的assetFileNames配置。该选项用于自定义构建结果中的“静态文件”名称
                //配置文档:https://www.rollupjs.com/guide/big-list-of-options#outputassetfilenames
                //经过实际测试,[assetFileNames]仅仅能指定非js的静态资源的输出路径及命名方式
                assetFileNames:"[hash].[name].[ext]" //默认值: assets/[name]-[hash][extname]
            }
        },

        assetsInlineLimit:400, //单位B,默认值4096B。小于这个限制的静态资源会被转化为base64格式,代码中引入base64。超过这个限制就直接使用静态资源,代码中引入静态资源的路径

        outDir:'dist', // 默认在根目录下生成dist目录,将打包后的内容输出到dist下。这里可以设置打包生成的目录,

        assetsDir:'statics11', //默认是 [outDir配置]/assets 。经过实际测试,这里个仅仅会将打包的js文件放置在[assetsDir]目录下。如需设置其他静态资源,请示运功

        // emptyOutDir:'' //默认为true,构建之前自动清空[outDir配置]的目录
    }

})注意:

Vite打包库配置
export default defineConfig({

  .....

  // 添加库模式配置

  build: {
    rollupOptions:{
  		external: ["vue", "vue-router","lodash"], //配置的库 ,不会被打包到最终产物中
  		output: {
    		globals: {
      		vue: "Vue", //这里配置 库名到全局变量的映射。代码中使用了全局变量Vue,就会被替换为使用vue包(需保证项目安装了vue包)
          lodash: "_",
    		},
  		},
		},
    minify:false, //boolean | 'terser' | 'esbuild';默认使用esbuild混淆压缩,也可以安装terser

  	lib: {
      entry: "./src/entry.ts", //入口文件。因为库不能使用 HTML 作为入口
      name: "SmartyUI", //暴露的全局变量
      fileName: "smarty-ui", //输出的包名。(默认是 package.json 的 name 选项)
      formats: ["es", "umd","iife"],// 导出模块格式(iife是立即执行函数的意思)
    },
  },
});Vite处理跨域问题
原理:
项目中请求 http://www.abc.com/api/123接口出现跨域
但是配置代理,向http://www.abc.com/api发起请求的接口会被devServer拦截到
devServer会再转发到${target}/api/123
import { defineConfig, loadEnv } from 'vite'

export default defineConfig(({ command, mode }) => {

    loadEnv(mode, process.cwd())

    return {
        server:{
            proxy:{
              	// 项目实际请求地址 http://www.cde.com/xxx

              	// 如果使用代理,必须让请求被devServe拦截到,有devServe向实际的地址请求
              	// 项目需设置请求的BaseUrl为/api (请求地址就成了 '网址地址/api/xxx')

                '/api': {// 所有请求中的前缀能匹配到 '网址地址/api/xxx' 的请求被devServe拦截

                    target: 'http://www.cde.com', // devServer将这个请求的前缀替换为${target}/api/xxx。这与实际接口地址不符,需要使用rewrite字段重写请求

                    changeOrigin: true, //开启跨域

                    rewrite: (path) => path.replace(/^\/api/, ''),
                  	//是否重写devServe实际请求地址,这个取决于接口的地址
                  	//例如:这里接口地址为http://www.cde.com/xxx,则需将/api替换为空格
                  },
            }
        },
    }
})当请求${target}/api时,就不会出现跨域问题
Vite插件(待补充)
插件设计
Vite存在生命周期,我们可以指定在Vite的不同生命周期,使用不同的插件来达成我们的目标
config
在解析 Vite 配置前调用
configResolved
在解析 Vite 配置后调用
configureServer
是用于配置开发服务器的钩子( ViteDevServer)
configurePreviewServer
用于预览服务器
transformIndexHtml
转换
index.html的专用钩子handleHotUpdate
执行自定义 HMR 更新处理
一般情况下,插件导出的都是函数,函数的入参就是插件的配置,函数的返回值是一个vite的配置对象
export default (customConfig)=>{
  // customConfig 接收插件的配置。进行内部处理

  // 最终需要返回一个对象。里面是vite的配置,该配置会在特点的生命周期与Vite的配置合并
  return {
    name:'插件名字'
    //yyy、xxx是生命周期钩子
    yyy:()=>{

    },
    xxx:()=>{
      return {
      	//xxx钩子返回的vite的配置
      }
    }
  }
}vite-plugin-html插件
vite.config.js
import {defineConfig} from 'vite'
import { createHtmlPlugin } from 'vite-plugin-html

export default defineConfig({
    plugins:[
        //---------处理index.html----------
        createHtmlPlugin({
             inject: {//注入数据。HTML中的<%-xxxx %>显示数据
                 data: {
                 	title: '首页',
                 	injectScript: `<script src="./inject.js"></script>`,
                 }
             }
         })   //第三方插件
    ]
})index.html
<html lang="en">
<head>
    <meta charset="UTF-8">
    <meta name="viewport" content="width=device-width, initial-scale=1.0">
    <title><%-title %></title>
    <%- injectScript %>
    <script src="/main.js" type="module"></script>
</head>
<body>
    测试
</body>
</html>实现vite-plugin-html
插件代码
export default (userOption={})=>{
    const injectData=userOption?.inject?.data||{}

    return {
      name:'create-html-plugin',
      enforce:'post',
      transformIndexHtml(html) {
       for(let key in injectData){
        // console.log(`<%-${key}%>`,injectData[key])
        html=html.replace(`<%-${key}%>`,injectData[key])
       }

        // 在这里可以修改HTML的内容
        return html
      },
    }
}配置vite.config.js
import {defineConfig} from 'vite'
import CreateHtmlPlugin  from './plugins/CreateHtmlPlugin'

export default defineConfig({
    plugins:[
        CreateHtmlPlugin({
            inject: {
                data: {
                    title: '首页',
                }
            }
        }),
    ]
})vite-aliases插件
使用这个插件,就不必在项目中使用别名配置了
resolve:{
        alias:{
            "@":path.resolve(__dirname,'./src')
        }
},默认,插件会生成别名 ,详情参考:仓库地址
安装:
yarn add vite-aliases -D # 使用node16以上版本使用:
// vite.config.js
import { ViteAliases } from 'vite-aliases'

export default {
  plugins: [
    ViteAliases()
  ]
};实现vite-plugin-aliases插件
import fs from "fs";
import path from "path";

function getTotalFolder(basePath) {
    let resAliasObj = {};

    resAliasObj["@"] = path.resolve(__dirname, basePath);

    const dirArr = fs.readdirSync(path.resolve(__dirname, basePath));
    dirArr.forEach((fileOrDirName) => {
        let statInfo = fs.statSync(
            path.resolve(__dirname, basePath, fileOrDirName)
        );
        if (statInfo.isDirectory()) {
            resAliasObj[`@${fileOrDirName}`] = path.resolve(
                __dirname,
                basePath,
                fileOrDirName
            );
        }
    });
    return resAliasObj;
}

export default () => {
    return {
        //config钩子,在解析 Vite 配置前调用。将最终返回的对象与vite.config.js合并,作为最终的vite配置
        config(config, env) {
            //注意,插件是在Vite中处理(Node环境),所以这里的输出在Node的控制台
            console.log("config-->", config); //vite.config.js中的配置对象
            console.log("env-->", env); // { mode: 'development', command: 'serve', ssrBuild: false }

            let aliasObj = getTotalFolder("../src");
            console.log(aliasObj);
            return {
                resolve: {
                    alias: aliasObj,
                },
            };
        },
    };
};vite-plugin-mock插件
安装:
yarn add vite-plugin-mock mockjs -D

# vite-plugin-mock的mock功能依赖于mockjs,所以这里还需要安装mockjs使用:
import { viteMockServe } from 'vite-plugin-mock'

export default defineConfig({
    plugins:[
        viteMockServe({
            mockPath: 'mock',//放置mock文件的目录
        		enable: true, //启用mock
        })
    ]
})配置接口mock数据(mock文件,必须要放在根目录/mock下)
//index.js
import mockJS from 'mockjs'


//使用mockJS生成的100条数据
const userList=mockJS.mock({
    //mockjs文档地址:http://mockjs.com/examples.html#Name
    "data|100":[ //100条数据
        {
            cname:'@cname',//中文名
            "id|+1":1, //递增的id
            time:"@time", //'00:14:47'
            data:'@date' //'1980-09-20'
        }
    ]
})


module.exports=[
    {
      	//定义一个接口
        url:'/api/users',
        method:'post',
        response:({body})=>{
            //body 请求体
            console.log('body',body);
            return {
                code:0,
                data:userList,
                msg:'ok'
            }
        }
    }
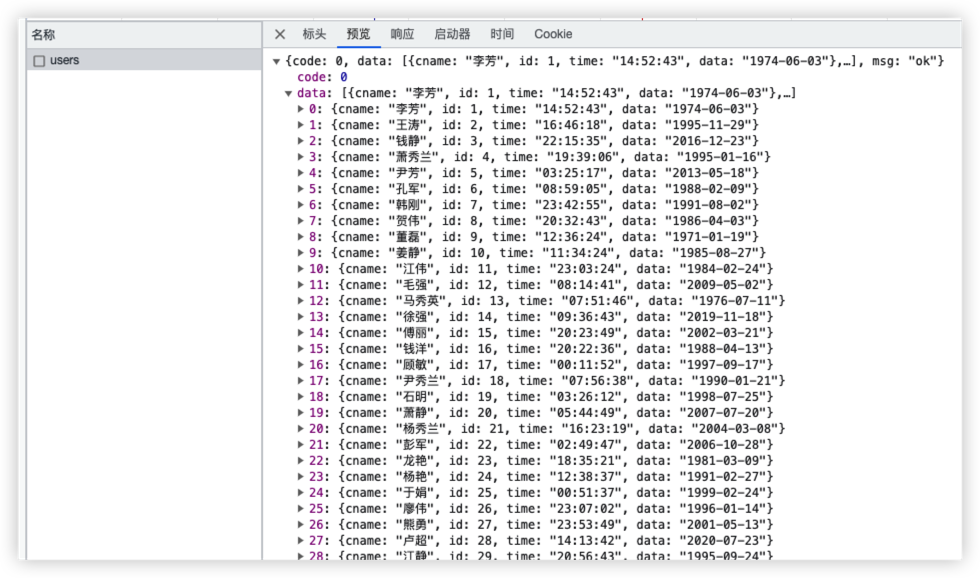
]测试插件功能
//main.js
fetch('/api/users',{
  method:'post'
}).then(res=>{
    console.log(res)
}).catch(err=>{
    console.log(err)
})
vite-plugin-env-parse 插件
将.env文件中设置的 VITE_xxx 环境变量,在项目中添加TS提示:https://github.com/yue1123/vite-plugin-env-parse
其实也可以自己写 vite-env.d.ts文件手动添加TS提示,但是当环境变量很多时就比较麻烦了

console消除插件(待补充)
打包后静态资源自动上传cdn插件(待补充)
console徽章
import { JSDOM } from "jsdom";
import { execSync } from "child_process";

function outputConsoleStr(output){
    const styleArr=[
        'background:green',
        'color:#FFFFFF',
        'font-weight: bold',
        'padding:5px',
        'border:1px solid #fff',
    ]

    return `console.log('%c${output}','${styleArr.join(';')}');`

}


export default (userOption={}) => {

    const {
        customExtendInfo=null //自定义字段
    }=userOption

    return {
        name: "vite-plugin-mark-version",
        transformIndexHtml(html) {
            const commitInfo = execSync(`git log -1 HEAD --pretty='%cd,%an,%s,%h'`, {
                encoding: "utf-8",
            });

            //将html字符串转化为Dom
            const dom = new JSDOM(html);
            const document = dom.window.document;

            //获取Git信息
            const commitInfoList = commitInfo.split(",");
            let infoMeta = document.createElement("meta");

            infoMeta.setAttribute("time", new Date());
            infoMeta.setAttribute("auth", commitInfoList[1]);
            infoMeta.setAttribute("description", commitInfoList[2]);
            infoMeta.setAttribute("hash", commitInfoList[3]);

            if(customExtendInfo){
                for(let key in customExtendInfo){
                    infoMeta.setAttribute(key, customExtendInfo[key]);
                }
            }
            //向HTML中插入信息
            document.head.append(infoMeta)


            //向浏览器控制台输出信息
            let resOutput=''
            const script=document.createElement('script')
            resOutput+=outputConsoleStr(`作者: ${commitInfoList[1]}`)
            resOutput+=outputConsoleStr(`提交msg: ${commitInfoList[2]}`)
            resOutput+=outputConsoleStr(`环境: ${process.env.NODE_ENV}`)
            script.textContent=resOutput
            document.body.append(script)

            return dom.serialize();
        },
    };
};这是简书的console种显示的徽章

Vite集成TS
Vite天生支持TS,但是其仅仅执行 .ts 文件的转译工作(TS类型检查不通过也能正常执行),并不执行 任何类型检查,并假定TS的类型错误已经被 IDE 显示出来,并被开发者处理了
如下运行一个项目,会发现main.ts文件内的代码正常执行
# 初始化项目
yarn init -y

# 装vite
yarn add vite -D


# 新建main.ts

# 新建index.html, 引入ts文件 <script src="./main.ts" type="module"></script>


# 在package.json中增加了脚本"scripts": {"dev":"vite dev"},启动vite
yarn dev但是
ts代码如果发生类型错误(这里的报错是编辑器提示的错误,getStuName的入参应该是string类型,但是传入的是number类型),终端与浏览器仍然会正常执行,无任何报错
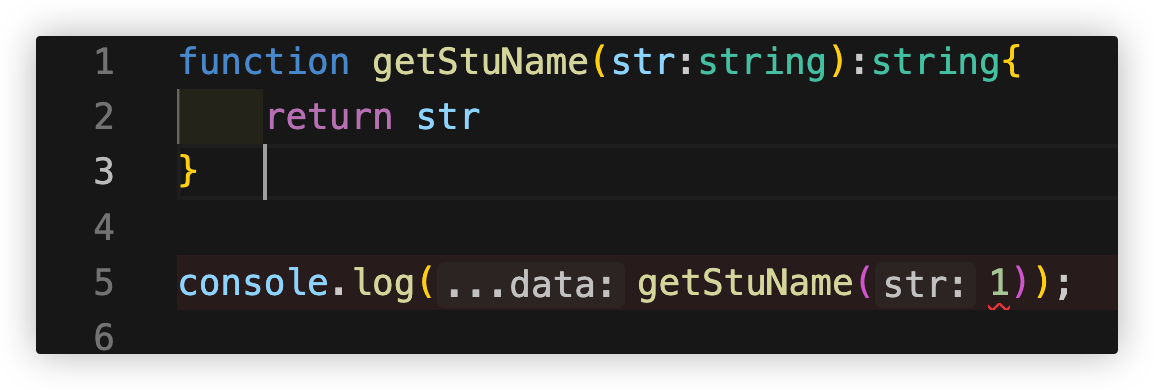

解决
使用插件:vite-plugin-checker
前提:
yarn add typescript -D #该插件依赖typescript根目录下增加 tsconfig.json
{
    "compilerOptions": {
        "skipLibCheck": true,//跳过对库的ts检查(不加这句,就会输出node_modules下的一些检查信息)
        "module": "ESNext", //TS编译后产物的JS版本

    },
    "include": ["src/**/*.ts"] //设置ts检查的目录
}安装:
yarn add vite-plugin-checker -D配置:
// vite.config.js
import checker from 'vite-plugin-checker'
export default {
  plugins: [
    checker({
      // e.g. use TypeScript check
      typescript: true,
    }),
  ],
}结果:


补充一点:build脚本需要改成下面的,可以让TS类型检查出现错误后,阻止Vite继续构建
"scripts": {
    "dev": "vite dev",
    "build":"tsc --noEmit && vite build"
},在代码中使用环境变量时,报TS错误。解决方案参考文档

安装node相关的类型
yarn add @types/node -Dvite.config.ts
import {defineConfig,loadEnv} from 'vite'
import checker from 'vite-plugin-checker'


export default defineConfig(({command,mode})=>{
    //加载.env.*文件
    loadEnv(mode,process.cwd()) //不安装@types/node,这里就会提示没有process

    return {
        plugins:[
          	//启动ts检查插件
            checker({
                typescript: true,
              }),
        ]
    }
})在src下,新建env.d.ts(注意,一定是放在src下,否则不生效)
/// <reference types="vite/client" />

interface ImportMetaEnv {
    readonly VITE_BASE_URL: string  //需要的环境变量定义在这里
    // 更多环境变量...
  }

interface ImportMeta {
    readonly env: ImportMetaEnv
}Vite性能优化
性能优化包括哪些?
开发时构建优化
使用
yarn dev、yarn serve启动项目的时长。vite是利用浏览器对ESM的支持,按需加载的,速度很快页面性能指标:首屏渲染(FP,First Paint)、首屏渲染(FCP,Frist Content Paint)
- 页面懒加载
- http优化:强缓存、协商缓存
生产的构建优化
- 优化体积:分包、构建产物压缩、treeshaking、图片资源的压缩、cdn加载静态资源
分包策略
在上面使用TS的项目的架子
安装lodash
yarn add lodash # 安装lodash

yarn add @types/lodash -D # 安装lodash的类型声明main.ts中
import { forEach } from 'lodash'

forEach([7,8,4],(item)=>{
    console.log(item)
})修改tsconfig.json
{
    "compilerOptions": {
        "skipLibCheck": true,
        "module": "ESNext",
      	// 文档:https://typescript.bootcss.com/module-resolution.html
      	//值:Classic(默认值)| Node 。例如ts中使用import {a} from 'xxx' ,
      	//    Classic会在当前目录下查找xxx.ts、xxx.d.ts,找不到就到上级查找这两个文件
      	//    Node,是按照Node的方式查找依赖。xxx是路径就去该路径下找,如果是包名,就去node_modules下查找
        "moduleResolution":"Node"

    },
    "include": ["src/**/*.ts"]
}修改vite.config.ts
import {defineConfig,loadEnv} from 'vite'
import checker from 'vite-plugin-checker'


export default defineConfig(({command,mode})=>{
    loadEnv(mode,process.cwd())

    return {
        build:{
          	//这里增加配置,打包后js不压缩
            minify:false
        },
        plugins:[
            checker({
                typescript: true,
              }),
        ]
    }
})执行打包(yarn build),打包的js文件中完整的写入了lodash文件

前面学过,只要代码发生变化,打包后的js文件名中的hash部分就会变化。这是因为浏览器如果发现曾经请求同名文件,就会直接使用缓存。只要保证打包后部署后的文件名变换了,用户访问网站时就一定会请求新的js文件
提出问题
像loadsh这种,在开发中引入的第三方,只要不改变版本是不会变化的
业务代码变化会导致文件名变化,每次用户重新请求时,整个文件也会重新返回给用户,但是其中的loash等第三方库是不会变化的
解决问题
修改vite.config.ts配置
import {defineConfig,loadEnv} from 'vite'
import checker from 'vite-plugin-checker'


export default defineConfig(({command,mode})=>{

    loadEnv(mode,process.cwd())

    return {
        build:{
            minify:false,
            rollupOptions:{
                "output":{
                  	//新增配置
                    "manualChunks":(sourcePath)=>{
                        console.log('build输出:',sourcePath)

                    }
                }
            }
        },
        plugins:[
            checker({
                typescript: true,
              }),
        ]
    }
})yarn build后,控制台输出。可以看出来配置manualChunks的参数是打包的源文件

import {defineConfig,loadEnv} from 'vite'
import checker from 'vite-plugin-checker'


export default defineConfig(({command,mode})=>{

    loadEnv(mode,process.cwd())

    return {
        build:{
            minify:false,
            rollupOptions:{
                "output":{
                    "manualChunks":(sourcePath)=>{
                        console.log('build输出:',sourcePath)
                        if(sourcePath.includes('node_modules')){
                            return 'vendor' //文件名。默认打包后的命名规则一般是[fileName]-[hash].js
                        }
                    }
                }
            }
        },
        plugins:[
            checker({
                typescript: true,
              }),
        ]
    }
})
可以看到lodash文件被单独打包到一个单独文件中。且业务代码变化后,再次打包这个文件名不会变化

多入口
https://cn.vitejs.dev/guide/build.html#multi-page-app
如下,定义了main、nested两个入口,值是入口文件的路径
// vite.config.js
import { resolve } from 'path'
import { defineConfig } from 'vite'

export default defineConfig({
  build: {
    rollupOptions: {
      input: {
        main: resolve(__dirname, 'index.html'),
        nested: resolve(__dirname, 'nested/index.html'),
      },
    },
  },
})区分两个入口,对于开发没有影响。仅仅是打包时,将其作为两个入口文件
如何做到提升性能?
- 当用户访问一个入口时,浏览器会根据该入口的URL加载相应的输出文件和资源。而不是加载整个项目的资源
- 如果多个入口有公用的资源,用户访问过入口A,再次访问入口B会直接使用该资源的缓存来提升速度
gzip压缩
将静态资源压缩
浏览器请求到的是压缩包,对压缩包解压后才显示出来
观察下以前yarn build后,终端的输出

使用vite插件:vite-plugin-compression
安装:
yarn add vite-plugin-compression -D引入插件
import {defineConfig,loadEnv} from 'vite'
import checker from 'vite-plugin-checker'
import viteCompression from 'vite-plugin-compression';
import path from 'path'


export default defineConfig(({command,mode})=>{

    loadEnv(mode,process.cwd())

    return {
        build:{
            minify:false,
            rollupOptions:{
                "output":{
                    "manualChunks":(sourcePath)=>{//分包优化
                        if(sourcePath.includes('node_modules')){
                            return 'vendor'
                        }
                    }
                }
            }
        },
        plugins:[
            checker({
                typescript: true,
              }),
          		//使用压缩插件。插件默认压缩 '/\.(js|mjs|json|css|html)$/i'
              viteCompression()
        ]
    }
})执行打包 yarn build

dist目录下,给打包后的js文件,都生成一个.gz压缩包
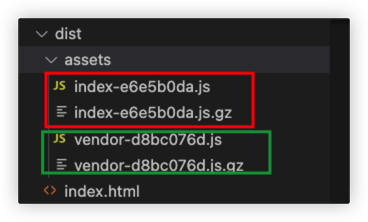
nginx部署配置
# '~*'表示不区分大小写,'~'表示区分大小写,'\.'是对点的转义,'\.js$'表示以.js为结尾的请求
location /assets/~*\.js$ {
  gzip_static on;  #启用了 Nginx 的静态文件压缩功能
  gzip_types application/javascript;  #指定了要进行压缩的文件类型为 JavaScript 文件
}当请求js文件时,Nginx 会检查是否存在同名的 .gz 文件,并返回压缩版本的文件。如果没有找到压缩文件,则会返回未压缩的文件。
同时,设置响应头content-encoding:gzip,提示浏览器收到结果后解压。注意:浏览器解压也会损耗一定时间,所以通常只有文件过大时我们才会启用压缩
动态导入
动态导入是ES6的特性,Vite可以利用该特性实现代码分割,等到需要某个模块时,再动态下载
例子:
main.ts 引入图片
import pic from './test-pic.png'
const img=document.createElement('img')
img.src=pic
document.body.append(img)vite.config.ts
import {defineConfig,loadEnv} from 'vite'
import checker from 'vite-plugin-checker'
import viteCompression from 'vite-plugin-compression';
import path from 'path'


export default defineConfig(({command,mode})=>{

    loadEnv(mode,process.cwd())

    return {
        build:{
            assetsInlineLimit:4000, //单位B
        },
        plugins:[
            checker({
                typescript: true, //ts检查插件
              }),
        ]
    }
})打包yarn build,这里使用的图片小于4000B(assetsInlineLimit配置),则会转为base64放入js文件中,导致文件体积非常大
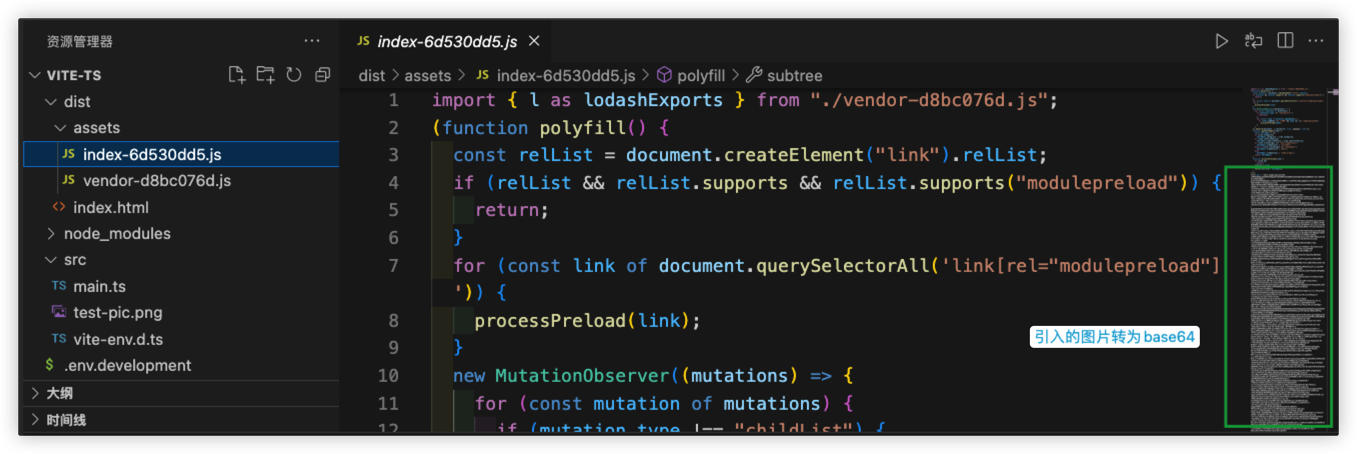
动态导入
import(xxx)函数返回值是一个Promise对象,所以可以用then接收返回值
import('./test-pic.png').then(pic=>{//返回值是一个Module对象
    console.log(pic)
    const img=document.createElement('img')
    img.src=pic.default //default属性是动态导入的资源
    document.body.append(img)
})执行打包yarn build。动态导入的内容会被单独打包成一个文件,当使用时再去动态加载
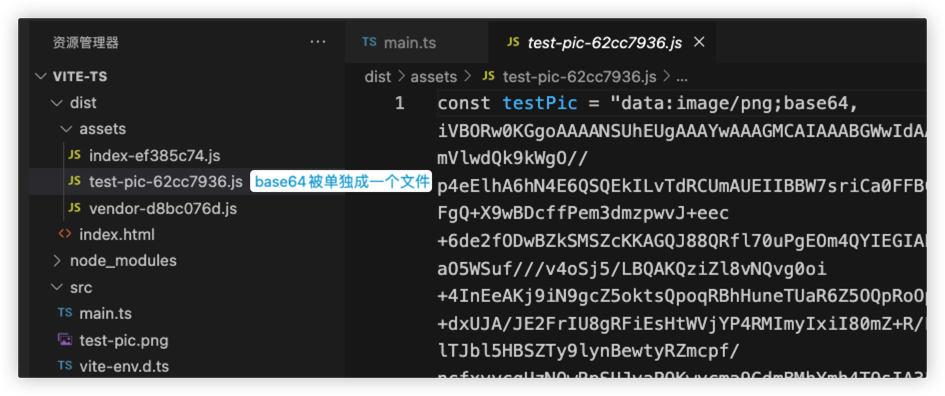
这种动态导入实际上,一般用在动态组件。下面是Vue的router.js文件。其中的component字段就是使用动态导入
import Vue from 'vue';
import VueRouter from 'vue-router';

Vue.use(VueRouter);

const routes = [
  {
    path: '/login',
    name: 'login',
    component: () => import('../views/login.vue'),
  },
  {
    path: '/',
    name: 'user',
    redirect: { path: 'index' },
    component: () => import('../layout/index.vue'),
    children: [
      {
        path: 'index',
        name: 'index',
        component: () => import('../views/index.vue'),
      },
      {
        path: 'my',
        name: 'my',
        component: () => import('../views/my.vue'),
      },
    ],
  },
];

const router = new VueRouter({
  base: process.env.VUE_APP_PATH_NAME,
  routes
});


export default router;webpack动态导入的原理
Vite中动态导入利用的是ES6语法,需要浏览器原生支持该语法。而webpack则是自己实现动态导入
function import(path){
    return new Promise((resolve)=>{
      	//只有路由进入了path页面,e()函数创建一个script标签,将src字段设置为提前编译好的页面js文件,并插入body。然后才进入then中的逻辑加载页面js
        webpack__require.e().then(()=>{
            const result=await webpack__require(path)
            resolve(result)
        })
    })
}CDN加速
一般我们会将打包后的静态资源上传到CDN,这样用户可以从最近的CDN节点下载数据,加快下载速度
前面的分包策略可以将lodash这种第三方资源打包后是单独的js文件
这里其实,我们也可以直接使用插件将打包后的文件,替换为使用CDN地址
使用vite插件:vite-plugin-cdn-import
安装:
yarn add vite-plugin-cdn-import -D配置文件vite.config.ts
import { defineConfig, loadEnv } from 'vite'
import checker from 'vite-plugin-checker'
import importToCDN from 'vite-plugin-cdn-import'


export default defineConfig(({ command, mode }) => {

    loadEnv(mode, process.cwd())

    return {
        plugins: [
            checker({
                typescript: true,
            }),

          	//引入插件。该插件仅仅会将打包后的包替换为cdn
            importToCDN({
                modules: [
                    {
                        name: 'lodash', //包名
                        var: '_', //引入的名,例如: import _ from 'lodash'
                        path: 'https://cdn.jsdelivr.net/npm/lodash@4.17.21/lodash.min.js' //将打包后中的lodash,替换为cdn地址
                    }
                ]
            })
        ]
    }
})package.json增加preview脚本
{
  "name": "vite-ts",
  "version": "1.0.0",
  "main": "index.js",
  "scripts": {
    "dev": "vite dev",
    "build": "tsc --noEmit && vite build",
    "preview":"vite preview"
  },
  "license": "MIT",
  "devDependencies": {
    "@types/lodash": "^4.14.195",
    "@types/node": "^20.4.2",
    "typescript": "^5.1.6",
    "vite": "^4.4.3",
    "vite-plugin-cdn-import": "^0.3.5",
    "vite-plugin-checker": "^0.6.1",
    "vite-plugin-compression": "^0.5.1"
  },
  "dependencies": {
    "lodash": "^4.17.21"
  }
}yarn preview 预览打包后的项目。我们会发现script中使用CDN
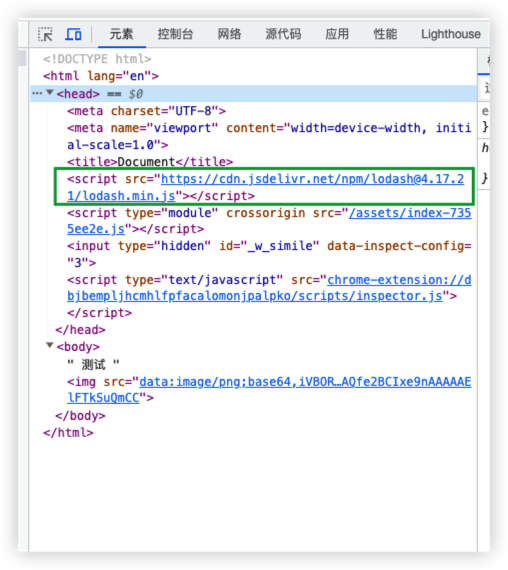
补充:
这里的插件仅仅是帮助我们将npm包替换为指定的CDN
目前,我们公司内部使用内部部署平台时,可以指定编译脚本,我们实现了一个工具来将打包后的assets文件整体上传CDN,并用项目名创建一个目录放在其下。将生产环境的base指定为我们的CDN地址
项目部署在docker中的nginx下,用户其实只是访问了打包后的index.html,实际加载的文件都是从CDN加载的
