Redis7学习笔记
学习笔记 提取码: 4bcj
概述
简介
Redis(Remote Dictionary Server,远程字典服务),是一个使用 ANSI C 语言编写、支持网络、 可基于内存亦可持久化的日志型、NoSQL 开源内存数据库
场景与分类
用户请求服务器,读相关的请求会先查Redis中是否存在
- 不存在,去数据库查询后,同步到Redis中,然后返回给用户
- 存在,直接返回用户
写相关的请求会直接写入数据库
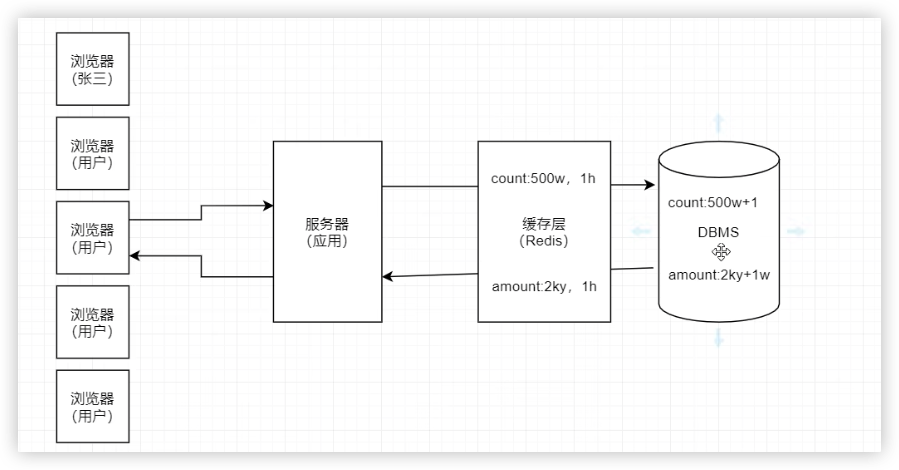
根据数据的特性,Redis缓存一般可划分为两类:
实时同步缓存
DBMS 中数据更新后,Redis 缓存中的存放的相关数据会被立即清除,如果再有对该数据的请求,必须先从 DBMS 中查询获取到最新数据,然后再写入到 Redis
阶段性同步缓存 Redis 缓存中的数据允许在一段时间内与 DBMS 中的数据不完全一致,而这个时间段就是这个缓存数据的过期时间。如果再有对该数据的请求,必须先从 DBMS 中查询获取到最新数据,然后再写入到 Redis
服务部署后有一个warmup(预热)的过程,一般会在这个时机将一些阶段性同步的缓存先入到Redis中
优势
性能极高
Redis 读的速度可以达到 11w 次/s,写的速度可以达到 8w 次/s。只所以具有这么高的性能,因为以下几点原因:(1)Redis 的所有操作都是在内存中发生的。(2)Redis 是用 C 语言开发的。(3)Redis 源码非常精细(集性能与优雅于一身)
持久化
Redis 内存中的数据可以进行持久化(其有两种方式:RDB 与 AOF)
高可用集群
Redis 提供了高可用的主从集群功能,可以确保系统的安全性
丰富的数据类型 Redis 是一个 key-value 存储系统。支持存储的 value 类型很多,包括String(字符串)、List(链表)、Set(集合)、Zset(sorted set 有序集合)、Hash(哈希类型)、 BitMap、HyperLogLog、Geospatial 类型
BitMap:一般用于大数据量的二值性统计
HyperLogLog(Hyperlog Log):用于对数据量超级庞大的日志做去重统计
Geospatial:地理空间,其主要用于地理位置相关的计算
强大的功能
Redis 提供了数据过期功能、发布/订阅功能、简单事务功能,还支持 Lua脚本扩展功能
支持 ACL 权限控制:
Redis6 开始引入了 ACL 模块,可以为不同用户定制不同的用户权限
支持多线程 IO 模型
Redis 之前版本采用的是单线程模型,从 6.0 版本开始支持了多线程模型
安装
前提准备
我们这里使用虚拟机,将Redis安装到虚拟机上(CentOS系统)
创建虚拟机、通过SSH连接到虚拟机等可以参考这篇文章
安装Redis
1、下载
在本地下载压缩包,使用FTP上传到虚拟机中
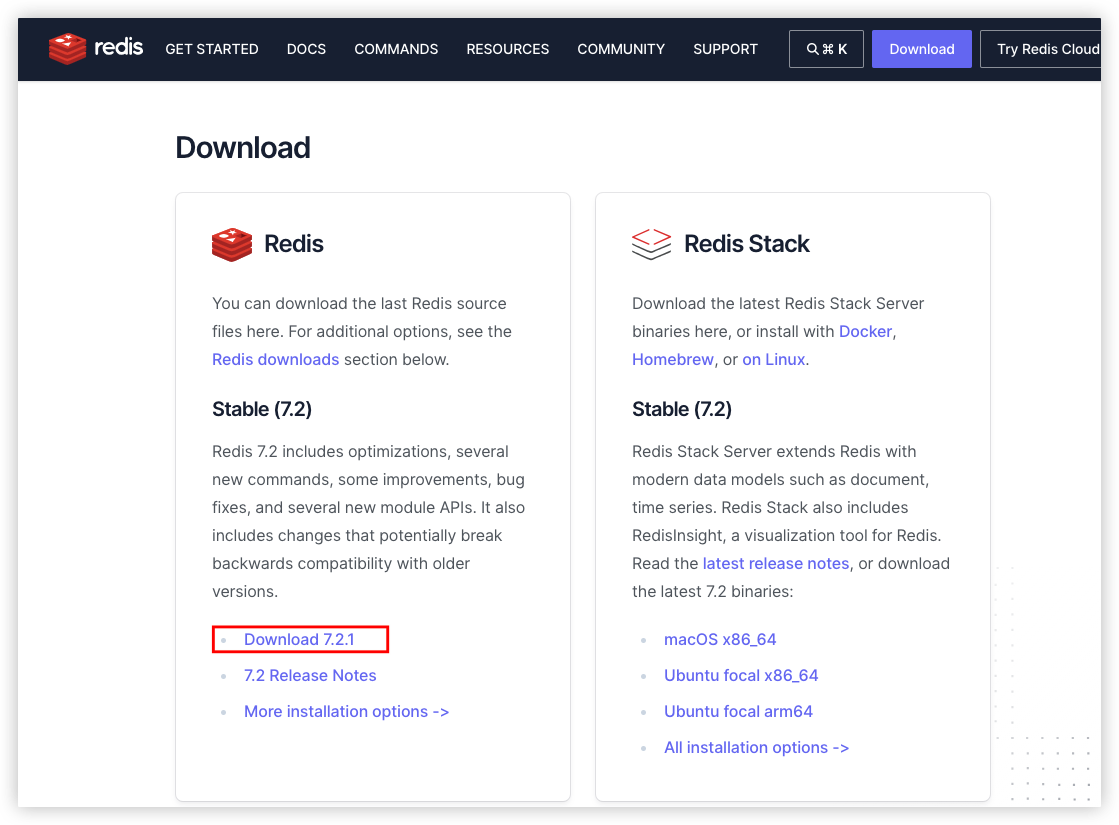
2、虚拟机中解压、编译、安装
解压(记住解压目录,修改Redis配置的配置文件在这里)
tar -zxvf xxx.tar.gz -C /opt/apps #解压文件到/opt目录下(如果提示没有app文件夹,则使用mkdir app创建)编译、安装
# 编译环境
yum -y install gcc gcc-c++

# 进入解压后的redis目录,其中有一个Makefile文件,使用make编译
make

# 安装
make install安装后,提示安装了下面三个部分:redis 服务器、客户端与性能测试工具benchmark

安装后的结果:
软件已被安装在/usr/local/bin这个目录下了

环境变量也被自动配置好了
shellecho $PATH #/usr/local/sbin:/usr/local/bin:/usr/sbin:/usr/bin:/root/bin解压目录(我们这里是 /opt/app/redis)
其中,有redis配置文件、哨兵配置文件等各种配置相关的文件
启动/停止
方式一
启动
redis-server #使用默认redis配置,启动redis服务。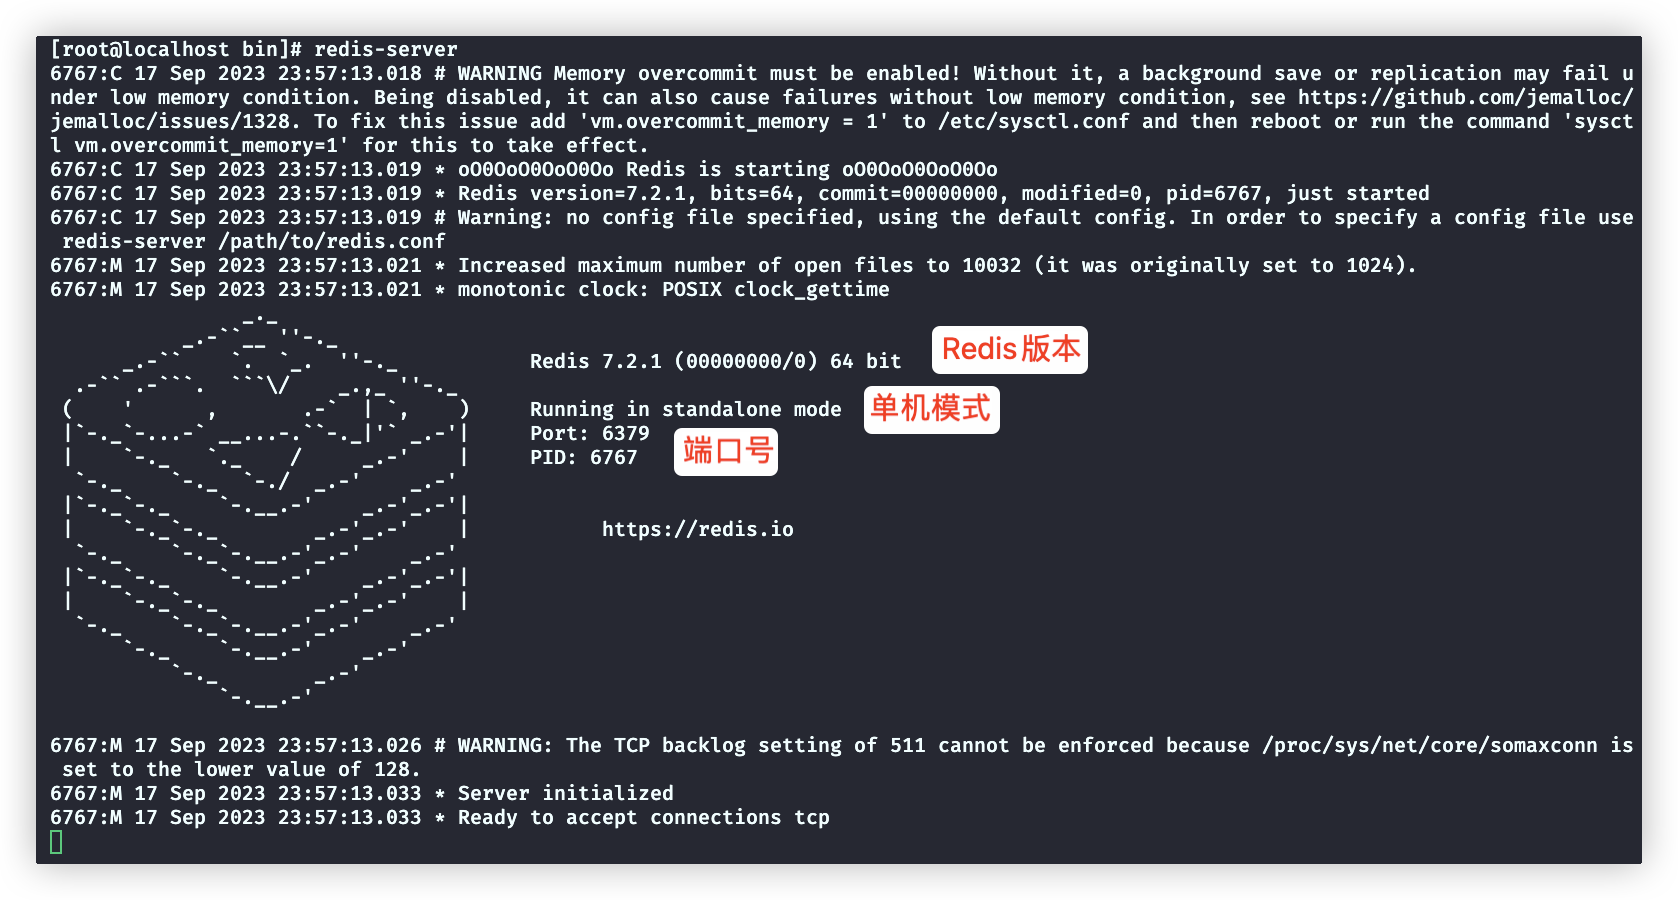
停止:关闭窗口则停止
方式二
守护进程方式启动(不会随着窗口关闭,而关闭)
先修改配置文件,在redis安装目录下的redis.conf文件中开启配置

启动
redis-server /opt/apps/redis/redis.conf查看和redis相关的线程,通过这个就可以判断redis是否启动了
ps aux | grep redis
关闭
# 客户端发送关闭指令
redis-cli shutdown

# 如果服务端启用了密码,通过-a 输出密码
redis-cli -a xxx shutdownRedis服务端配置
redis.conf中配置选项很多,推荐在vi、vim编辑器中使用下面的方式搜索配置
输入 / 进入查找模式
输入 查找关键词
输入 回车
输入 n 下一个
输入 esc退出查找模式生产环境必须配置
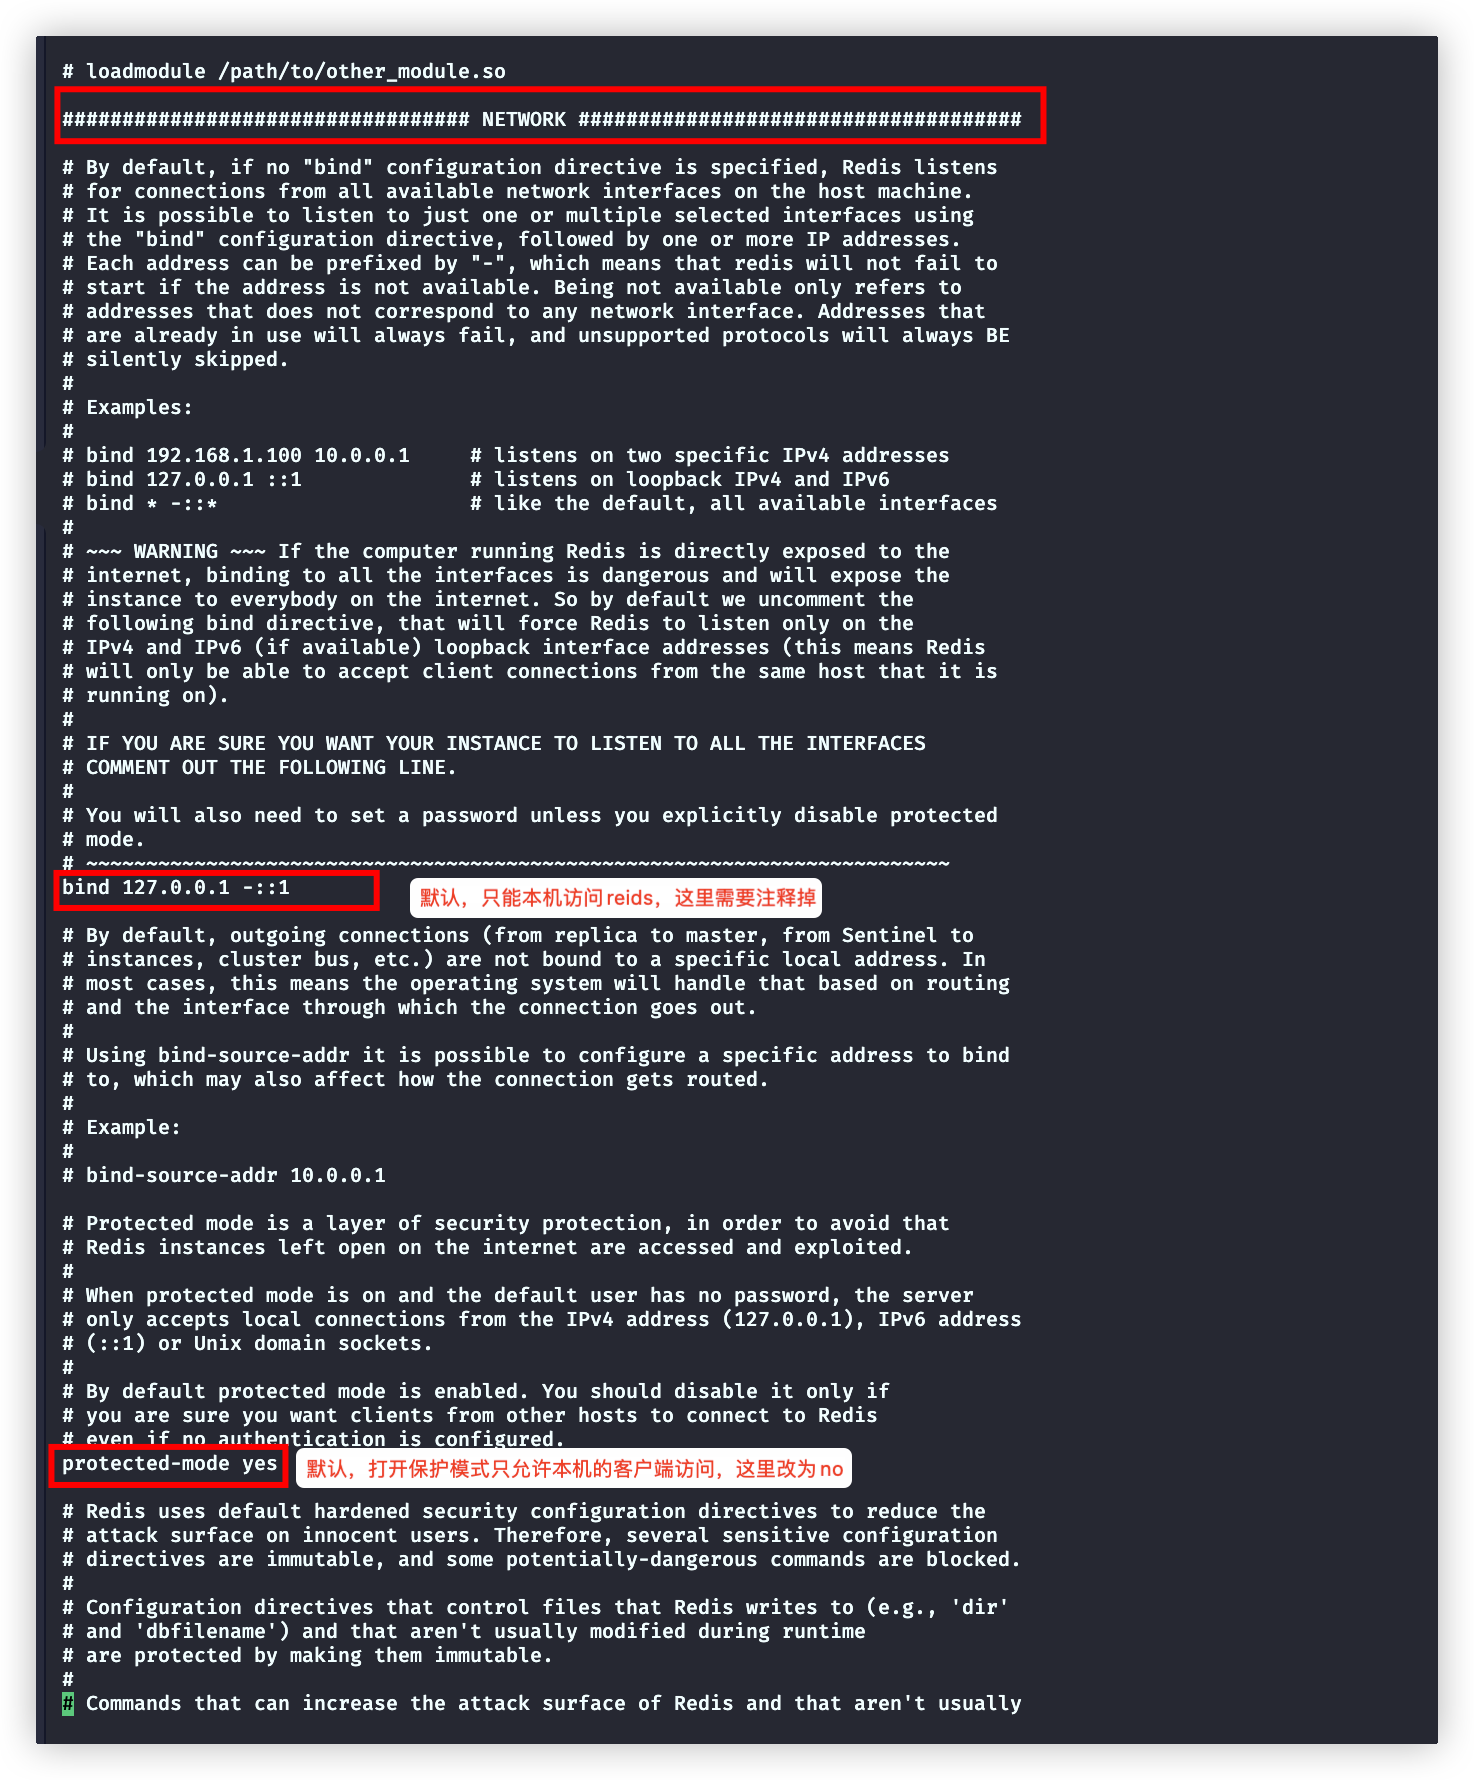
关闭绑定客户端IP、保护模式
开启密码

redis-cli #进入交互模式(输入exit可退出交互模式)

set name tom #设置name:tom这个键值对,提示没权限
get name #获取name的值,提示没权限

reids-cli -a hedaodao #-a后是密码,进入交互模式,就有权限了禁用危险命令

rename-command flushall "" # 清空 Redis 服务器上的所有数据库

rename-command flushdb "" # 清空当前选择的数据库(默认是数据库编号为0的数据库)network模块
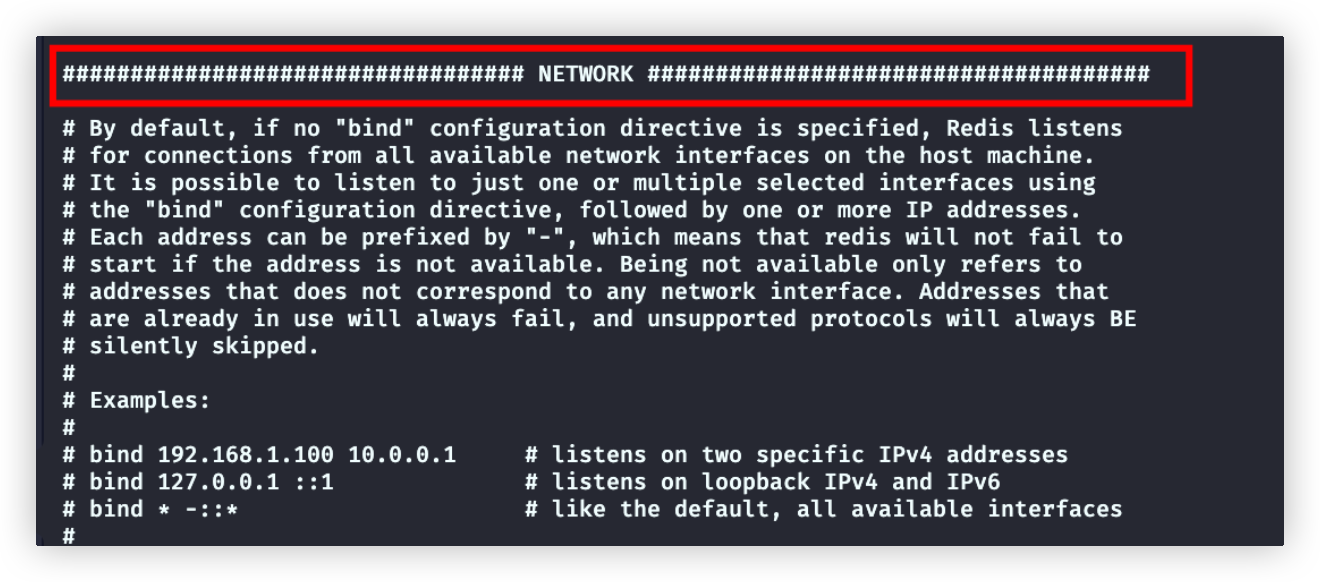
# 这两个配置前面讲过了。需要注释掉
bind 127.0.0.1 -::1
protected-mode yes

# 启端口号
port 6379

# 服务端与客户端建立TCP连接的队列容量,其值与Linux系统的somaxconn参数取最小值为实际的队列容量。
# 查询somaxconn值: cat /proc/sys/net/core/somaxconn
# 查询somaxconn值: vim /etc/sysctl.conf 文件添加 net.core.somaxconn=2048。使用sysctl -p 使得配置生效
# 生产环境下(特别是高并发场景下),backlog 的值最好要大一些,否则可能会影响系统性能。所以一般设置somaxconn大点,tcp-backlog 就会生效了
tcp-backlog 551

# 客户端与Redis服务器连接空闲时,超过多少时间断开连接。0表示默认值2小时,值设置为2m为2分钟
timeout 0

# 单位:秒。Redis服务端间隔多少时间检测下服务端是否存活,如果连续两次客户端未响应,则服务端断开连接
tcp-keepalive 300general模块
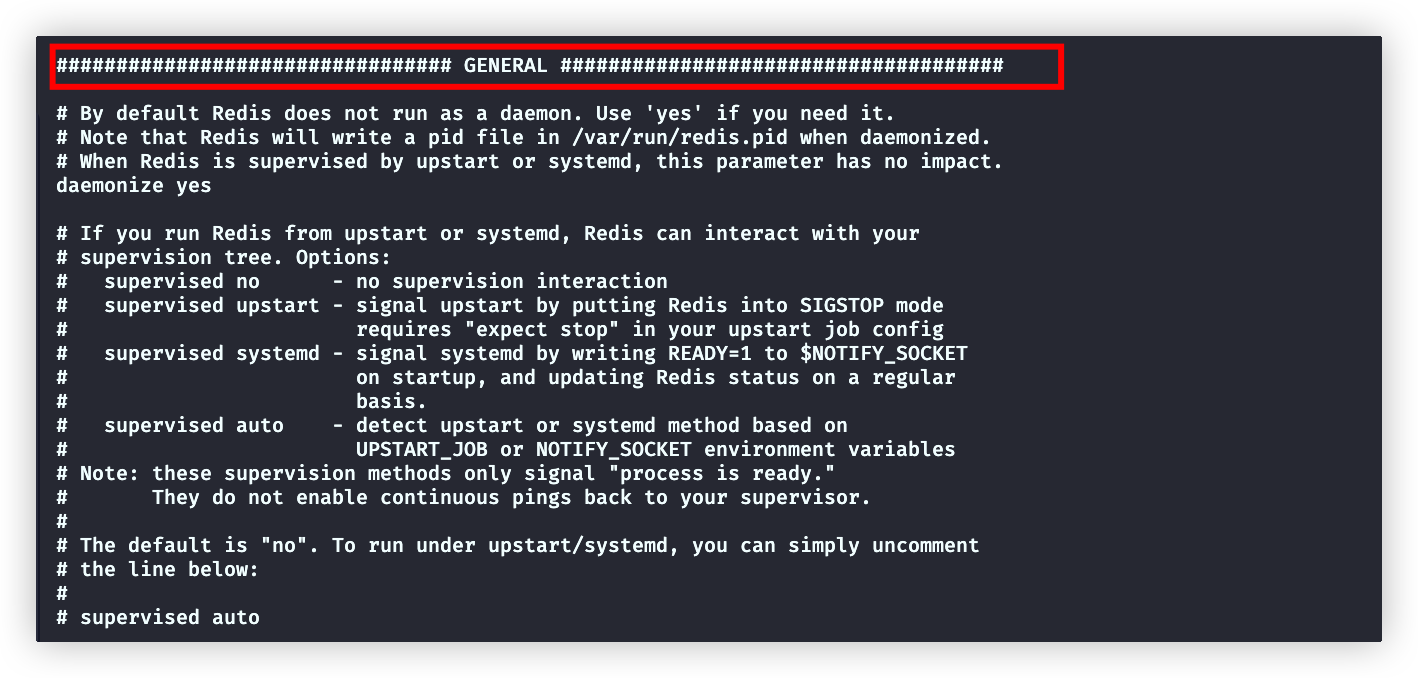
# 默认no,需修改为yes,以守护进程方式启动 :redis-server xxxx/redis.conf
daemonize yes


# 该配置用于指定 Redis 运行时 pid 写入的文件(前台启动+守护进程启动)
# 如果注释掉该设置,守护进程启动:pid 文件为/var/run/redis.pid;前台启动(daemonize 为 no):不生产 pid 文件
pidfile /var/run/redis_6379.pid

# 日志级别:debug(一般在开发和测试时使用)、verbose、notice(生产中使用)、warning(只记录非常重要/关键的信息)
loglevel notice

# 指定日志文件
# 设置为"",代表如果前台启动,输出到控制台(标准输出);如果是守护进程启动,不输出
# 比如设置为 /root/redis.log ,就是出输出到/root/redis.log文件中
logfile ""

# 设置redis数据库的数据,默认16个数据库
databases 16security模块

# 设置密码,注释掉就可以不用密码了
requirepass xxxclient模块
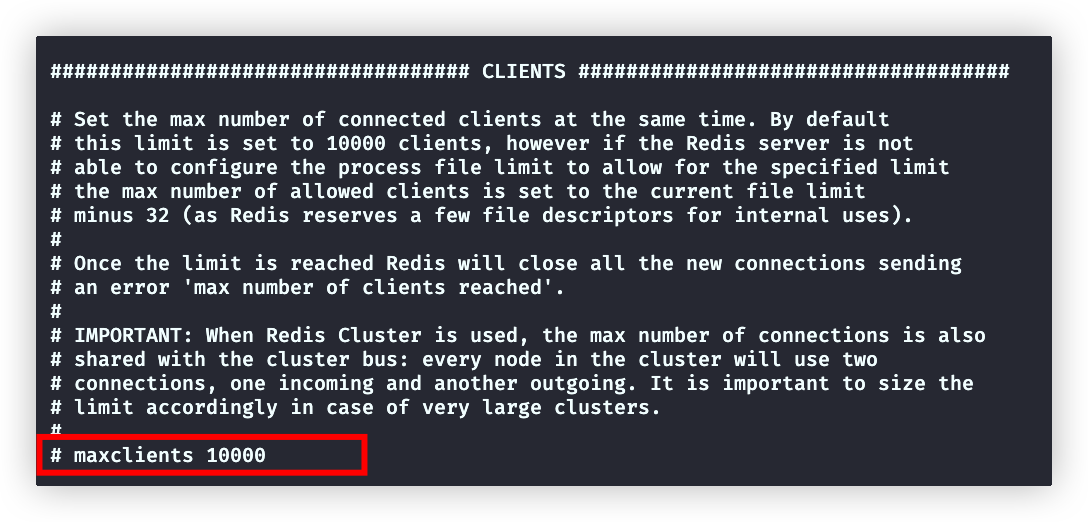
Linux系统中一个进程可以拥有的最大文件描述符数量(文件描述符基本上是对打开的文件、套接字或其他输入/输出资源的引用)
系统通过限制文件描述符的数量,可以控制进程可以消耗的资源,并防止它打开过多的文件,从而导致资源耗尽
ulimit -n # 查询系统限制maxclients设置Redis服务能够连接的客户端数量,但是实际其不能超过(系统的限制的数量-32),32是Redis内部使用的文件描述符数量
要想修改系统限制
vim /etc/secutiry/limits.conf

# 添加
* hard nofile xxx
* soft nofile xxx

# <domain>: 可以是用户名、用户组名,或者以@符号开头的用户组名。
# <type>: 指定限制的类型,可以是 soft(软限制)或 hard(硬限制)。
# <item>: 使用 nofile 来设置文件描述符的限制。
# <value>: 设置文件描述符的限制值。memory management模块

# 设置最大占用内存,如果超出则按照maxmamory-policy字段设置处理策略
# maxmemory <bytes>


# Redis的内存逐出策略有8种,如下:
# 1、volatile-lru:使用近似 LRU 算法移除,仅适用于设置了过期时间的 key。
# 2、allkeys-lru:使用近似 LRU 算法移除,可适用于所有类型的 key。
# 3、volatile-lfu:使用近似 LFU 算法移除,仅适用于设置了过期时间的 key。
# 4、allkeys-lfu:使用近似 LFU 算法移除,可适用于所有类型的 key。
# 5、volatile-random:随机移除一个 key,仅适用于设置了过期时间的 key。
# 6、allkeys-random:随机移除一个 key,可适用于所有类型的 key。
# 7、volatile-ttl:移除距离过期时间最近的 key。
# 8、noeviction:不移除任何内容,只是在写操作时返回一个错误,默认值。
# 注意:即使使用设置的策略后,仍超出内存限制,则对get操作正常返回,对于其他类似于set、lpush等返回错误
# maxmamory-policy noeviction


# LRU、LFU、ttl等逐出换成的算法是近似的(节省内存),这个属性用来指定挑选要删除的 key 的样本数量。默认5表示Redis从最近使用的5个key中挑选一个逐出内存,实践表明5也已经足够了,10非常准确但是内存占用太大
# maxmemory-samples 5


# 移除容忍度。选出移出内存的key,并不是立即移除。
# 0表示立即移除
# 10是默认值,一般不改动就是10
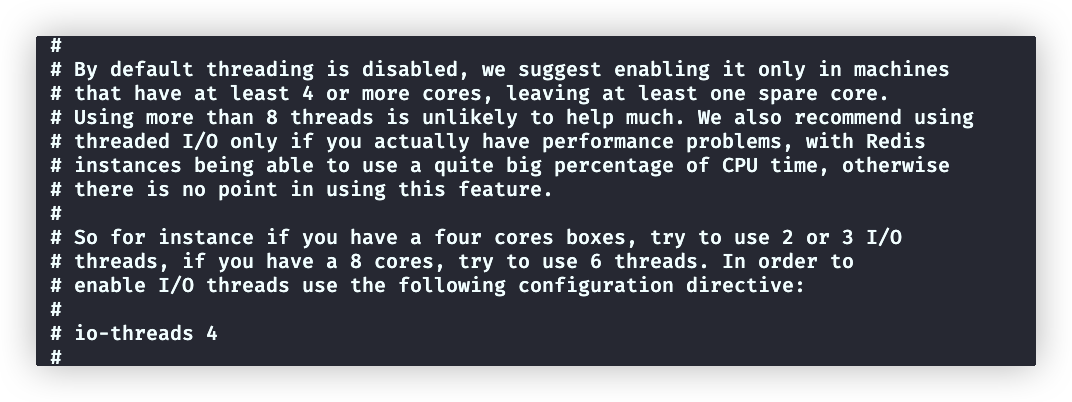
# maxmemory-eviction-tenacity 10threaded I/O模块

# io-threads 4

#io-threads-do-reads no下面截图是配置文件中,对于这两个配置的介绍:

snapshotting模块
RDB持久化配置
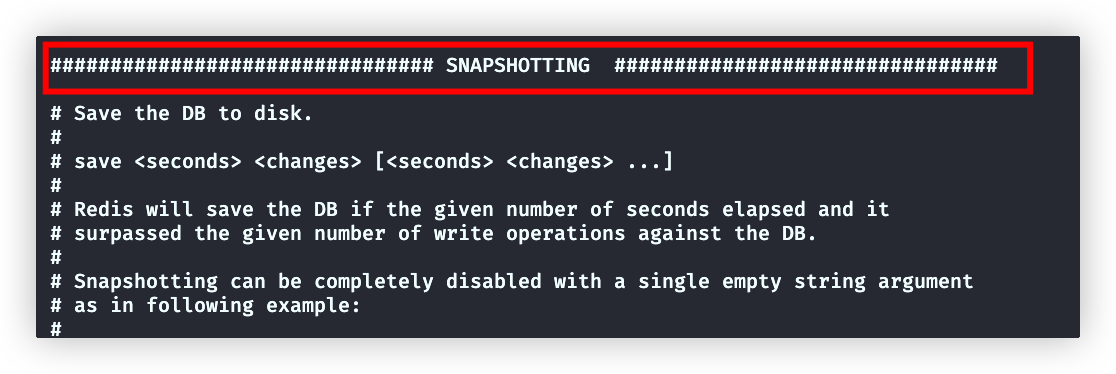
详细参考RDB
append only mode模块
AOF持久化配置
详细参考AOF
其他配置
# 使用指定文件,覆盖文件内的同名配置。(需要写在文件最后一行)
include /xxx/test.confRedis客户端
命令行
shellredis-cli -h 地址 -p 端口 -a 密码可视化工具
注意:
Redis服务端需开启防火墙
# 查询防火墙是否开启6379端口
firewall-cmd --list-all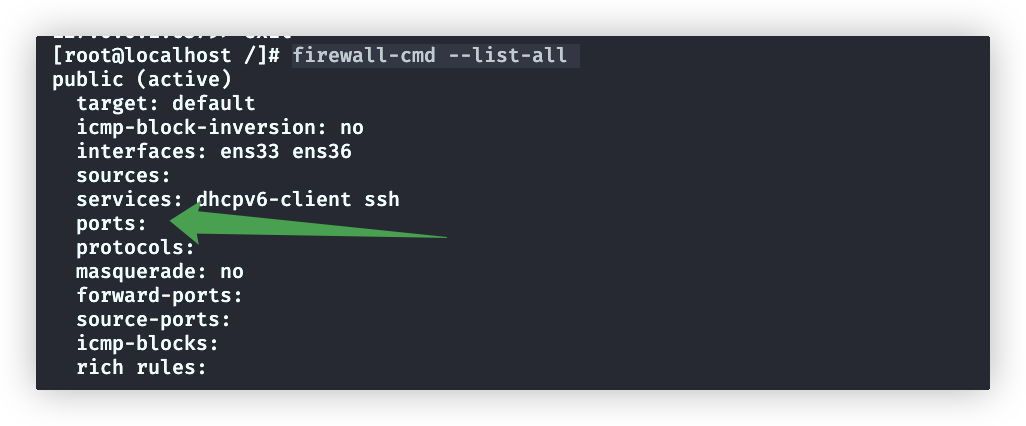
没有开启
# 开启6379端口
firewall-cmd --zone=public --add-port=6379/tcp --permanent

# 重启防火墙
systemctl reload firewalld再次查询防火墙规则,会发现port字段有了6379

Redis命令
在redis-cli进入命令行交互模式
redis-cli #进入交互模式

exit #退出交互模式

# 交互模式下,tab键可以补全命令基础命令
# 心跳命令 ping,服务端存活就会响应PONG
ping

# 存储 key=name , value=tom。默认存储在db0
set name tom

# 切换为 db5,存储在db0中的数据这里看不到
select 5
>127.0.0.1:6379[5] #会有一个[x],标识是几号数据库

# 清空当前数据库
flushdb
# 清空所有数据库
flushall配置相关
# 获取redis服务配置
config get xxx # xxx是配置名,比如: config get port
config get da* # 支持正则,匹配da开头的配置


# 设置配置(使用这个命令,我们就不必使用vim打开redis.conf再修改)
config set xxx yyy # 仅在内存中修改
cinfig rewrite # 必须执行这个,才能保证配置文件被修改


#这种方案修改配置,不会造成Key操作
查找符合条件的key(该操作会阻塞进程,线上环境数据量很多 ,会阻塞业务,所以很少使用)
keys * # 所有key

key h* # h开头的
key *h* # 包含h的kkey判断key是否存在
exists name
>(integer 1) #返回1,表示存在删除key
del key1 key2 # 多个key之间用空格间隔
>(integer 2) # 删除成功的个数重命名
rename key1 key2 # 将key1重命名为key2移动
remove key1 3 # 把key1移动到db3查询值的类型
type key1 # key1对应的value的类型

# 所有的类型:
# 1、none (key 不存在)
# 2、string (字符串)
# 3、list (列表)
# 4、set (集合)
# 5、zset (有序集)
# 6、hash (哈希表)存活时间
# 设置key的存活时间,过期后key-value被删除。即使rename仍然遵循设置的存活时间
# 带有生存时间的 key被称为“易失的”(volatile)
expire key1 5 # 单位s
pexpire key1 5 # 单位s

# 取消存活时间,设为永久
persist key1

# 查询剩余存活时间。
# 当 key 不存在时,返回 -2
# 当 key 存在,但没有设置剩余生存时间时,返回 -1
# 当 key 存在,设置了剩余生存时间时,返回 对应剩余时间
ttl key1 #单位s
pttl key1 #单位s随机返回key,常用于判断当前db是否为空
randomkey
>(nil) #没有key检索是否存在key,返回符合条件的key(替代keys命令)
# SCAN cursor [MATCH pattern] [COUNT count] [TYPE type]

# 取(0,2]的key,即2个key
scan 0 count 2

# 筛选出来key名中包含h的
scan 0 count 2 mathc *h*

# 筛选出来value为string的key
scan 0 count 2 type stringString类型Value的操作
# 设置key value。key存在更行value,不存在创建key-value
set name tom
# 如果value含有空格,用引号(单、双都可以)
set tip "hello word"

# nx,key在当前数据库不存在,才能成功。如果存在,返回nil
set name tom nx # 等价于setnx name tom

# xx,key在当前数据库存在,才能成功(用于更新)
set name tom xx


# 设置过期时间。ex是秒,px是毫秒
set name tom ex 200 #等价于setex name 200 tom
set name tom px 200 #等价于psetex name 200 tom

#获取key1的值后,在给key1设置新的值value
getset key1 value


# 设置多个键值对
mset k1 v1 k2 v2 k3 v3
# 设置多个键值对(key必须不存在,一旦有key存在,所有数据插入失败)
msetnx k1 v1 k2 v2 k3 v3

# 获取多个值(一旦有key不存在,则获取失败)
mget key1 key2


# 追加value内容(如果key1存在且为字符串,则把value追加到原来的值后;不存在,则设置为value)
append key1 value

# 注意:key不存在则初始化为0,在执行+1或-1。value不是数字,返回错误提示
incr key1 # key对应的值+1
decr key2 # key对应的值-1
incrby key1 数字 # key对应的值+数字 (可以是正、负,不能为小数)
decrby key2 数字 # key对应的值-数字 (可以是正、负,不能为小数)
incrbyfloat key1 数字 # key对应的值-数字 (可以是正、负、小数)


# 返回字符串的长度。如果key不存在,返回0;key不是字符串,返回错误
strlen key

# 返回value的切片, [0,5]之间的字节(并不会改变原字符串)
getrange key 0 5
# 从5开始(包括5),用value1覆盖原value值。如果5超过了原value的长度,则中间使用\x00填充
setrange key 5 value1Hash类型Value的操作
key的值是Hash类型,值类似对象是多个key-value形式
# 设置值,hset key field1 value1 field2 value2
hset employee name jack age 10
hsetnx employee name jack age 10 #只有name、age都不存在,才能设置成功。否则,设置失败返回0

# 获取值中field对应的value
hget employee name

# 获取value中所有的 field+value
hgetall employee
"name"
"jack"
"age"
"10"

# 所有field
hkeys employee
# 所有field的数量
hlen employee

# 所有value
hvals employee
# value的长度(字节)
hstrlen employee name

# 删除指定field
hdel employee age

# 是否存在field。返回0不存在,1存在
hexists employee name


# field对应的value如果是数字,+2
hincrby employee age 2  # 数字可正、可负,不可为小数
hincrbyfloat employee age 0.1 # 这个可以是小数List类型Value的操作
key的值是List类型,值类似数组是多个元素的形式
其底层实际是一个无头节点的双向链表
# 从右侧入队,rpush key item1 item2 item3。key不存在,则创建后推入元素
rpush names jack tom tomas
# 从右侧入队。key不存在,直接返回0(仅用于追加元素)
rpushx names jack tom tomas

# 从左侧入队 lpush、lpushx


# 从左侧出队,数字指定出队的元素数,不设置默认为1
lpop names [数字]
# 从右侧出队
rpop names [数字]

# 出队一个元素的阻塞版本:blpop、blrpop。
# 如果有元素就出队,没有就阻塞x秒,如果此时有元素就出队,没有元素返回nil
# 为0时代表一直阻塞,直到其中有元素(类似Go中的channel)
blpop name 10 # 阻塞10s
blpop name 0


# A中右出队有一个元素,在B的左侧入队。(A、B可以是同一个key,就变成了把List的最后一个元素,放在开头)
rpoplpush A B


# 打印数组 [0,最后一个]
lrange names 0 -1

# 元素个数
llen names

# 按索引查询元素
lindex names 2

# 按索引替换元素为xxx
lset names 2 xxx

# 插入数据
linsert names before tom lisi # 在tom前,插入lisi
linsert names after tom lisi  # 在tom后,插入lisi

# 删除
lrem names 2 jack # 从左到右,删除2个jack就结束
lrem names -2 jack  # 从右到左,删除2个jack就结束
lrem names 1 tom # # 从左到右,删除第一个tom就结束

# 改变原list为[1,2]之间的切片
ltrim names 1 2Set类型Value的操作
Set 中的元素具有无序性与不可重复性
其底层都是 value 为 null 的 hash 表。也正因为此,才会引发无序性与不可重复性。
# 加入数据 name:(jack,tom)
sadd name jack tom

# 查看集合name中的数据
smembers name

# 集合元素个数
scard name

# 判断jack是否在集合name中
sismenber name jack

# 把集合1的成员set1Elem,移入集合2。如果集合1没有set1Elem,则直接向集合2添加元素set1Elem
smove set1 set2 set1Elem

# 集合name中,移出元素jack、tom
srem name jack tom

# 在集合中随机挑选4个元素输出,注意:并不移除元素(如果集合中就2个元素,就会输出全部数据。参数尽量不要为负数,可能会输出重复元素)
srandmember name 4

# 在集合中随机移出2个元素
spop name 2集合操作:交集、差集、并集
# 差集:集合x-集合y
sdiff x y # 输出差集
sdiffstore res x y # 将差集存入res

# 交集
sinter x y
sinterstore res x y # 将交集存入res

# 并集
sunion x y
sunion res x y # 将并集存入resZSet类型Value的操作
ZSet 是有序集合,其与 Set 的不同之处是,有序 Set 中的每一个元素都有一个分值 score,Redis 会根据score 的值对集合进行由小到大的排序
其与 Set 集合都是元素不能重复,但元素的score
# 加入数据 name:(tom,jack) ,按照分数从小到大排序,如果分数一样,按照字母排序
zadd name 1 tom 5 jack # 格式:score value

# 集合元素个数
zcard name

# 集合全部数据(参数为索引)
zrange name 0 -1 # 集合元素(第二个参数可以为负数,-1表示到最后一个)
zrange name 0 -1 withscores # 集合元素+分数

# 按照分数筛选数据。
### 指定分数范围的三种形式,只输出符合条件的元素
zrangebyscore name 30 80  # [30,80]之间的元素
zrangebyscore name (30 (80 # (30,80)之间的元素
zrangebyscore name -inf +inf # 正负无穷
### withscores选项:输出元素+分数
zrangebyscore name 30 80 withscores
### limit选项:
zrangebyscore name 30 80 limit 0 3 # 筛选结果中从索引0开始,输出3个元素
# 反着符合条件的元素输出,注意范围也得是从 大到小
zrevrangebyscore name 80 30

# 符合分数区间内元素的个数
zcount name 20 30 # 分数在[20,30]之间元素的个数

# 按元素查询其分数
zscore name tom # 查tom的分数

# 获取元素所在索引
zrank name tom # 从集合头部开始,查tom的索引(从0开始)
zrevrank name tom # 从集合尾部开始,tom所在的索引(从0开始)

# 加减元素对应的分数 (数字也可是负数,就是减)
zincrby name 10 tom

# 移除元素
zrem name jack tom
# 按索引范围移除元素
zremrangebyrank name 2 4 # [2,4]移除元素
# 按分数范围移除元素
zremrangebyscore name 50 80 #移出分数[50,80]的之间元素。支持开区间zremrangebyscore name (50 (80 表示移出分数(50,80)之间的元素集合中所有元素分数都是相同值时:可以根据元素字母范围查询
# 查找:指定字母范围的元素
# ZRANGEBYLEX key min max [LIMIT offset count]
zrangebylex name [a (b # zrangebylex的区间开闭情况,必须写出来
zrangebylex name - + # 正负无穷,用 - 、+ 表示

# 删除指定字母范围的元素
zremrangebylex name (d [f
# 比如name中包含 b c (d dog e f] find,删除后结果是 b c d findBitMap类型Value的操作
该数据类型本质上就是一个仅包含 0 和 1 的二进制字符串
适用于海量数据的统计

# key是北京,设置其123位(offset)是1,代表123号投了支持票,0代表投了反对票
# 注意:设置123位,前面的0-122位会自动置为0
setbit beijing 123 1

# key是北京,获取其123位
getbit beijing 123

# 统计所有数据中1的个数
bitcount beijing
# 统计[0,4]字节间1的个数(两个数字都可以是负的,代表倒数第几个)
bitcount beijing 0 4

# 获取第一个为1的偏移量
bitpos beijing 1
# 获取第一个为0的偏移量
bitpos beijing 0
# 获取在[0,4]字节间,第一个为0的偏移量
bitpos beijing 0 0 4二进制操作
# a、b进行与操作,结果放入dest中
bitop and dest a b

# 或
bitop or dest a b

# 异或
bitop xor dest a b

# 非
bitop not dest a bHyperLogLog类型Value的操作
HyperLogLog类型(超级日志记录)该数据类型可以简单理解为一个 set 集合,集合元素为字符串
HyperLogLog 是一种基数计数概率算法,通过该算法可以利用极小的内存完成去重数据的统计,且误差仅为0.81%
通常用于海量数据的统计元素个数
# 添加数据 key=courses课程,value=math、english
pfadd courses math english

# 元素个数
pfcount courses
# 多个key就是多个集合的并集中元素的个数
pfcount key1 key2


# 将key1、key2集合,合并到sum中
pfmerge sum key1 key2Geospatial类型Value的操作
描述地理位置的类型,本质上仍是一种集合,只不过集合元素比较特殊,由<经度,纬度,名称>三部分构成
经度:longitude ,有效经度为[-180,180]。正的表示东经,负的表示西经
纬度:latitude,有效纬度为[-85.05112878, 85.05112878]。正的表示北纬,负的表示南纬
用途:可以设置、查询某地理位置的经纬度,查询某范围内的空间元素,计算两空间元素间的距离等
# 添加经纬度 北京、东京
geoadd capitals 116.3 39.9 beijing 129.69 35.69 tokyo
ca
# 获取capitals中的北京的经纬度
geopos capitals beijing

# 获取北京、东京的距离(计算距离时,会假设地球是个完美的球体,所以会造成0.5%的误差)
geodist capitals beijing tokyo

# 指定圆心、半径,返回范围内的 元素名称
georadius capitals 116 39 1000 KM # 圆心116 39,半径1000单位千米

## withcoord选项,返回 元素的名称+经纬度
## withdist选项,返回 元素的名称+元素距离圆心距离
## asc(从近到远) 、 desc(从远到近)
## count xx 返回xx个元素


# 如果中心点是集合中的点,可以使用下面的方式。
georadiusbymember capitals beijing 1000 KM # 距离beijing这个元素1000KM的所有元素名称订阅/发布命令
如果功能要求很复杂,还是优先使用例如 RocketMQ、Kafka 等消息中间件
# 订阅频道new1、new2。执行后处于阻塞状态,等待相关频道的消息
subscribe new1 new2

# 取消订阅频道
unsubscribe new2

# 在频道new1,发布消息
public new1 "happy day"统计
pubsub channels # 列出当前被订阅的频道


pubsub numsub new1 # 返回订阅频道new1的订阅者数量Redis底层
String类型底层
Redis中的所以类型其最终的元素都是字符串,这个字符串类型不同于C语言中的
我们称为简单动态字符串(Simple Dynamic String,SDS) ,其C语言结构如下:
struct sdshdr {
	// 字节数组,用于保存字符串
	char buf[];
	// buf[]中已使用字节数量,称为 SDS 的长度
	int len;
	// buf[]中尚未使用的字节数量
int free;
}注意:Redis中不可变的字符串还是使用的是C中的字符串
例子:buf字段是C的字节数组,需要以\0结尾,但是len是不算\0的
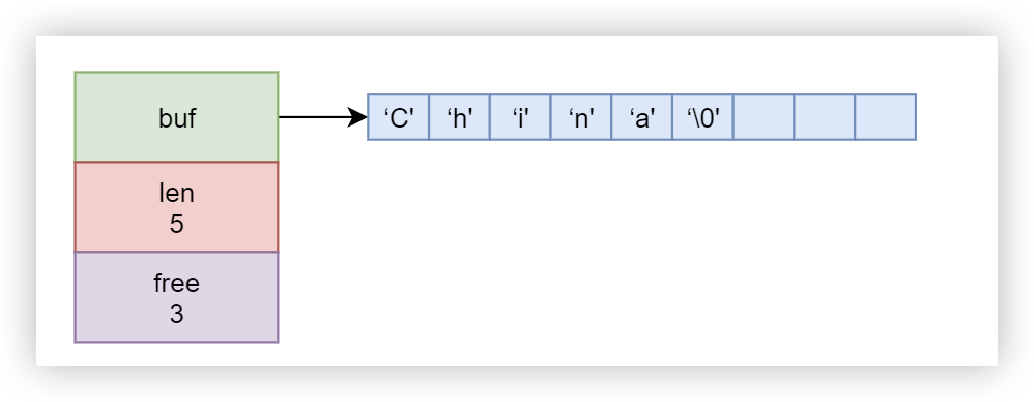
Hash、ZSet类型底层
其底层使用zipList(压缩列表)或者skipList(跳跃列表)
Redis如何判断使用哪种?进入redis命令行交互模式:
# 搜索zipList的两个配置
config get zset-*-ziplist-*

# 元素字节数
"zset-max-ziplist-value"
"64"

# 集合元素个数
"zset-max-ziplist-entries"
"128"超过上面两个配置值,底层就会采用skipList
Redis7.0后,不再使用zipList,而是使用listPack替代
zipList结构
zipList(压缩列表)是一个经过特殊编码的用于存储字符串或整数的双向链表。 其底层数据结构由三部分构成:head、entries 与 end,这三部分在内存上是连续存放的。
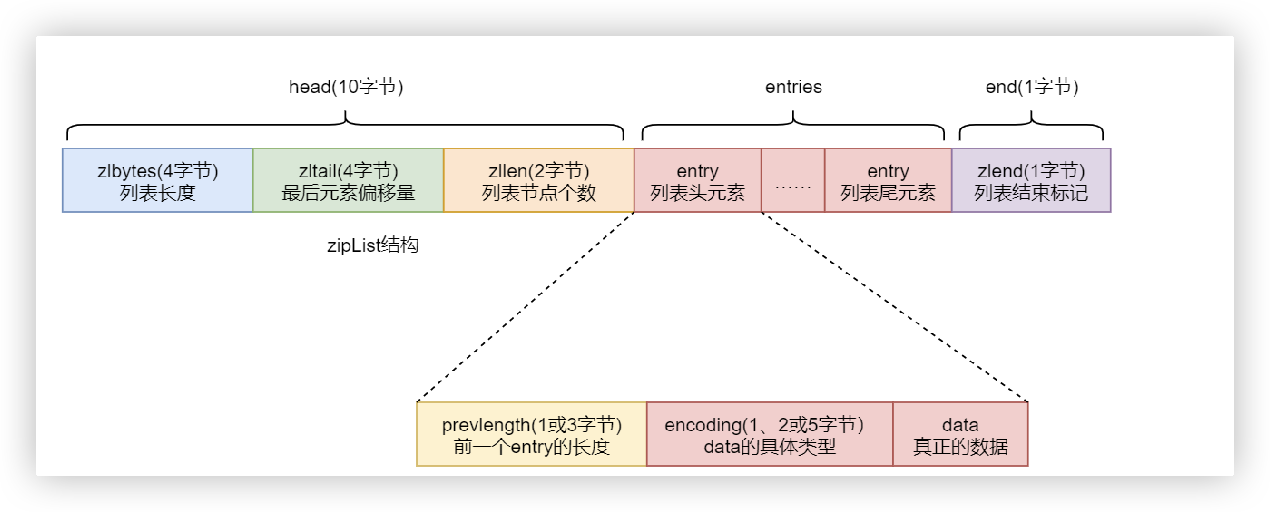
补充:
# 进入redis命令行交互模式:
# 可获取xxx的在其底层C语言中的具体类型
object encoding xxxlistPack结构
Redis7.0后,不再使用zipList,而是使用listPack,但为了兼容性,在Redis配置中仍然保留了 zipList 的相关属性
原因:zipList中的entries的每个entry元素都包含prevlength部分,用来记录上一个entry的长度,如果频繁出现插入、修改操作,会导致级联更新,在高并发的写操作场景下会极度降低Redis 的性能
# 搜索listPack的两个配置
config get zset-*-listpack-*


"zset-max-listpack-entries"
"128"
"zset-max-listpack-value"
"64"创建一个Hash类型的数据,查看其底层类型
hset employee name jack age 20
object encoding employee # "listpack"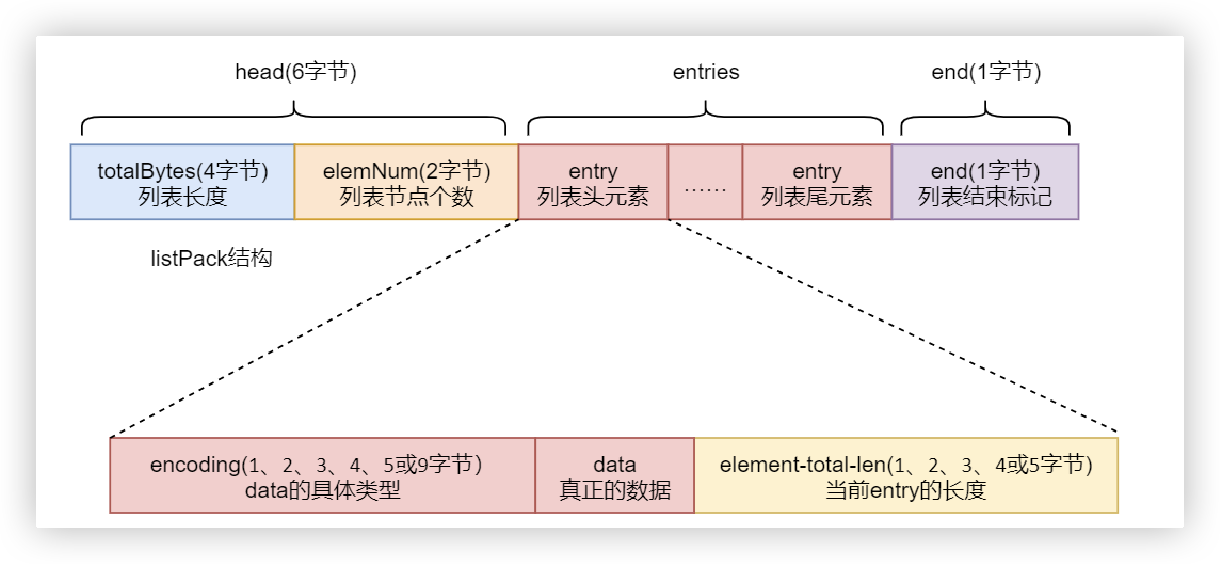
skipList结构
skipList(跳表)是一种随机化的数据结构,基于并联的链表,实现简单,查找效率较高
跳表是链表的一种,只不过在链表的基础上增加了跳跃功能。也正是这个跳跃功能,使得在查找元素时,能够提供较高的效率
可以参考这个:https://www.jianshu.com/p/9d8296562806

List类型底层
List 的底层实现,使用 quickList
其是由多个zipList构成的

Redis事务
Redis 的事务的本质是一组命令的批处理。
这组命令在执行过程中会被顺序地、一次性全部执行完毕,只要没有出现语法错误,这组命令在执行期间是不会被中断
multi
> OK

# 进入了事务模式,会提示TX

# 下面开始指定事务中进行的一组操作
(TX)> set age 20
> QUEUED

(TX)> incr age
> QUEUED


# 执行事务
(TX)> exex

# 取消事务
(TX)> discard注意:
multi

(TX)> set name tom

(TX)> incr name

(TX)> set age 20


# 执行事务
(TX)> exex

# 结果: name不能加1,这并不是语法错误,而是执行中发生的错误。所有incr name 执行失败,而 set age 20 则会执行成功Redis持久化
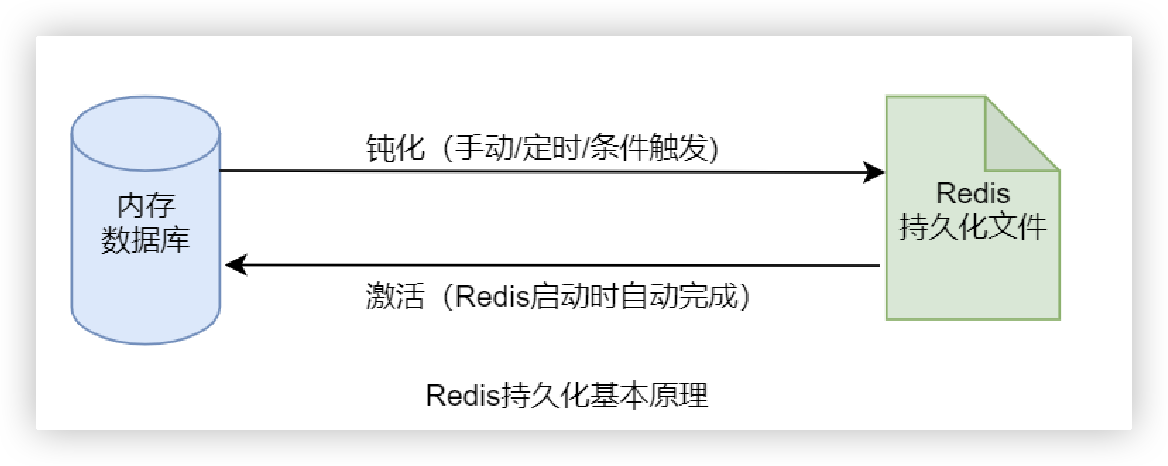
Redis 是一个内存数据库,所以其运行效率非常高。但内存中的数据是不持久的,若主机宕机或 Redis 关机重启,则内存中的数据全部丢失
所以,Redis 具有持久化功能,其会在特定时机按照设置以**快照(RDB)或操作日志(AOF)**的形式将数据持久化到磁盘
当启动时,自动从磁盘加载到内存中
过程如下:
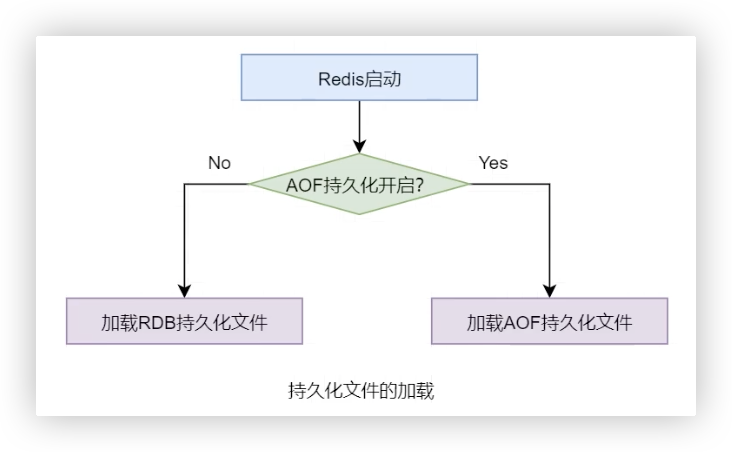
启动时,读取配置文件选择使用哪种方式:
RDB(默认开启)
RDB(Redis DataBase)是指将内存中某一时刻的数据快照全量写入到指定的 rdb 文件的持久化技术
RDB 持久化默认是开启的。当 Redis 启动时会自动读取 RDB 快照文件,将数据从硬盘载入到内存,以恢复 Redis 关机前的数据库状态
开启RDB后(默认开启),在Redis安装目录下,会有一个dump.rdb文件用于存储持久化数据

如何进行RDB持久化:
手动save
save 命令可立即进行一次持久化保存
save 命令在执行期间会阻塞 redis-server 进程,直至持久化过程完毕。而在 redis-server 进程阻塞期间,Redis不能处理任何读写请求,无法对外提供服务,所以一般不使用

手动bgsave
相当于后台运行的save,Redis服务进程会fork一个子进程,由该子进程负责完成保存,过程不会阻塞进程Redis服务器的读写操作(使用较多)

bgsave的流程:
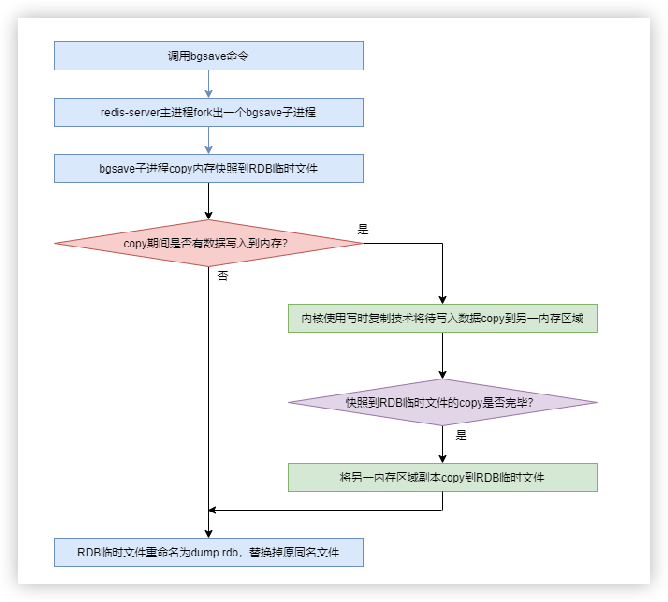
注意:fork出的子进程和父进程共享内存资源,所以子进程可以复制内存中的数据到RDB文件中。Linux系统中一旦内存被共享,则该内存就变成只读的。当Redis在拷贝内存数据的过程中,如果有新的写入操作,Linux就会采用写时复制技术(Copy-On-Write,Linux会将数据写入一个新的非共享的内存区域A,待数据拷贝完成,再将A的数据追加到RDB临时文件中,最后重命名为dump.rdb文件),最终RDB文件中包含了所有内存数据
关机时自动触发
配置文件设置条件触发
在Redis配置文件中,进行配置。其本质仍然是bgsave,只不过是自动触发
补充:
shelllastsave # 返回最后一次持久化时间下面介绍snapshotting模块的配置:
save
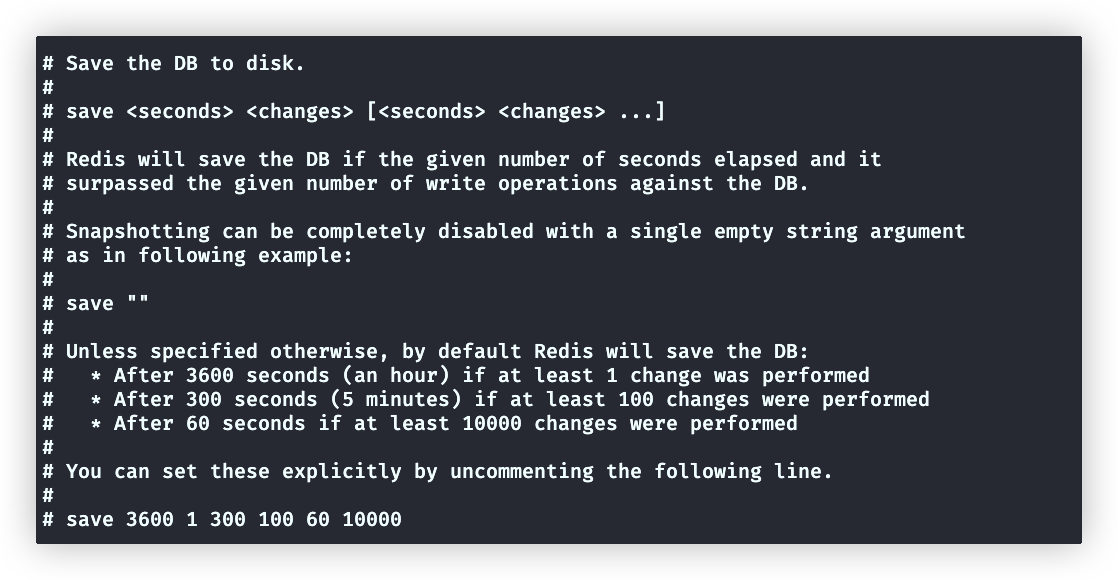
不开启RDB持久化,save设置为"" 开启RDB持久化: save 3600 1 300 100 60 10000 # 默认值 60s内,如果超过10000次写操作,就触发一个持久化 300s,,,, 100次 3600,,,, 1次stop-write-on-bgsave-error

当RDB开启时,才生效
shell# 开启这个时,当持久化失败后,redis无法执行其他写操作 stop-write-on-bgsave-error:yesrdbcompression
 shell
shell# 生成 dump.rdb 文件时开启压缩,可大幅降低文件的大小,加速主从集群中从节点的数据同步 rdbcompression yes # 默认开启rdbchecksum
 shell
shell# CRC64 校验和就被放置在了文件末尾。这使格式更能抵抗 RDB文件的损坏,但在保存和加载 RDB 文件时,性能会受到影响(约 10%) rdbchecksum yes # 默认开启sanitize-dump-payload
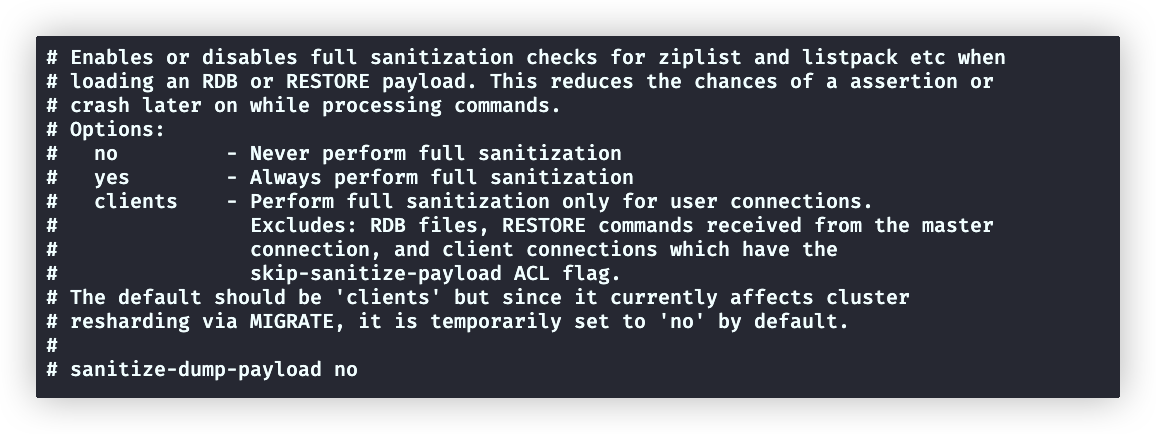
该配置用于设置在加载 RDB 文件或进行持久化时是否开启对 zipList、listPack 等数据的全面安全检测
- no:不检测
- yes:总是检测
- clients(默认):只有当客户端连接时检测。排除了加载 RDB 文件与进行持久化时的检测。
涉及到集群数据迁移时,应该设置为no
dbfilename
生成的rdb文件名

dir
生成的rdb、aof文件放置的目录,默认安装目录

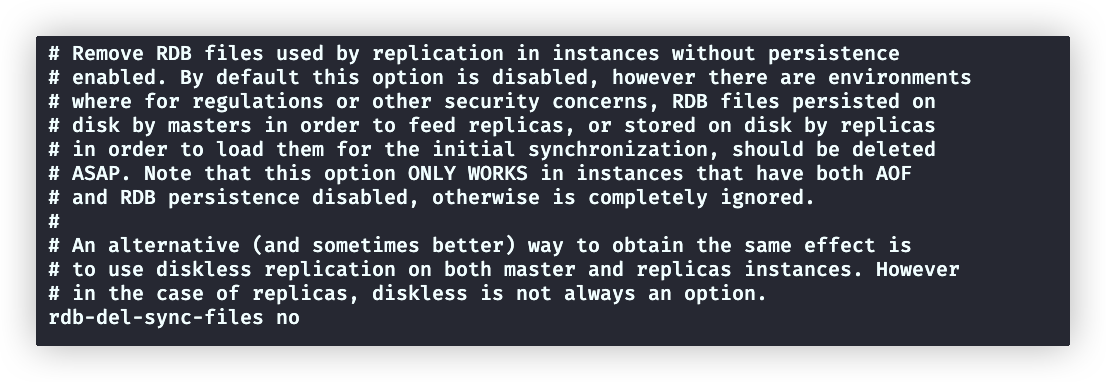
rdb-del-sync-files
默认no,对于没有开启RDB和AOF持久化的副本实例,控制其是否删除rdb文件
RDB的缺点:可能会存在Redis因为意外的关闭,而丢失最近30s左右的数据(还没来的及触发备份rdb文件)。高并发情况下,30s会丢失大量数据
AOF
AOF(Append Only File)是指 Redis 将每一次的写操作都以日志的形式追加到一个 AOF 文件中的持久化技术。当需要恢复内存数据时,将这些写操作重新执行一次,便会恢复到之 前的内存数据状态。(注意AOF不会修改,如果删除某字段,这条删除命令会追加到文件尾部)
使用AOF持久化方案,发生严重事件:
- 在发生在服务器断电时,仅丢失最后1s的写操作
- 发生Redis进程错误时(操作系统正常运行),仅丢失最后一次写操作
AOF持久化触发
自动触发
执行写操作
手动触发:bgsave
与rdb命令一样,但是底层实现不一样
Rewrite 机制
随着使用时间的推移,AOF 文件会越来越大。为了防止 AOF 文件由于太大而占用大量 的磁盘空间,降低性能,Redis 引入了 Rewrite 机制来对 AOF 文件进行压缩。
# 类似下面这种,name最终值是最后一次的值,如果aof记录多条多数据会浪费大量空间。所以需要rewrite
set name tom
set name jackRewrite过程
当 Rewrite 开启后,主进程 redis-server 创建出一个子进程 bgrewriteaof,由该子进程完成 rewrite 过程。其首先对现有 aof 文件进行rewrite 计算,将计算结果写入到一个临时文件,写入完毕后,再 rename 该临时文件为原 aof 文件名,覆盖原有文件
触发条件
手动触发
textbgrewriteaof自动触发
通过redis.conf配置文件设置
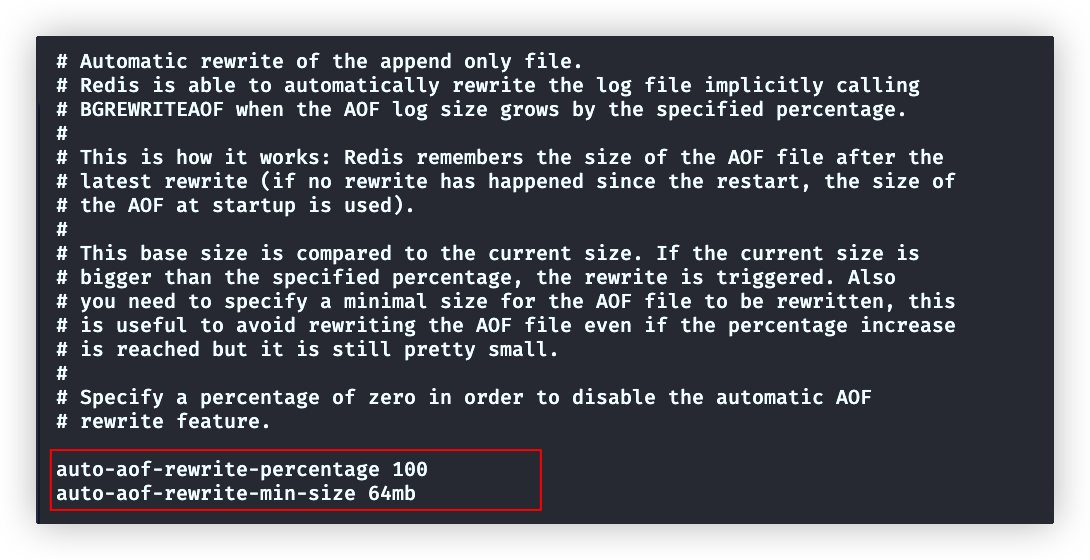
redis将最后一次rewrite的aof文件的大小作为基础size。
如果文件大小超过auto-aof-rewrite-percentage设置的百分比,就会触发rewrite
textauto-aof-rewrite-percentage # 开启 rewrite 的增大比例,默认100%。指定为0,表示禁用自动 rewrite。 auto-aof-rewrite-min-size # 开启 rewrite 的 AOF 文件最小值,默认 64M。该值的设置主要是为了防止小 AOF 文件被 rewrite,从而导致性能下降。
AOF基础配置

appendonly
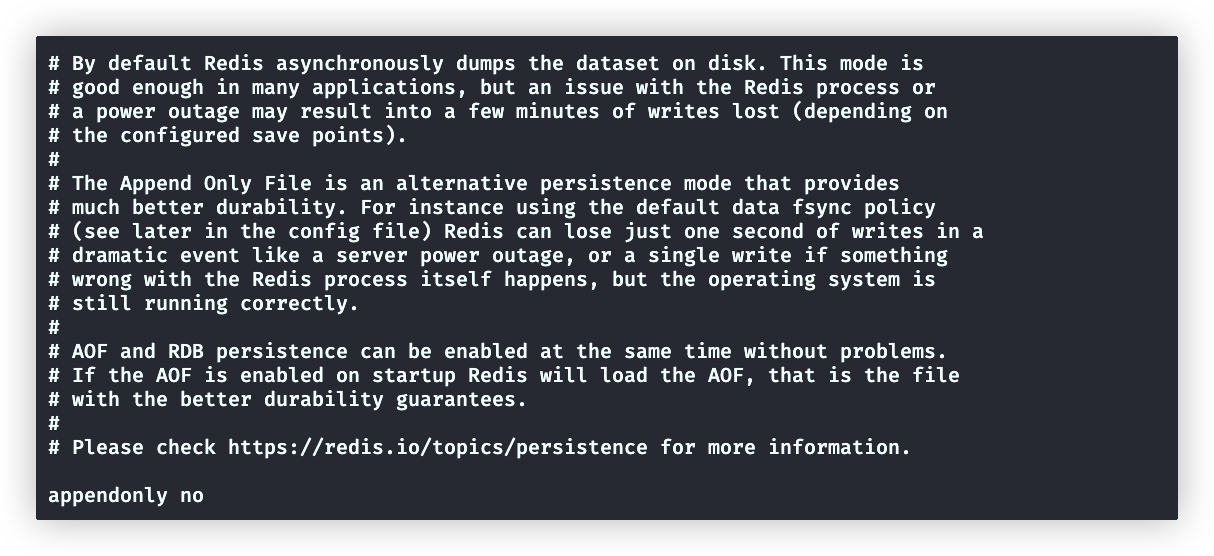
# 默认关闭,设置为yes开启AOF。RDB与AOF都开启,Redis会使用aof文件
appendonly yesappendfilename、appenddirname
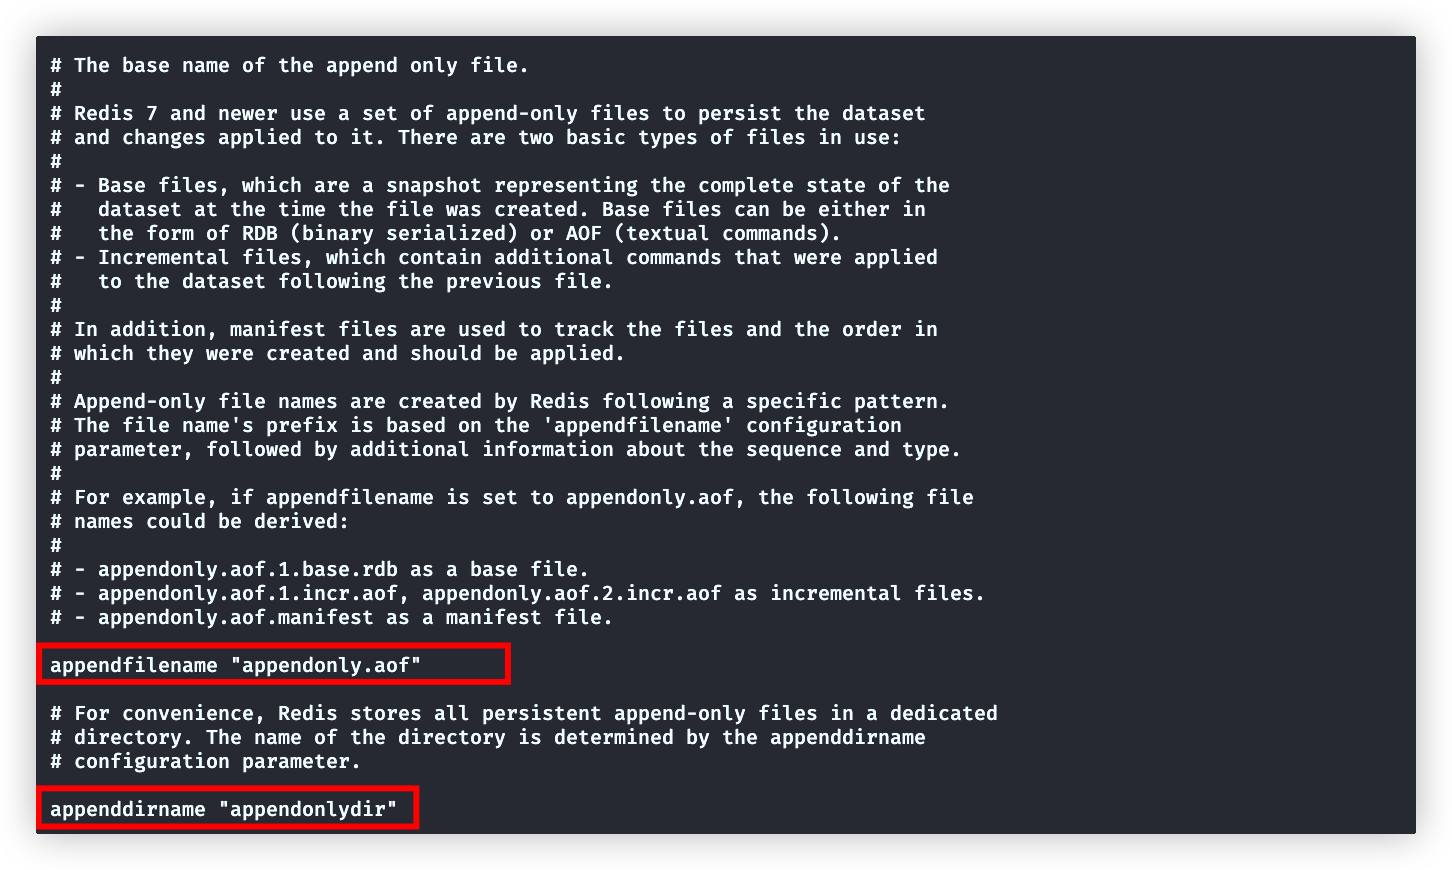
aof的配置文件不是一个,而是多个文件。他们都放在appenddirname指定的目录下
包含三种文件,appendfilename用指定前缀,默认appendonly.aof
基础文件:完整的数据库备份
    appendonly.aof.base.rdb

增量文件:用来记录每一条写命令,可能会有多个
		appendonly.aof.1.incr.aof
		appendonly.aof.2.incr.aof

清单文件:
appendonly.aof.manifest 记录前面生成的所有文件,还有增量文件的顺序aof-timestamp-enabled
aof-timestamp-enabled yes # 默认yes,即基础文件使用rdb格式(no表示使用aof格式文件作为基础文件格式,但是不要修改为no这个配置)AOF性能配置
appendfsync(配置bgsave进程写)
Redis写入文件,调用系统调用fsync的时机
补充:操作系统写入数据时,会先写入系统缓存,当达到一定阈值后才写入文件,或者调用主动fsync写入文件(fsync是一个将数据从操作系统缓冲区刷新到磁盘的同步操作)
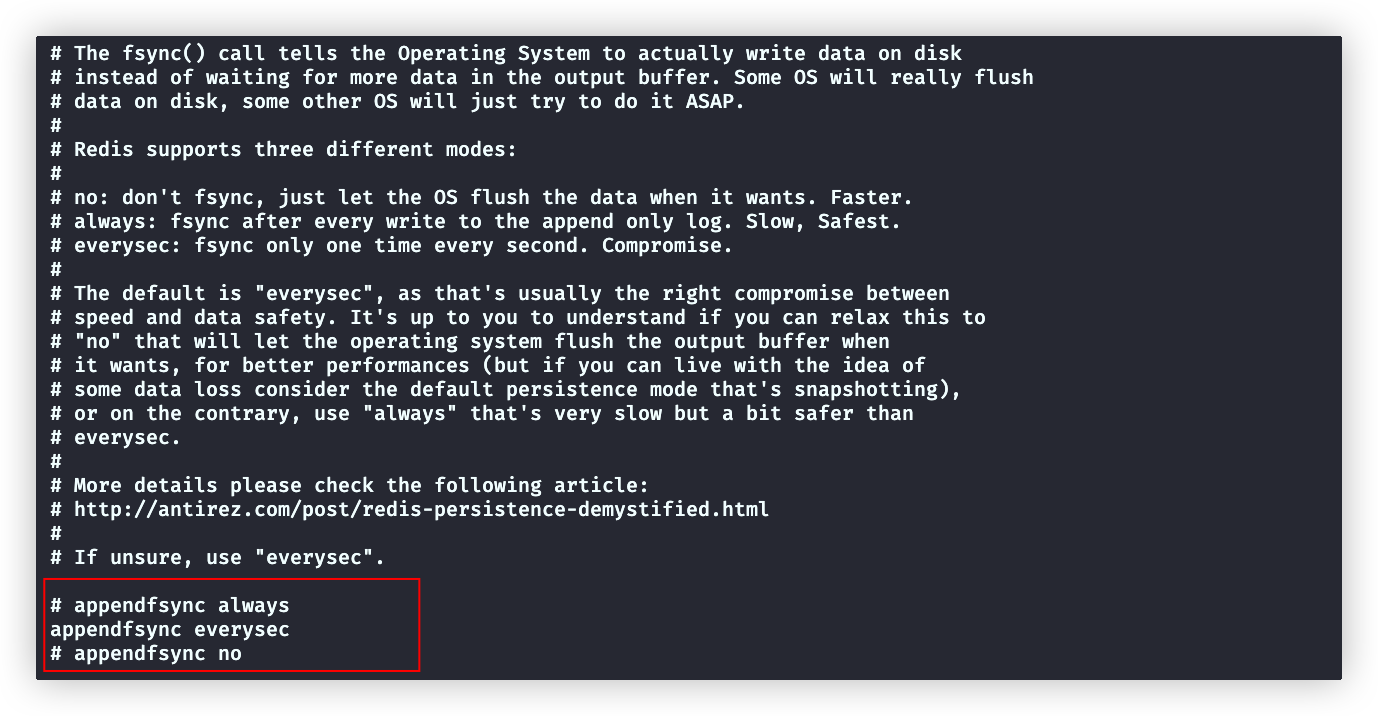
appendfsync配置用来指定bgsave子进程(与rdb一样,aof文件写入也是bgsave,只不过两者底层实现不同)写入aof文件的方式:
默认为everysec,即每秒写入磁盘(推荐)
always,即每次执行写AOF文件的操作都写入磁盘(性能太低了)
no,由操作系统决定写入
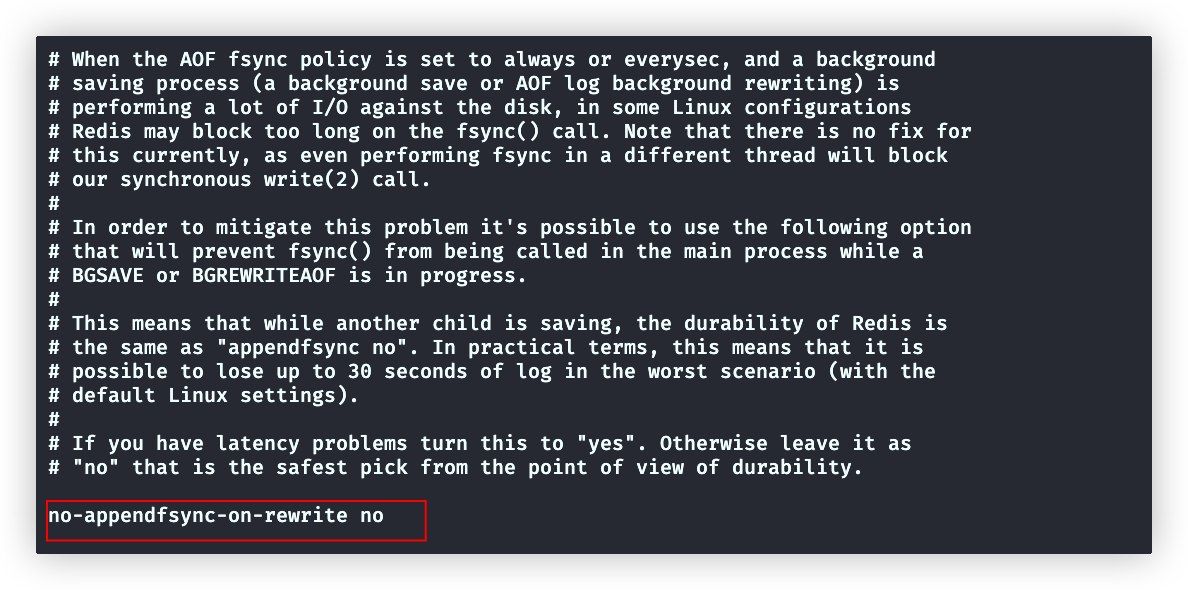
no-appendfsync-on-rewrite(配置Redis主进程写)
在appendfsync设置为always(默认)、everysec时,这个配置才生效
- 默认值为no,主进程会正常调用fsync(配置项是no-appendfsync-xxx,配置是no,就是双重否定表示肯定)
- yes,表示当bgsave或bgrewriteaof子进程运行,主进程不会调用fsync
图里注释解释了,大量的fsync会阻塞Redis主进程对外提供服务,默认的no会造成性能下降
但是,很少有高并发的写操作,所以还是默认推荐no
aof-rewrite-incremental-fsync(配置bgrewriteaof进程写)
yes,即rewrite进程没生成4MB文件就调用fsync写入一次磁盘

aof-load-truncated
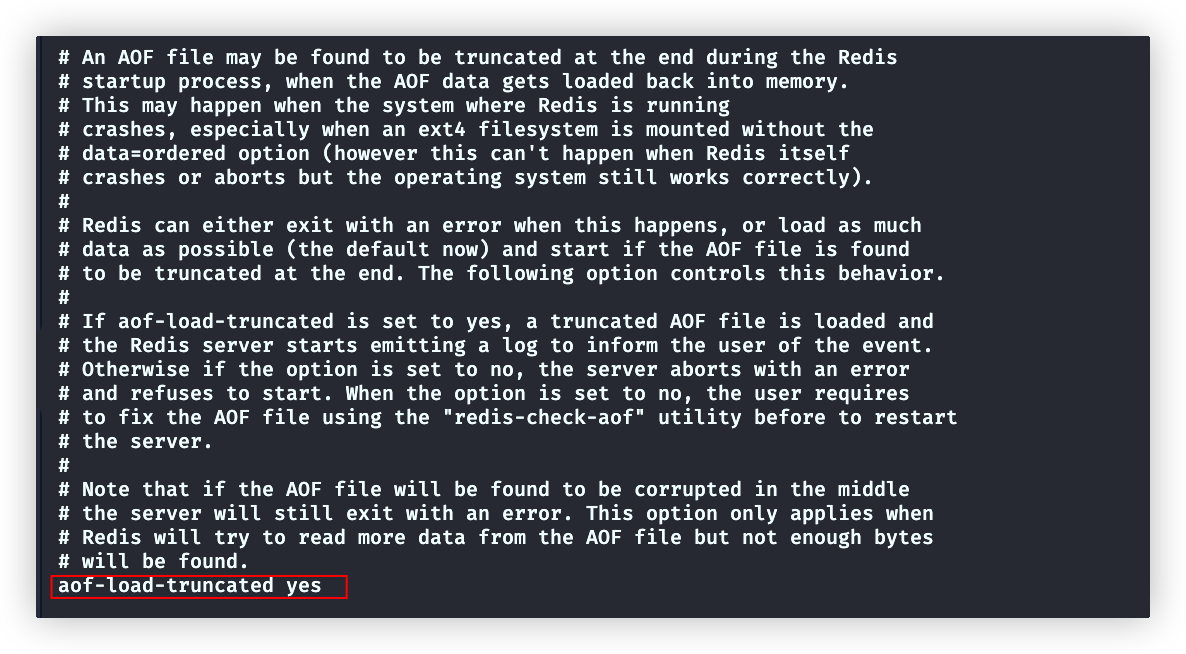
aof-load-truncated yes

# 当在aof文件末尾丢失了数据 。
# 比如 : 最后一行丢失
*2
$4
name
$4
tom

# yes 会尽可能加载更多的正确数据后启动。例子:会直接丢掉name:tom这个键值对
# no 不会启动( ps aux | grep redis 查看是否启动)。必须使用 redis-check-aof 工具修复后,才能启动Redis


# 注意:如果在文件中间丢失,Redis是不能启动的,会抛出错误在 /usr/local/bin下有一个 redis-check-aof 工具(可以在全局使用的),用来修复aof文件
# 检查aof文件
redis-check-aof appendonly.aof.1.incr.aof


# 修复aof文件
redis-check-aof --fix appendonly.aof.1.incr.aof例子:
appendonly.aof.1.incr.aof 文件(缺失了name:xxx 中的xxx)
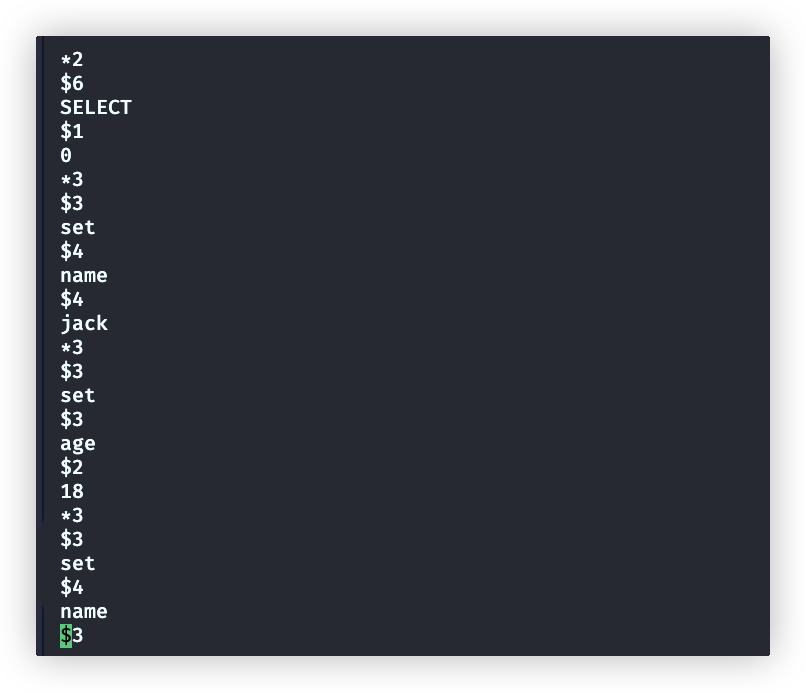
检查文件

修复文件

修复结果

aof-timestamp-enabled
给aof文件增加时间戳,但是默认解析器不支持,所以保持no

AOF文件格式
执行写命令
set name jack

set age 18查看文件:
appendonly.aof.1.base.rdb (基础文件)
是个rdb文件,是仓库的完整快照
appendonly.aof.1.incr.aof 文件 (增量文件)
文本是以行来划分,每行以
\r\n结束。每一行都有一个消息头,来表示消息类型。消息头有六个不同字符:text(*) 表示消息体总共有多少行,不包括当前行 ($) 表示下一行消息数据的长度,不包括换行符长度\r\n (+) 表示一个正确的状态信息 (-) 表示一个错误信息 (:) 表示返回一个数值 (空) 表示一个消息数据
appendonly.aof.manifest 文件(清单文件)
texttype b 代表是基础文件 type i 代表是增量文件 seq 是顺序
流程总结

对比
RDB与AOF
优点
- rdb文件是二进制,数据较小(AOF本质是个写操作的日志,体积会越来越大)
- 二进制文件加载到内存很快(AOF本质是将写操作从新执行,速度慢)
缺点
rdb文件是二进制可读性差(AOF可读性强)
容易丢失数据(AOF安全性强,仅仅会丢失最后1s或者最后一次的写操作)
全量保存快照文件,过程中发生宕机数据会丢失
rdb的持久化策略,是时间范围内达到触发次数时,进行持久化。如果未达到条件时就宕机,也会导致部分数据丢失
save 3600 1 300 100 60 10000写时复制回降低性能
备份rdb文件时,Redis主进程由于和bgsave子进程共享内存,导致主进程无法写入数据,这时候必须使用写时复制,这会降低性能
如何选择
无需使用持久化技术:仅使用Redis作为缓存系统
纯rdb方案:如果对数据安全性要求不高(可以容忍部分数据丢失)
纯aof方案:不使用,因为aof太慢了,性能差
rdb+aof混合持久化:推荐方案
性能测试工具
redis-benchmark用于对Redis做的性能测试,可执行文件在下面目录内
cd /usr/local/bin/查询所有命令说明
redis-benchmark --help使用方式非常清晰:
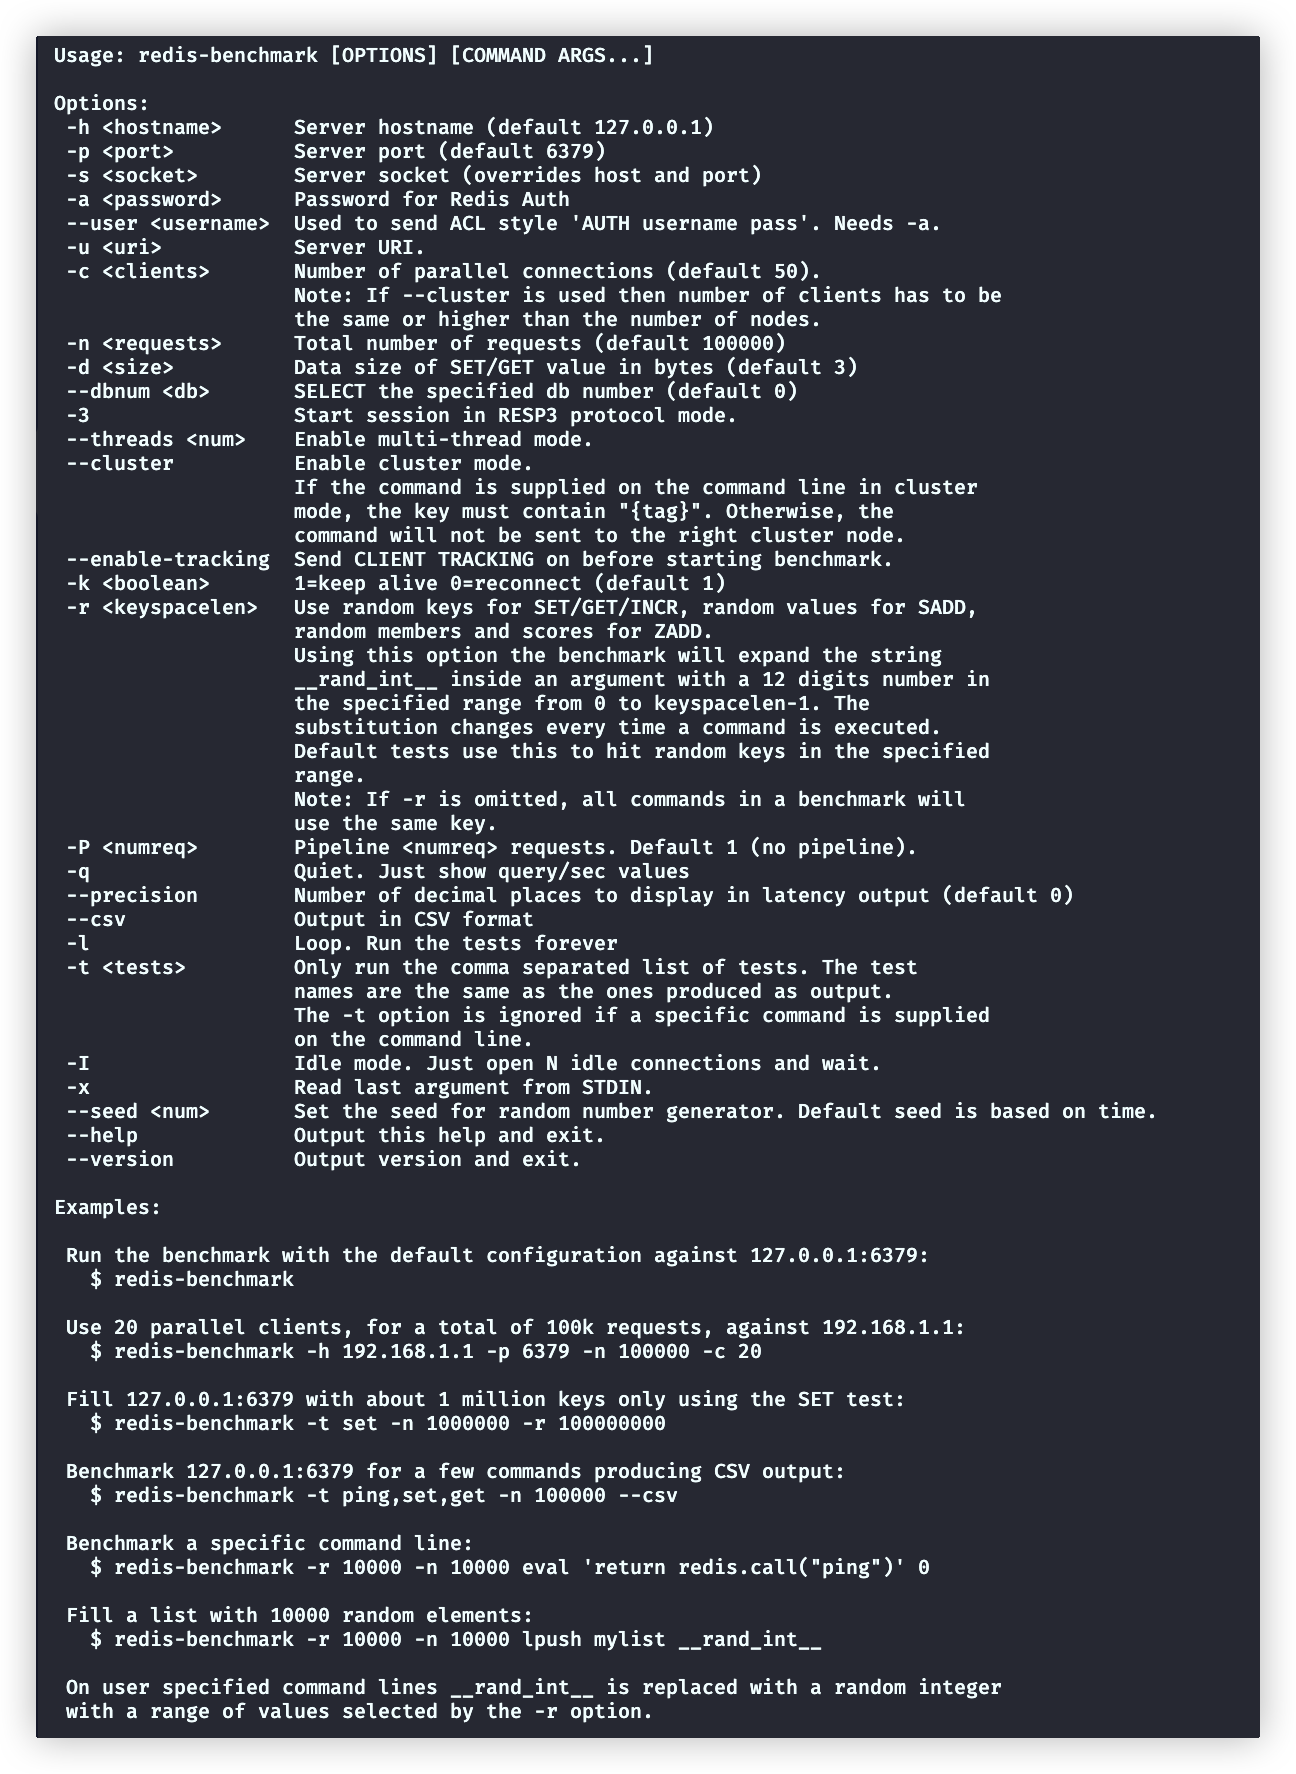
注意:redis-benchmark指定的host、port都是redis服务的地址
# -h、-c都是默认值可以省略
redis-benchmark -h 127.0.0.1 -p 6379 -c 100 -n 200000这个命令会将Redis左右的操作都重试一遍
我们以输出中的LPUSH部分为例子:
====== LPUSH ======
  200000 requests completed in 24.45 seconds
  100 parallel clients # 1000客户端并发,-c可以指定
  3 bytes payload # 读写的对象都是3字节,-d可以指定
  keep alive: 1 # 是否保持连接状态,1表示开启,-k可以指定
  host configuration "save": 3600 1 300 100 60 10000
  host configuration "appendonly": no
  multi-thread: no # 服务端是否开启多线程,这个需修改redis配置文件的io-threads字段

# 每次增长剩余请求百分比的一半时,统计请求完成的百分比分布
Latency by percentile distribution:
0.000% <= 5.159 milliseconds (cumulative count 1)
# 以这个为例子,完成了50%(100111个)的请求,花费了9.087毫秒
50.000% <= 9.087 milliseconds (cumulative count 100111)
75.000% <= 10.575 milliseconds (cumulative count 150058)
87.500% <= 11.359 milliseconds (cumulative count 175174)
93.750% <= 11.943 milliseconds (cumulative count 187533)
96.875% <= 12.575 milliseconds (cumulative count 193764)
98.438% <= 13.359 milliseconds (cumulative count 196889)
99.219% <= 14.447 milliseconds (cumulative count 198442)
99.609% <= 16.703 milliseconds (cumulative count 199219)
99.805% <= 22.671 milliseconds (cumulative count 199610)
99.902% <= 29.151 milliseconds (cumulative count 199805)
99.951% <= 37.023 milliseconds (cumulative count 199903)
99.976% <= 40.735 milliseconds (cumulative count 199954)
99.988% <= 57.535 milliseconds (cumulative count 199976)
99.994% <= 58.879 milliseconds (cumulative count 199988)
99.997% <= 59.167 milliseconds (cumulative count 199994)
99.998% <= 59.327 milliseconds (cumulative count 199997)
99.999% <= 59.423 milliseconds (cumulative count 199999)
100.000% <= 59.487 milliseconds (cumulative count 200000)
100.000% <= 59.487 milliseconds (cumulative count 200000)


# 每增长1毫秒时,统计请求完成的百分比分布
Cumulative distribution of latencies:
0.000% <= 0.103 milliseconds (cumulative count 0)
3.771% <= 6.103 milliseconds (cumulative count 7542)
17.601% <= 7.103 milliseconds (cumulative count 35202)
33.712% <= 8.103 milliseconds (cumulative count 67423)
50.333% <= 9.103 milliseconds (cumulative count 100666)
67.126% <= 10.103 milliseconds (cumulative count 134252)
83.764% <= 11.103 milliseconds (cumulative count 167528)
94.845% <= 12.103 milliseconds (cumulative count 189690)
98.084% <= 13.103 milliseconds (cumulative count 196168)
99.059% <= 14.103 milliseconds (cumulative count 198117)
99.413% <= 15.103 milliseconds (cumulative count 198825)
99.559% <= 16.103 milliseconds (cumulative count 199118)
99.636% <= 17.103 milliseconds (cumulative count 199272)
99.669% <= 18.111 milliseconds (cumulative count 199339)
99.701% <= 19.103 milliseconds (cumulative count 199401)
99.737% <= 20.111 milliseconds (cumulative count 199474)
99.769% <= 21.103 milliseconds (cumulative count 199538)
99.788% <= 22.111 milliseconds (cumulative count 199577)
99.816% <= 23.103 milliseconds (cumulative count 199633)
99.835% <= 24.111 milliseconds (cumulative count 199671)
99.852% <= 25.103 milliseconds (cumulative count 199703)
99.863% <= 26.111 milliseconds (cumulative count 199726)
99.874% <= 27.103 milliseconds (cumulative count 199748)
99.889% <= 28.111 milliseconds (cumulative count 199778)
99.902% <= 29.103 milliseconds (cumulative count 199804)
99.913% <= 30.111 milliseconds (cumulative count 199827)
99.934% <= 31.103 milliseconds (cumulative count 199868)
99.938% <= 32.111 milliseconds (cumulative count 199877)
99.940% <= 34.111 milliseconds (cumulative count 199880)
99.945% <= 35.103 milliseconds (cumulative count 199890)
99.951% <= 36.127 milliseconds (cumulative count 199902)
99.952% <= 37.119 milliseconds (cumulative count 199904)
99.957% <= 38.111 milliseconds (cumulative count 199915)
99.964% <= 39.103 milliseconds (cumulative count 199928)
99.972% <= 40.127 milliseconds (cumulative count 199943)
99.980% <= 41.119 milliseconds (cumulative count 199960)
99.981% <= 42.111 milliseconds (cumulative count 199961)
99.984% <= 43.103 milliseconds (cumulative count 199967)
99.984% <= 57.119 milliseconds (cumulative count 199969)
99.990% <= 58.111 milliseconds (cumulative count 199981)
99.996% <= 59.103 milliseconds (cumulative count 199993)
100.000% <= 60.127 milliseconds (cumulative count 200000)

# 总结
Summary:
	# 吞吐量 :8178.96请求/秒
  throughput summary: 8178.96 requests per second
  latency summary (msec):
          avg       min       p50       p95       p99       max
        9.171     5.152     9.087    12.135    14.007    59.487

	# avg:200000个请求的平均耗时为9.171毫秒
	# min:请求一次最小花费时间为5.152毫秒
	# p50、p95、p99:表示50%、95%、99%的请求,花费的平均耗时
# max:请求一次最大花费时间为59.487毫秒指定
# -t 指定测试的命令
redis-benchmark -t lpush,sadd -c 100 -n 200000

# -q 输出精简版报告=> 请求数/毫秒Redis主从集群
Redis 的主从集群是一主多从的读写分离集群
集群中的Master 节点负责处理客户端的读写请求,而 Slave 节点仅能处理客户端的读请求
只所以要将集群搭建为读写分离模式,主要原因是:对于数据库集群,写操作压力一般都较小,压力大多数来自于读操作请求。所以,只有一个节点负责处理写操作请求即可
伪集群搭建与配置
Redis采用单线程 IO 模型时,在多核主机中为了提高处理器的利用率,一般会在一个主机中安装多台 Redis,这就称为构建Redis 主从伪集群。
下面要搭建的读写分离伪集群包含一个 Master 与两个 Slave。它们的端口号分别是:6380、6381、6382
公共配置
# 在redis目录下
mkdir cluster
cp redis.conf cluster/
cd cluster/

//修改公共文件
# 开启密码
requirepass hedaodao  #
# 做为slave时,连接的master的密码
masterauth <master-password>

# 因为集群中的master一点宕机下线,会有其他的slave升级为master。所以集群中的所有哦redis实例的masterauth和requirepass需保持一致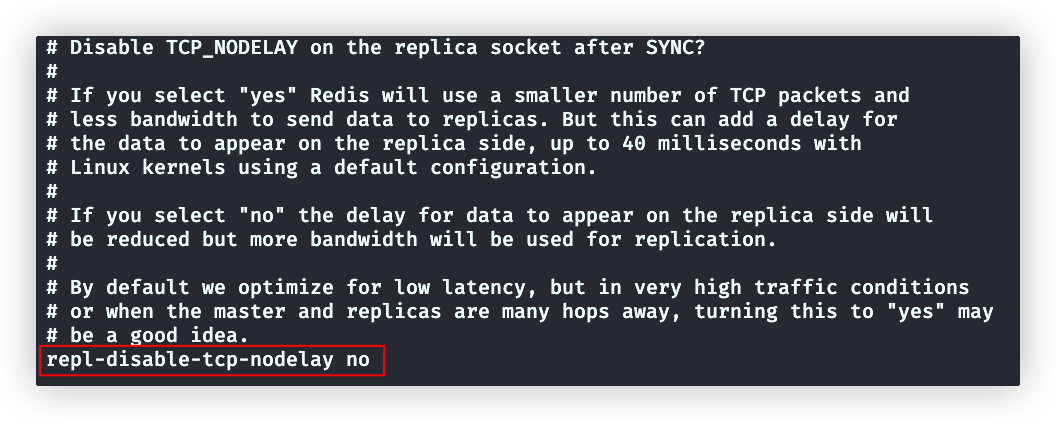
repl-disable-tcp-nodelay no # disable+nodelay 双重否定,所以yes是有延迟,no是无延迟

# 设置为yes,就会使用Nagle算法,主从同步数据时不会立即发送tcp包,而是达到一定的数据量才发送一个tcp包,这样避免了频繁发送包(每个包都携带头尾信息,频发发生浪费带宽)

# 如果主从复制数据量非常大、有多级Redis,就会很快达到指定的数据量,这种情况下即使设置为yes,延迟也会很小,这时比较适合yes各个Redis配置
# 不存在的文件,会新建
vi redis6380.conf

## 添加下面配置,作为启动在6380端口的redis的配置
# 引入公共配置
include redis.conf

# 指定pid文件存储位置
pidfile /var/run/redis_6380.pid

# 端口
port 6380

# rdb文件名
dbfilename dump6380.rdb

# aof文件名
appendfilename appendonly6380.aof


# 日志文件(该配置并不会自动创建文件,需要自己建好文件,再启动redis)
# logfile logs/access6380.log

63
# 当master宕机,选举slave为master是会参照该属性.越小优先级越高,为0则不能晋升为master
replica-priority 100继续创建6381、6382配置文件
:%s/6380/6380 # 将文件中的6380替换为6381启动三个redis服务
redis-server redisxxxx.conf # 6380、6381、6382

ps aux | grep redis # 查看是否启动成功客户端连接redis服务
redis-cli -p xxxx # 6380、6381、6382 可通过端口连接到不同实例

> info replication # 在交互模式下查询,主从复制信息
role:master # 每个实例默认都是master
connected_slaves:0 # 没有slave
master_failover_state:no-failover
master_replid:00cc23da2a5c0bf376b0f50469d0f1669ded064f
master_replid2:0000000000000000000000000000000000000000
master_repl_offset:0
second_repl_offset:-1
repl_backlog_active:0
repl_backlog_size:1048576
repl_backlog_first_byte_offset:0
repl_backlog_histlen:0


# ----------------建立主从关系-------------------

#------6381、6382 这两台作为slave--------
>slaveof 127.0.0.1 6380 #添加6380为master节点
>info replication
role:slave # 角色变为slave
master_host:127.0.0.1 # 自己的master地址和端口
master_port:6380
master_link_status:up # up代表连接正常,如果master挂了,这里就是down了
master_last_io_seconds_ago:9
master_sync_in_progress:0
slave_read_repl_offset:560
slave_repl_offset:560
slave_priority:20
slave_read_only:1
replica_announced:1
connected_slaves:0 # 即使是slave,也会有下一级的slave。后面会讲到redis的多级结构
master_failover_state:no-failover
master_replid:e0289d3727266ab15a6780fd49857fc3e7ce58a4 # 集群中的master节点的id
master_replid2:0000000000000000000000000000000000000000 # 如果集群中的maser易主了,master_replid就会变成新master的id。master_replid2存的是历史上一个master的id,这里的`00000....`表示,这个集群master并未易主
master_repl_offset:560
second_repl_offset:-1
repl_backlog_active:1
repl_backlog_size:1048576
repl_backlog_first_byte_offset:15
repl_backlog_histlen:546


#------6380 作为master--------
>info replication
role:master
connected_slaves:2
# 可以查到两个slave节点信息。offset是向slave同步的数据量,slave节点的slave_repl_offset字段是接收的数据量
slave0:ip=127.0.0.1,port=6381,state=online,offset=42,lag=0
slave1:ip=127.0.0.1,port=6382,state=online,offset=42,lag=1
master_failover_state:no-failover
master_replid:e0289d3727266ab15a6780fd49857fc3e7ce58a4
master_replid2:0000000000000000000000000000000000000000
master_repl_offset:42
second_repl_offset:-1
repl_backlog_active:1
repl_backlog_size:1048576
repl_backlog_first_byte_offset:1
repl_backlog_histlen:42redis的集群的多级结构
如果存在大量的二级slave,对应主节点的复制压力很大。这时候就可以采用多级结构,两个以及slave,这两个slave在复制到更多的slave中
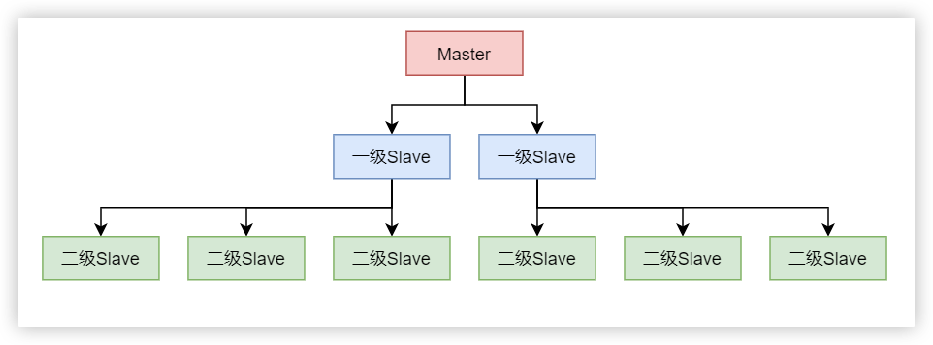
# 连接准备做三级slave的redis。添加二级节点作为master
slaveof 二级节点地址 二级节点端口容灾处理
如果master宕机。slave如何晋升为master
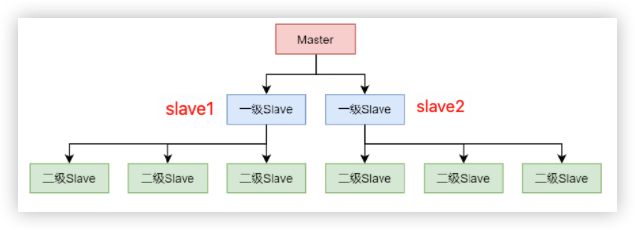
手动
例如把slave1节点执行下面命令,就会晋升为master节点
shellslaveof no one注意:slave2节点也必须手动加入到新的master节点(原来的slave1)
slaveof slave1地址 slave1端口这时候,原来的master重启了,虽然重新启动的redis默认情况都是master,但是已经和原来的集群分离了。必须加入新的master
slaveof slave1地址 slave1端口哨兵机制(sentinel)
从Redis2.6开始提供了高可用的解决方案—— Sentinel 哨兵机制。
即,在集群中再引入一个节点,该节点充当 Sentinel 哨兵,用于监视 Master 的运行状态,并在 Master 宕机后自动指定一个 Slave 作为新的 Master 若使用一个哨兵,该哨兵发生宕机,整个集群就会因为无法选出master而瘫痪。所以一般会创建一个哨兵集群 集群中每个哨兵都会定时会向 Master 发送心跳,如果 Master 在有效时间内向它们都进行了响应,则说明 Master 是“活着的”。如果有 quorum 个哨兵没有收到响应,那么就认为 Master 已经宕机,然后会将原来的某一个 Slave晋升为 Master
配置sentinel
shell# redis安装目录下 sentinel.conf 是sentinel的配置文件 cp sentinel.conf cluster/sentinel配置文件完整版(用 ----- 加入自己的翻译,或对英文的注解)
shell# Example sentinel.conf # By default protected mode is disabled in sentinel mode. Sentinel is reachable # from interfaces different than localhost. Make sure the sentinel instance is # protected from the outside world via firewalling or other means. # 保护模式,默认关闭 protected-mode no # port <sentinel-port> # The port that this sentinel instance will run on # 哨兵运行端口 port 26379 # By default Redis Sentinel does not run as a daemon. Use 'yes' if you need it. # Note that Redis will write a pid file in /var/run/redis-sentinel.pid when # daemonized. # 是否以守护进程运行哨兵 daemonize no # When running daemonized, Redis Sentinel writes a pid file in # /var/run/redis-sentinel.pid by default. You can specify a custom pid file # location here. pidfile /var/run/redis-sentinel.pid # Specify the server verbosity level. # This can be one of: # debug (a lot of information, useful for development/testing) # verbose (many rarely useful info, but not a mess like the debug level) # notice (moderately verbose, what you want in production probably) # warning (only very important / critical messages are logged) # nothing (nothing is logged) # 日志等级 loglevel notice # Specify the log file name. Also the empty string can be used to force # Sentinel to log on the standard output. Note that if you use standard # output for logging but daemonize, logs will be sent to /dev/null logfile "" # To enable logging to the system logger, just set 'syslog-enabled' to yes, # and optionally update the other syslog parameters to suit your needs. # syslog-enabled no # Specify the syslog identity. # syslog-ident sentinel # Specify the syslog facility. Must be USER or between LOCAL0-LOCAL7. # syslog-facility local0 # sentinel announce-ip <ip> # sentinel announce-port <port> # # The above two configuration directives are useful in environments where, # because of NAT, Sentinel is reachable from outside via a non-local address. # # When announce-ip is provided, the Sentinel will claim the specified IP address # in HELLO messages used to gossip its presence, instead of auto-detecting the # local address as it usually does. # # Similarly when announce-port is provided and is valid and non-zero, Sentinel # will announce the specified TCP port. # # The two options don't need to be used together, if only announce-ip is # provided, the Sentinel will announce the specified IP and the server port # as specified by the "port" option. If only announce-port is provided, the # Sentinel will announce the auto-detected local IP and the specified port. # # Example: # # sentinel announce-ip 1.2.3.4 # dir <working-directory> # Every long running process should have a well-defined working directory. # For Redis Sentinel to chdir to /tmp at startup is the simplest thing # for the process to don't interfere with administrative tasks such as # unmounting filesystems. ----- 哨兵临时文件放置的文件夹 dir /tmp # sentinel monitor <master-name> <ip> <redis-port> <quorum> # # Tells Sentinel to monitor this master, and to consider it in O_DOWN # (Objectively Down) state only if at least <quorum> sentinels agree. -----至少有quorum个哨兵主观认定master宕机,才能判断master节点宕机 # # Note that whatever is the ODOWN quorum, a Sentinel will require to # be elected by the majority of the known Sentinels in order to # start a failover, so no failover can be performed in minority. ------这句比较难理解。实际上需要在所有哨兵中,选出一个多数派(分为两派,认定master宕机、认定master未宕机的)来执行故障转移任务(就是切换redis的主从关系),如果quorum设置的少于哨兵总数的一半,那选出的哨兵一定是认定master未宕机的。所以,quorum必须设置为一半以上 # # Replicas are auto-discovered, so you don't need to specify replicas in # any way. Sentinel itself will rewrite this configuration file adding # the replicas using additional configuration options. # Also note that the configuration file is rewritten when a # replica is promoted to master. # # Note: master name should not include special characters or spaces. # The valid charset is A-z 0-9 and the three characters ".-_". # 这个配置很重要,仔细阅读上面的介绍 ----- 这个配置是设置哨兵监听当前的master的信息,对于其他副本实例(slave),哨兵会自动检测到 下面会被这个文件作为公共的哨兵配置文件,这条配置会在各个哨兵配置文件中重写,所以,这里要注释掉 sentinel monitor mymaster 127.0.0.1 6379 2 # sentinel auth-pass <master-name> <password> # # Set the password to use to authenticate with the master and replicas. # Useful if there is a password set in the Redis instances to monitor. # # Note that the master password is also used for replicas, so it is not ----- master和replicas实例都需要设置相同的密码 # possible to set a different password in masters and replicas instances # if you want to be able to monitor these instances with Sentinel. # # However you can have Redis instances without the authentication enabled # mixed with Redis instances requiring the authentication (as long as the # password set is the same for all the instances requiring the password) as # the AUTH command will have no effect in Redis instances with authentication switched off.(授权被关闭) ----- 支持 设置密码和未设置密码的redis实例混合在一起组成集群(注意,设置密码的必须保持密码一致) # # Example: # # sentinel auth-pass mymaster MySUPER--secret-0123passw0rd # sentinel auth-user <master-name> <username> # # This is useful in order to authenticate to instances having ACL capabilities, # that is, running Redis 6.0 or greater. When just auth-pass is provided the # Sentinel instance will authenticate to Redis using the old "AUTH <pass>" # method. When also an username is provided, it will use "AUTH <user> <pass>". # In the Redis servers side, the ACL to provide just minimal access to # Sentinel instances, should be configured along the following lines: # # user sentinel-user >somepassword +client +subscribe +publish \ # +ping +info +multi +slaveof +config +client +exec on # sentinel down-after-milliseconds <master-name> <milliseconds> # # Number of milliseconds the master (or any attached replica or sentinel) should # be unreachable (as in, not acceptable reply to PING, continuously, for the # specified period) in order to consider it in S_DOWN state (Subjectively # Down). # # Default is 30 seconds. ---------哨兵30秒未收到响应,则该哨兵认为宕机 sentinel down-after-milliseconds mymaster 30000 # IMPORTANT NOTE: starting with Redis 6.2 ACL capability is supported for # Sentinel mode, please refer to the Redis website https://redis.io/topics/acl # for more details. # Sentinel's ACL users are defined in the following format: # # user <username> ... acl rules ... # # For example: # # user worker +@admin +@connection ~* on >ffa9203c493aa99 # # For more information about ACL configuration please refer to the Redis # website at https://redis.io/topics/acl and redis server configuration # template redis.conf. # ACL LOG # # The ACL Log tracks failed commands and authentication events associated # with ACLs. The ACL Log is useful to troubleshoot failed commands blocked # by ACLs. The ACL Log is stored in memory. You can reclaim memory with # ACL LOG RESET. Define the maximum entry length of the ACL Log below. acllog-max-len 128 # Using an external ACL file # # Instead of configuring users here in this file, it is possible to use # a stand-alone file just listing users. The two methods cannot be mixed: # if you configure users here and at the same time you activate the external # ACL file, the server will refuse to start. # # The format of the external ACL user file is exactly the same as the # format that is used inside redis.conf to describe users. # # aclfile /etc/redis/sentinel-users.acl # requirepass <password> # # You can configure Sentinel itself to require a password, however when doing # so Sentinel will try to authenticate with the same password to all the # other Sentinels. So you need to configure all your Sentinels in a given # group with the same "requirepass" password. Check the following documentation # for more info: https://redis.io/topics/sentinel # # IMPORTANT NOTE: starting with Redis 6.2 "requirepass" is a compatibility # layer on top of the ACL system. The option effect will be just setting # the password for the default user. Clients will still authenticate using # AUTH <password> as usually, or more explicitly with AUTH default <password> # if they follow the new protocol: both will work. # # New config files are advised to use separate authentication control for # incoming connections (via ACL), and for outgoing connections (via # sentinel-user and sentinel-pass) # # The requirepass is not compatible with aclfile option and the ACL LOAD # command, these will cause requirepass to be ignored. # sentinel sentinel-user <username> # # You can configure Sentinel to authenticate with other Sentinels with specific # user name. # sentinel sentinel-pass <password> # # The password for Sentinel to authenticate with other Sentinels. If sentinel-user # is not configured, Sentinel will use 'default' user with sentinel-pass to authenticate. # sentinel parallel-syncs <master-name> <numreplicas> # # How many replicas we can reconfigure to point to the new replica simultaneously # during the failover. Use a low number if you use the replicas to serve query # to avoid that all the replicas will be unreachable at about the same # time while performing the synchronization with the master. --------- 原master宕机。进行故障转移时,这里用来设置几个副本同时把数据复制到新选的master中 注意:复制时,新maser无法提供读写服务,同步中的slave副本是无法进行对外读服务的,所以切记不可设置为所有的slave个数 sentinel parallel-syncs mymaster 1 # sentinel failover-timeout <master-name> <milliseconds> # # Specifies the failover timeout in milliseconds. It is used in many ways: # # - The time needed to re-start a failover after a previous failover was # already tried against the same master by a given Sentinel, is two # times the failover timeout. ----- 哨兵进行故障转移时如果失败,重新进行故障转移的超时时间为上一次的两倍: 2*(默认3分钟)=6分钟 # # - The time needed for a replica replicating to a wrong master according # to a Sentinel current configuration, to be forced to replicate # with the right master, is exactly the failover timeout (counting since # the moment a Sentinel detected the misconfiguration). ----- 这里的wrong master指的是宕机的master,right master是新的master。因为新master被选举后,slave的配置文件中还是配置的旧的master,文件被哨兵变更为新的master的时间 # # - The time needed to cancel a failover that is already in progress but # did not produced any configuration change (SLAVEOF NO ONE yet not # acknowledged by the promoted replica). ------ 哨兵选择晋升slave后,决定取消晋升的超时时间 # # - The maximum time a failover in progress waits for all the replicas to be # reconfigured as replicas of the new master. However even after this time # the replicas will be reconfigured by the Sentinels anyway, but not with # the exact parallel-syncs progression as specified. ------- 故障转移的最大时间,但是即使超过了这个时间,哨兵仍然会继续做转移,只不过哨兵可能会增加sentinel parallel-syncs指定的同步的数量 # # Default is 3 minutes. --------- sentinel failover-timeout mymaster 180000 # SCRIPTS EXECUTION # # sentinel notification-script and sentinel reconfig-script are used in order # to configure scripts that are called to notify the system administrator # or to reconfigure clients after a failover. The scripts are executed # with the following rules for error handling: # # If script exits with "1" the execution is retried later (up to a maximum # number of times currently set to 10). # # If script exits with "2" (or an higher value) the script execution is # not retried. # # If script terminates because it receives a signal the behavior is the same # as exit code 1. # # A script has a maximum running time of 60 seconds. After this limit is # reached the script is terminated with a SIGKILL and the execution retried. # NOTIFICATION SCRIPT # # sentinel notification-script <master-name> <script-path> # # Call the specified notification script for any sentinel event that is # generated in the WARNING level (for instance -sdown, -odown, and so forth). # This script should notify the system administrator via email, SMS, or any # other messaging system, that there is something wrong with the monitored # Redis systems. # # The script is called with just two arguments: the first is the event type # and the second the event description. # # The script must exist and be executable in order for sentinel to start if # this option is provided. # # Example: # # sentinel notification-script mymaster /var/redis/notify.sh # CLIENTS RECONFIGURATION SCRIPT # # sentinel client-reconfig-script <master-name> <script-path> # # When the master changed because of a failover a script can be called in # order to perform application-specific tasks to notify the clients that the # configuration has changed and the master is at a different address. # # The following arguments are passed to the script: # # <master-name> <role> <state> <from-ip> <from-port> <to-ip> <to-port> # # <state> is currently always "start" # <role> is either "leader" or "observer" # # The arguments from-ip, from-port, to-ip, to-port are used to communicate # the old address of the master and the new address of the elected replica # (now a master). # # This script should be resistant to multiple invocations. # # Example: # # sentinel client-reconfig-script mymaster /var/redis/reconfig.sh # SECURITY # # By default SENTINEL SET will not be able to change the notification-script(通知脚本) # and client-reconfig-script(故障转移结束之后触发脚本) at runtime. This avoids a trivial security issue # where clients can set the script to anything and trigger a failover in order # to get the program executed. -------- yes表示禁止在运行时重新配置 Sentinel 的脚本 sentinel deny-scripts-reconfig yes # REDIS COMMANDS RENAMING (DEPRECATED) # # WARNING: avoid using this option if possible, instead use ACLs. # # Sometimes the Redis server has certain commands, that are needed for Sentinel # to work correctly, renamed to unguessable strings. This is often the case # of CONFIG and SLAVEOF in the context of providers that provide Redis as # a service, and don't want the customers to reconfigure the instances outside # of the administration console. # # In such case it is possible to tell Sentinel to use different command names # instead of the normal ones. For example if the master "mymaster", and the # associated replicas, have "CONFIG" all renamed to "GUESSME", I could use: # # SENTINEL rename-command mymaster CONFIG GUESSME # # After such configuration is set, every time Sentinel would use CONFIG it will # use GUESSME instead. Note that there is no actual need to respect the command # case, so writing "config guessme" is the same in the example above. # # SENTINEL SET can also be used in order to perform this configuration at runtime. # # In order to set a command back to its original name (undo the renaming), it # is possible to just rename a command to itself: # # SENTINEL rename-command mymaster CONFIG CONFIG # HOSTNAMES SUPPORT # # Normally Sentinel uses only IP addresses and requires SENTINEL MONITOR # to specify an IP address. Also, it requires the Redis replica-announce-ip # keyword to specify only IP addresses. # # You may enable hostnames support by enabling resolve-hostnames. Note # that you must make sure your DNS is configured properly and that DNS # resolution does not introduce very long delays. # SENTINEL resolve-hostnames no # When resolve-hostnames is enabled, Sentinel still uses IP addresses # when exposing instances to users, configuration files, etc. If you want # to retain the hostnames when announced, enable announce-hostnames below. # SENTINEL announce-hostnames no # When master_reboot_down_after_period is set to 0, Sentinel does not fail over # when receiving a -LOADING response from a master. This was the only supported # behavior before version 7.0. # # Otherwise, Sentinel will use this value as the time (in ms) it is willing to # accept a -LOADING response after a master has been rebooted, before failing # over. SENTINEL master-reboot-down-after-period mymaster 0cluster文件夹下添加三个哨兵配置文件
shell# sentinel(哨兵)实例 ,26380、26381、26382 # 新建26380哨兵实例的文件 vi sentinel26380.conf # 文件加入如下配置 include sentinel.conf # 引入公共配置 pidfile /var/run/sentinel_26380.pid port 26380 sentinel monitor myMaster 192.168.174.120 6380 2 # myMaster可以随便起个名字,用来代表master节点。192.168.174.120 6380是master的ip和端口。 2表示只有有两个哨兵任务master宕机,则判断master已宕机 #logfile access26380.log # 日志与配置三个redis实例相似,新建三个配置文件即可
启动哨兵
shell# 启动哨兵 # redis-sentinel是redis-server的别名,也可以使用redis-server启动哨兵 # redis-server 哨兵配置文件 --sentinel redis-sentinel 哨兵配置文件 # 查询哨兵集群的信息 # redis-sentinel的本质就是redis-server,所以也可以使用redis-cli连接 redis-cli -p 哨兵端口 info sentinel # 使用任意一个哨兵的端口即可 # redis-cli -p 26380 info sentinel # 查询哨兵集群信息 # 输出: sentinel_masters:1 # 监控了1个master(哨兵是可以监控多个集群的) sentinel_tilt:0 sentinel_tilt_since_seconds:-1 sentinel_running_scripts:0 sentinel_scripts_queue_length:0 sentinel_simulate_failure_flags:0 # 哨兵配置文件中给master节点起的名字就是myMaster # address是master的ip和端口 # slaves个数是2 # sentinels(哨兵)个数是3 master0:name=myMaster,status=ok,address=192.168.174.120:6380,slaves=2,sentinels=3哨兵启动后,我们查看26380端口的哨兵(每个启动的哨兵配置文件都变化了)
shellinclude sentinel.conf pidfile "/var/run/sentinel_26380.pid" port 26380 sentinel monitor myMaster 192.168.174.120 6380 2 #logfile access26380.log # Generated by CONFIG REWRITE protected-mode no latency-tracking-info-percentiles 50 99 99.9 dir "/tmp" user default on nopass sanitize-payload ~* &* +@all sentinel myid c05e7f92cd2f0ace8b5e1a7b266386497b9a53b8 sentinel config-epoch myMaster 0 sentinel leader-epoch myMaster 0 sentinel monitor mymaster 127.0.0.1 6379 2 sentinel config-epoch mymaster 0 sentinel leader-epoch mymaster 0 sentinel current-epoch 0 # ----- redis的两个slave sentinel known-replica myMaster 192.168.174.120 6381 # 本机的ip,所以与下一行的127.0.0.1是一样的 sentinel known-replica myMaster 127.0.0.1 6381 sentinel known-replica myMaster 192.168.174.120 6382 sentinel known-replica myMaster 127.0.0.1 6382 # ----- 两个哨兵 sentinel known-sentinel myMaster 192.168.174.120 26381 d9b962d71ad736d0472d558138be1410eaf4f3a7 sentinel known-sentinel myMaster 192.168.174.120 26382 669c77662921529702abb9cc14017407be483583 ~对于redis的master(端口6380)的配置文件没有变化
但是两个slave的配置文件变化了
shell## 添加下面配置,作为启动在6381端口的redis的配置 # 引入公共配置 include redis.conf # 指定pid文件存储位置 pidfile "/var/run/redis_6381.pid" # 端口 port 6381 # rdb文件名 dbfilename "dump6381.rdb" # aof文件名 appendfilename "appendonly6381.aof" # 日志文件 #logfile logs/access6381.log # 当master宕机,选举slave为master是会参照该属性.越小优先级越高,为0则不能晋升为master replica-priority 20 #-------------------------------------多了下面这些行 # Generated by CONFIG REWRITE daemonize yes dir "/opt/apps/redis/cluster" latency-tracking-info-percentiles 50 99 99.9 protected-mode no appendonly yes save 3600 1 save 300 100 save 60 10000 aof-load-truncated no replicaof 192.168.174.120 6380 # 指明当前节点是192.168.174.120 6380的slave user default on nopass sanitize-payload ~* &* +@all模拟master(6380端口)宕机
shellredis-cli -p 6380 shutdown现象:
观察哨兵,会打印一条日志。表示切换master为6381端口
shellswitch-master myMaster 192.168.174.120 6380 192.168.174.120 6381哨兵配置会自动变为
shell# 这里原来是6380,但是现在宕机了。自动变为新的master地址 sentinel monitor myMaster 192.168.174.120 6381 2redis集群信息
shell>redis-cli -p 6381 info replication # 虽然这里6381还是slave,但是master的IP和端口已经变成了6381了 # 类似于多级结构 role:slave master_host:192.168.174.120 master_port:6381 master_link_status:down master_last_io_seconds_ago:-1 master_sync_in_progress:0 slave_read_repl_offset:498326 slave_repl_offset:498326 master_link_down_since_seconds:-1 slave_priority:20 slave_read_only:1 replica_announced:1 connected_slaves:1 slave0:ip=192.168.174.120,port=6382,state=online,offset=498326,lag=0 master_failover_state:no-failover master_replid:ea12c952478fb3eb0ac09b8d6f8c0b37eb3a9c9c master_replid2:4bf01980a3f7897482cb0b31dff22544ffc29f39 master_repl_offset:498326 second_repl_offset:494175 repl_backlog_active:1 repl_backlog_size:1048576 repl_backlog_first_byte_offset:15 repl_backlog_histlen:498312
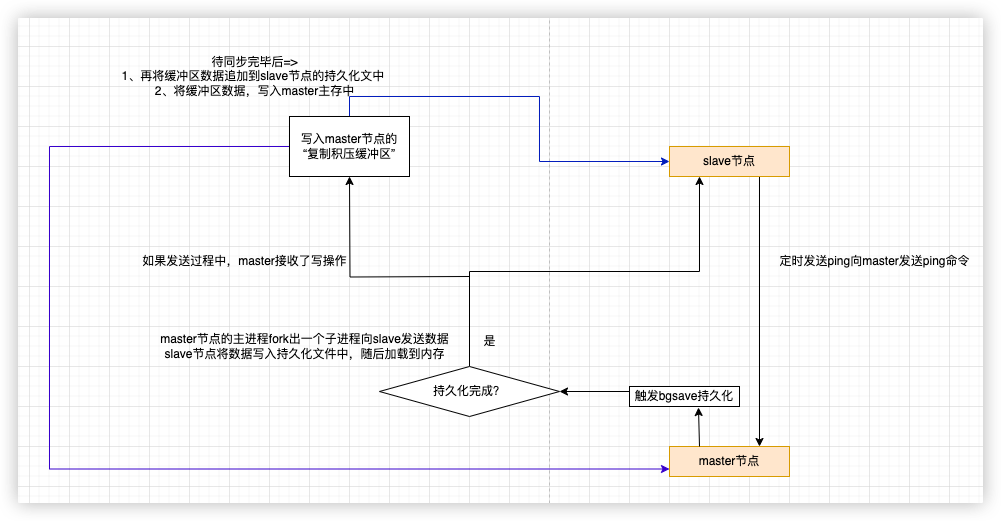
主从复制过程
